
容器与云原生 / 系统课时
部署无状态业务服务
部署无状态业务服务
本课把一个可水平扩展的业务容器落到 Kubernetes:用 Deployment 管理副本和滚动更新,用 Service 提供稳定访问入口,并通过资源约束与探针让发布结果可验证、可恢复。
学习目标
- 编写包含镜像、端口、副本、资源限制和探针的 Deployment。
- 用 ClusterIP Service 为无状态 Pod 提供稳定的集群内访问入口。
- 通过
kubectl验证滚动状态、Pod 就绪情况和 Service 后端。
先确定无状态服务的部署边界
无状态服务不把必须保留的数据写在容器本地,任意副本都能处理请求,因此可以安全地扩容、缩容和替换 Pod。Deployment 负责维持期望副本数并执行滚动更新,Service 则通过标签选择器持续找到当前可用的 Pod。
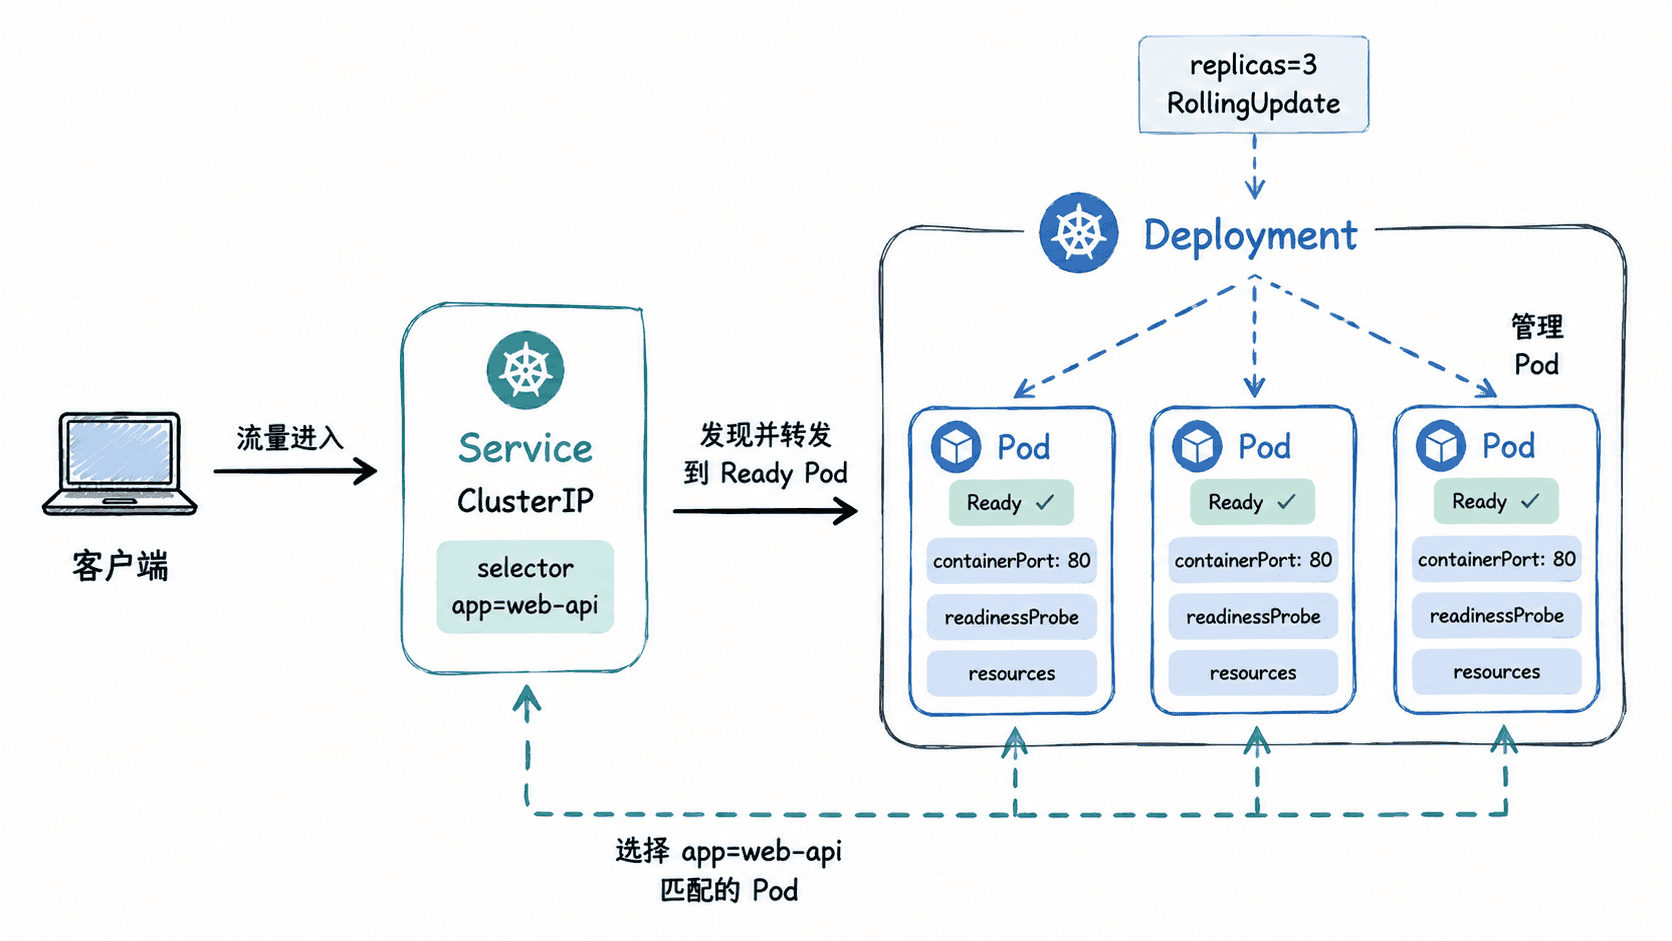
这里使用 nginx:1.27-alpine 作为可直接运行的示例镜像,部署方法与真实 HTTP 业务服务相同。替换成自己的镜像时,需要同步确认监听端口、健康检查路径和资源需求。
编写 Deployment 与 Service
将下面内容保存为 web-api.yaml。Namespace、Deployment 和 Service 放在同一个清单里,便于一次创建完整的最小部署单元。
apiVersion: v1
kind: Namespace
metadata:
  name: microservices
---
apiVersion: apps/v1
kind: Deployment
metadata:
  name: web-api
  namespace: microservices
  labels:
    app: web-api
spec:
  replicas: 3
  strategy:
    type: RollingUpdate
    # 控制滚动期间允许的不可用副本和临时新增副本。
    rollingUpdate:
      maxUnavailable: 1
      maxSurge: 1
  selector:
    matchLabels:
      app: web-api
  template:
    metadata:
      labels:
        app: web-api
    spec:
      containers:
        - name: web-api
          image: nginx:1.27-alpine
          ports:
            - name: http
              containerPort: 80
          # requests 参与调度,limits 约束单容器资源上限。
          resources:
            requests:
              cpu: 100m
              memory: 64Mi
            limits:
              cpu: 500m
              memory: 128Mi
          # readiness 决定 Pod 是否进入 Service 的可用后端。
          readinessProbe:
            httpGet:
              path: /
              port: http
            initialDelaySeconds: 2
            periodSeconds: 5
          livenessProbe:
            httpGet:
              path: /
              port: http
            initialDelaySeconds: 10
            periodSeconds: 10
---
apiVersion: v1
kind: Service
metadata:
  name: web-api
  namespace: microservices
  labels:
    app: web-api
spec:
  type: ClusterIP
  selector:
    app: web-api
  ports:
    - name: http
      port: 80
      # 使用命名端口,避免容器端口变化时重复维护数字。
      targetPort: http
这份配置的关键约束是 Deployment 的 spec.selector.matchLabels、Pod 模板的 metadata.labels 与 Service 的 spec.selector 必须匹配。应用后可通过副本就绪数和 EndpointSlice 验证标签选择与探针是否真正生效。
应用清单并检查发布
执行创建命令:
kubectl apply -f web-api.yaml预期输出(首次创建):
namespace/microservices created
deployment.apps/web-api created
service/web-api created
重复执行时,资源可能显示 configured 或 unchanged,这是声明式应用清单的正常结果。
等待 Deployment 完成滚动发布:
kubectl rollout status deployment/web-api -n microservices预期输出:
deployment "web-api" successfully rolled out检查副本、Service 类型与 Pod 数量:
kubectl get deployment web-api -n microservices -o jsonpath='{.status.readyReplicas}/{.spec.replicas}{"\n"}'
kubectl get service web-api -n microservices -o jsonpath='{.spec.type}{" "}{.spec.clusterIP}{"\n"}'
kubectl get pod -n microservices -l app=web-api -o name
预期输出:
3/3
ClusterIP <IP>
pod/web-api-<ID>
pod/web-api-<ID>
pod/web-api-<ID><IP>、<ID> 是动态值,三个 Pod 的实际 ID 会彼此不同。
验证 Service 已发现后端
仅看到 Pod Running 还不够,Service 必须真正拿到 Ready 后端。执行:
kubectl get endpointslice -n microservices \
  -l kubernetes.io/service-name=web-api \
  -o jsonpath='{.items[0].endpoints[*].conditions.ready}{"\n"}'
预期输出:
true true true如果副本数已经是 3,但这里缺少端点或出现 false,优先检查 Service selector 是否与 Pod label 一致,再检查 readiness 探针。kubectl describe pod <ID> -n microservices 可查看探针事件,其中 <ID> 替换为实际 Pod 名称。
发布时最容易忽略的边界
Deployment 适合可替换副本,不适合依赖固定 Pod 名称或本地持久数据的组件。业务镜像还应避免使用浮动的 latest 标签;生产发布更适合固定版本标签或镜像摘要,这样回滚时才能准确恢复到已知镜像。
Service 的 ClusterIP 只提供集群内入口。需要从集群外访问时,应在它之上再选择 Ingress、Gateway API 或云负载均衡方案,而不是把每个业务 Pod 直接暴露出去。