
容器与云原生 / 系统课时
ClusterIP 服务
ClusterIP 服务
Pod 会因扩缩容和重建不断更换 IP,直接把 Pod 地址写进客户端并不可靠。本课将创建一个 ClusterIP Service,用稳定的虚拟地址和 DNS 名称访问一组动态 Pod,并验证后端端点与请求转发结果。
学习目标
- 创建通过标签选择 Pod 的 ClusterIP Service
- 验证 Service 虚拟 IP、DNS 名称与 EndpointSlice
- 按固定顺序排查 Service 无法访问的问题
ClusterIP 解决什么问题
ClusterIP 是 Service 的默认类型,主要用于集群内部访问。它提供一个稳定的虚拟 IP,并生成形如 hello-web.default.svc.cluster.local 的 DNS 名称。客户端只依赖 Service,后端 Pod 可以扩容、缩容或重建。
Service 不直接“拥有”Pod。控制平面根据 selector 查找标签匹配且可作为后端的 Pod,并维护 EndpointSlice。节点上的 Service 数据平面通常由 kube-proxy 实现,也可能由支持 eBPF 的网络插件替代。
创建 Deployment 与 Service
下面的清单创建两个 Nginx Pod,并用 app: hello-web 作为 Service 选择器。将内容保存为 hello-service.yaml。
apiVersion: apps/v1
kind: Deployment
metadata:
  name: hello-web
spec:
  replicas: 2
  selector:
    matchLabels:
      app: hello-web
  template:
    metadata:
      labels:
        app: hello-web
    spec:
      containers:
        - name: nginx
          image: nginx:1.27-alpine
          ports:
            - name: http
              containerPort: 80
---
apiVersion: v1
kind: Service
metadata:
  name: hello-web
spec:
  type: ClusterIP
  selector:
    app: hello-web
  ports:
    - name: http
      port: 80
      targetPort: http
port 是客户端访问 Service 的端口,targetPort 是后端容器接收请求的端口。这里使用命名端口 http,可以避免容器端口调整后在多处重复修改数字。应用清单并等待 Pod 就绪。
kubectl apply -f hello-service.yaml
kubectl rollout status deployment/hello-web --timeout=120s
预期输出
deployment.apps/hello-web created
service/hello-web created
deployment "hello-web" successfully rolled out
如果资源已存在,第一条命令可能显示 configured 或 unchanged,这同样表示清单已被接受。
验证虚拟 IP 与后端端点
先查看 Service 和 EndpointSlice。ClusterIP 是虚拟地址,不会像 Pod IP 那样绑定到某个单独容器。
kubectl get service hello-web
kubectl get endpointslice -l kubernetes.io/service-name=hello-web -o wide
预期输出
NAME        TYPE        CLUSTER-IP     PORT(S)   AGE
hello-web   ClusterIP   <CLUSTER_IP>   80/TCP    <TIME>
NAME             ADDRESSTYPE   PORTS   ENDPOINTS                  AGE
hello-web-<ID> IPv4 80 <POD_IP_1>,<POD_IP_2> <TIME><CLUSTER_IP>、<POD_IP_1>、<POD_IP_2>、<ID> 和 <TIME> 是动态值。接着从集群内创建客户端 Pod,通过 Service DNS 发起请求。
kubectl run service-client --image=curlimages/curl:8.10.1 --restart=Never --command -- sleep 3600
kubectl wait --for=condition=Ready pod/service-client --timeout=120s
kubectl exec service-client -- sh -c 'curl -s http://hello-web | head -n 1'
预期输出
pod/service-client created
pod/service-client condition met
<!DOCTYPE html>
收到 Nginx 页面首行说明 DNS 解析、Service 规则和后端 Pod 均已工作。测试完成后可执行 kubectl delete pod service-client 清理临时客户端。
请求如何转发到 Pod
客户端先把 hello-web 解析为 ClusterIP,再向该虚拟 IP 的 80 端口发送请求。节点数据平面匹配 Service 规则,从 EndpointSlice 中选择一个可用 Pod IP,并把流量转发到该 Pod 的目标端口。
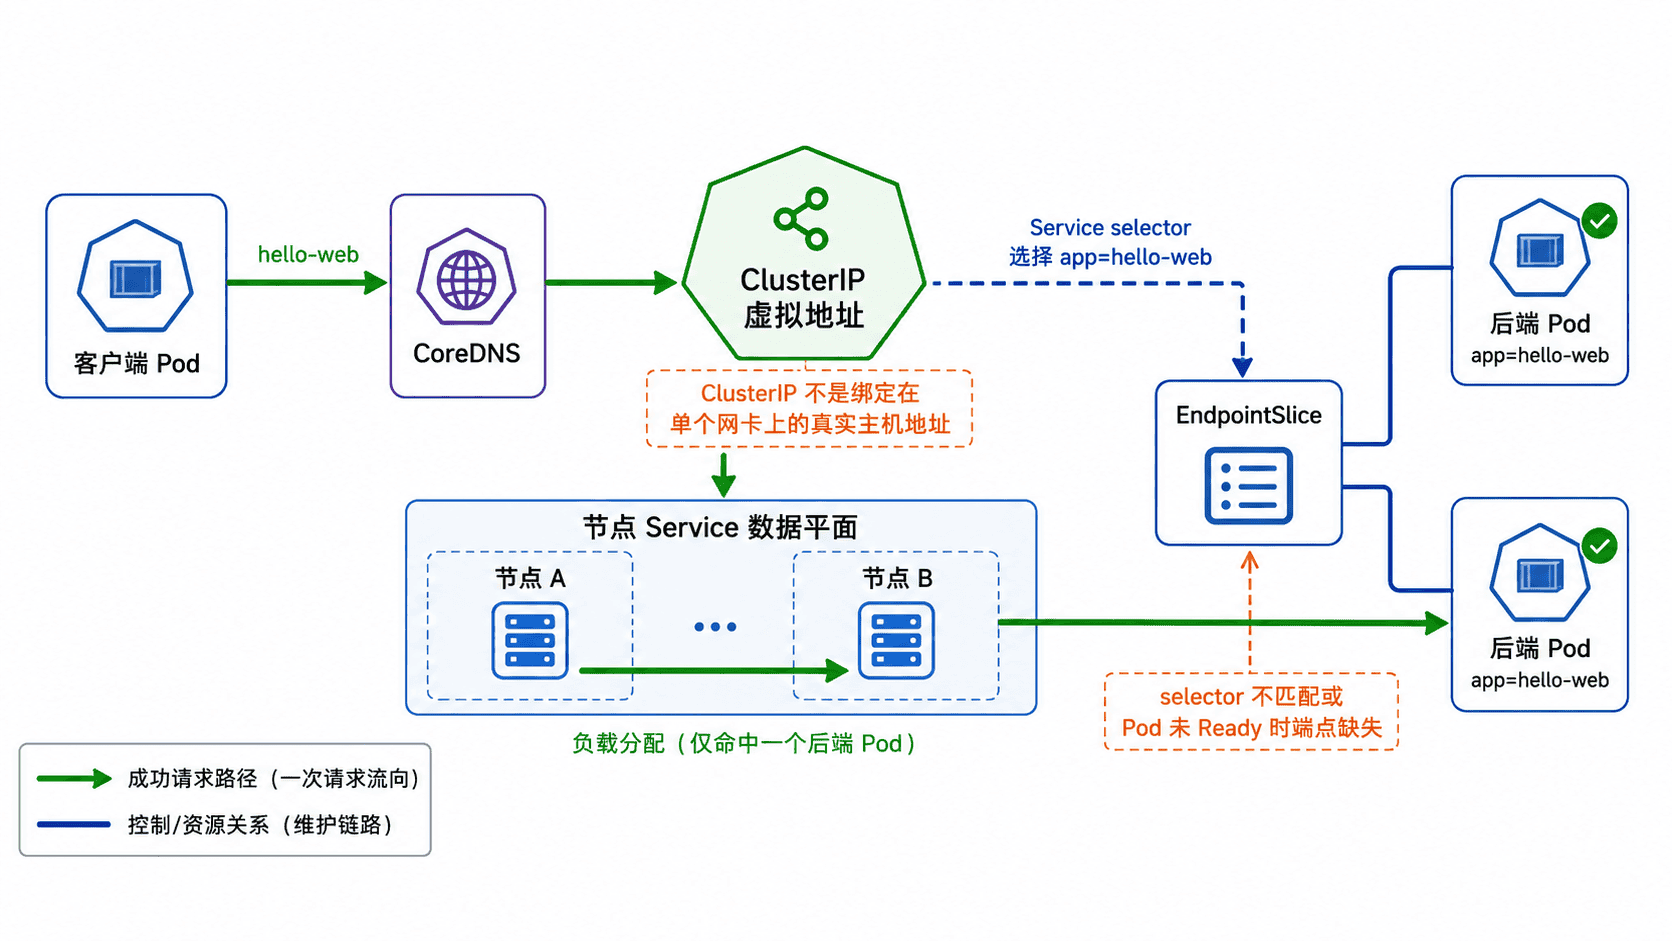
由于 Service 后端来自持续更新的 EndpointSlice,Pod 被替换后客户端无需改地址。默认情况下,ClusterIP 只面向集群内部;从集群外部访问应选择 NodePort、LoadBalancer、Ingress 或 Gateway 等合适入口。
常见问题排查
访问失败时不要先怀疑 ClusterIP 本身,应按“选择器、就绪状态、端口、DNS、网络策略”的顺序检查。最常见的问题是 Service 的 selector 与 Pod 标签不一致,导致 EndpointSlice 没有后端。
kubectl get pods -l app=hello-web --show-labels
kubectl describe service hello-web
kubectl get endpointslice -l kubernetes.io/service-name=hello-web
kubectl get pods -l app=hello-web
预期结果
应看到两个标签包含 app=hello-web 且状态为 Running、Ready 的 Pod;
Service 的 Selector 为 app=hello-web;
EndpointSlice 的 ENDPOINTS 列包含对应 Pod IP。
如果端点存在但仍不能访问,再确认 port 与 targetPort 是否正确、后端进程是否监听目标端口,以及 NetworkPolicy 是否允许客户端到后端的流量。