
容器与云原生 / 系统课时
搭建本地 Kubernetes 集群
搭建本地 Kubernetes 集群
本课选择 kind 在本机容器运行时中创建一个控制平面节点和两个工作节点。你将完成前置检查、集群创建、上下文切换、工作负载与集群网络验证,并掌握失败定位和清理方法。
学习目标
- 检查 Docker、kubectl 与 kind 是否满足实验条件
- 使用配置文件创建可重复的多节点本地集群
- 通过节点、Deployment、Service 和集群内请求验证运行状态
选择方案并检查前置条件
kind 会把 Kubernetes 节点运行在 Docker 或 Podman 容器中,适合学习对象调度、滚动更新和多节点行为。本课统一使用 Docker,避免不同容器运行时带来的额外差异;kind 官方工具说明也将 Docker 或 Podman 列为运行前提。:contentReference[oaicite:2]{index=2}
先确认三个命令都可执行,并且 Docker 服务端能够响应。版本号会随安装时间和平台变化,因此输出使用占位符表示。
docker version --format '{{.Server.Version}}'
kubectl version --client
kind version
预期输出的关键形式如下。
<DOCKER_VERSION>
Client Version: v<KUBECTL_VERSION>
kind v<KIND_VERSION> go<GO_VERSION> <OS>/<ARCH>
若第一条命令提示无法连接守护进程,先启动 Docker Desktop 或 Docker Engine;若出现 command not found,应先完成对应工具安装,再继续创建集群。
声明多节点集群
kind 支持通过 --config 读取集群配置,多节点拓扑使用 kind.x-k8s.io/v1alpha4。下面的三个节点仍共享宿主机资源,主要用于模拟调度和节点角色,而不是增加真实计算能力。:contentReference[oaicite:3]{index=3}
将以下内容保存为 kind-config.yaml。
kind: Cluster
apiVersion: kind.x-k8s.io/v1alpha4
nodes:
  - role: control-plane
  - role: worker
  - role: worker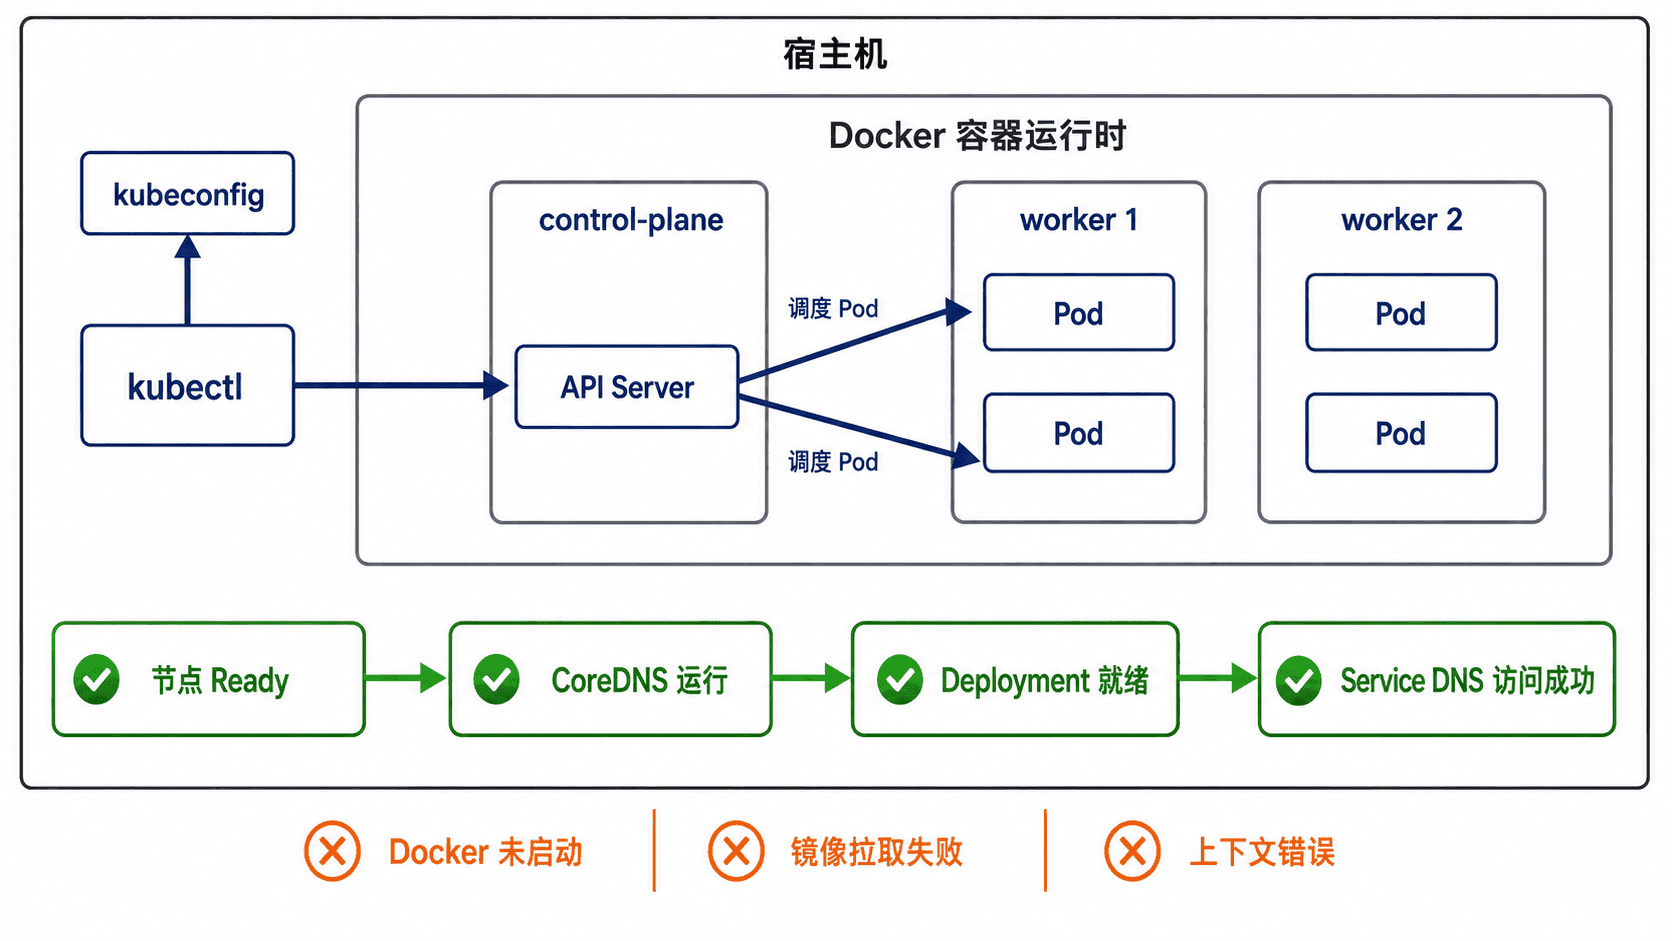
创建集群并验证节点
执行创建命令后,kind 会生成 kubeconfig 上下文。显式切换上下文可以避免 kubectl 误操作其他集群;随后等待所有节点进入 Ready,再查看节点列表。kubectl cluster-info 可用于确认当前 kubeconfig 能访问控制平面。:contentReference[oaicite:4]{index=4}
kind create cluster --name anystack-lab --config kind-config.yaml
kubectl config use-context kind-anystack-lab
kubectl cluster-info
kubectl wait --for=condition=Ready nodes --all --timeout=180s
kubectl get nodes
预期结果的关键行如下,实际 API Server 端口会不同。
Creating cluster "anystack-lab" ...
Set kubectl context to "kind-anystack-lab"
Switched to context "kind-anystack-lab".
Kubernetes control plane is running at https://127.0.0.1:<PORT>
node/anystack-lab-control-plane condition met
node/anystack-lab-worker condition met
node/anystack-lab-worker2 condition met
anystack-lab-control-plane   Ready   control-plane
anystack-lab-worker          Ready   <none>
anystack-lab-worker2         Ready   <none>
部署工作负载验证网络
节点 Ready 只能证明节点已注册。下面再创建一个 Deployment 和 ClusterIP Service,并从临时 Pod 访问服务名称 hello,同时验证调度、容器启动、Service 选择器、CoreDNS 和集群网络。
将以下内容保存为 smoke-test.yaml。
apiVersion: apps/v1
kind: Deployment
metadata:
  name: hello
spec:
  replicas: 2
  selector:
    matchLabels:
      app: hello
  template:
    metadata:
      labels:
        app: hello
    spec:
      containers:
        - name: nginx
          image: nginx:1.27-alpine
          ports:
            - containerPort: 80
---
apiVersion: v1
kind: Service
metadata:
  name: hello
spec:
  selector:
    app: hello
  ports:
    - port: 80
      targetPort: 80
应用资源并等待 Deployment 就绪,然后启动一次性 BusyBox Pod 请求 Service。--rm 会在命令结束后删除检查 Pod。
kubectl apply -f smoke-test.yaml
kubectl rollout status deployment/hello --timeout=120s
kubectl run network-check --rm -i --restart=Never --image=busybox:1.36 -- sh -c "wget -qO- http://hello | grep -o 'Welcome to nginx!'"
预期输出如下。
deployment.apps/hello created
service/hello created
deployment "hello" successfully rolled out
Welcome to nginx!
pod "network-check" deleted
典型失败与清理
创建阶段长时间停在拉取镜像时,先检查网络代理和 Docker 是否能拉取 kind 节点镜像;kubectl 连接到错误集群时,用 kubectl config current-context 核对上下文;Pod 为 Pending 或 ImagePullBackOff 时,用 kubectl describe pod <POD_NAME> 查看事件。
实验结束后删除测试资源和整个集群。删除 kind 集群会一并移除其节点容器和对应上下文,但不会卸载 Docker、kubectl 或 kind。
kubectl delete -f smoke-test.yaml
kind delete cluster --name anystack-lab
kind get clusters
预期输出如下。
deployment.apps "hello" deleted
service "hello" deleted
Deleting cluster "anystack-lab" ...
No kind clusters found.