
计算机视觉 / 系统课时
使用 ONNX Runtime
使用 ONNX Runtime
本课不再依赖 Ultralytics 的预测封装,而是用 ONNX Runtime 完成一条可控的检测链路:读取图片、Letterbox 缩放、执行模型、解码候选框、分类别 NMS、还原坐标并保存标注结果。
学习目标
- 创建 ONNX Runtime 推理会话并读取模型输入形状
- 实现与 YOLOv8 检测模型匹配的图像预处理和输出解码
- 使用分类别非极大值抑制过滤重复框,并验证最终图片
理解完整推理链路
ONNX Runtime 只负责执行计算图,不会自动完成 OpenCV 图片的颜色转换、缩放填充、张量转置和后处理。部署代码必须严格复现训练框架使用的数据约定,否则模型可以正常运行,但检测框会偏移、类别分数会异常或完全没有结果。
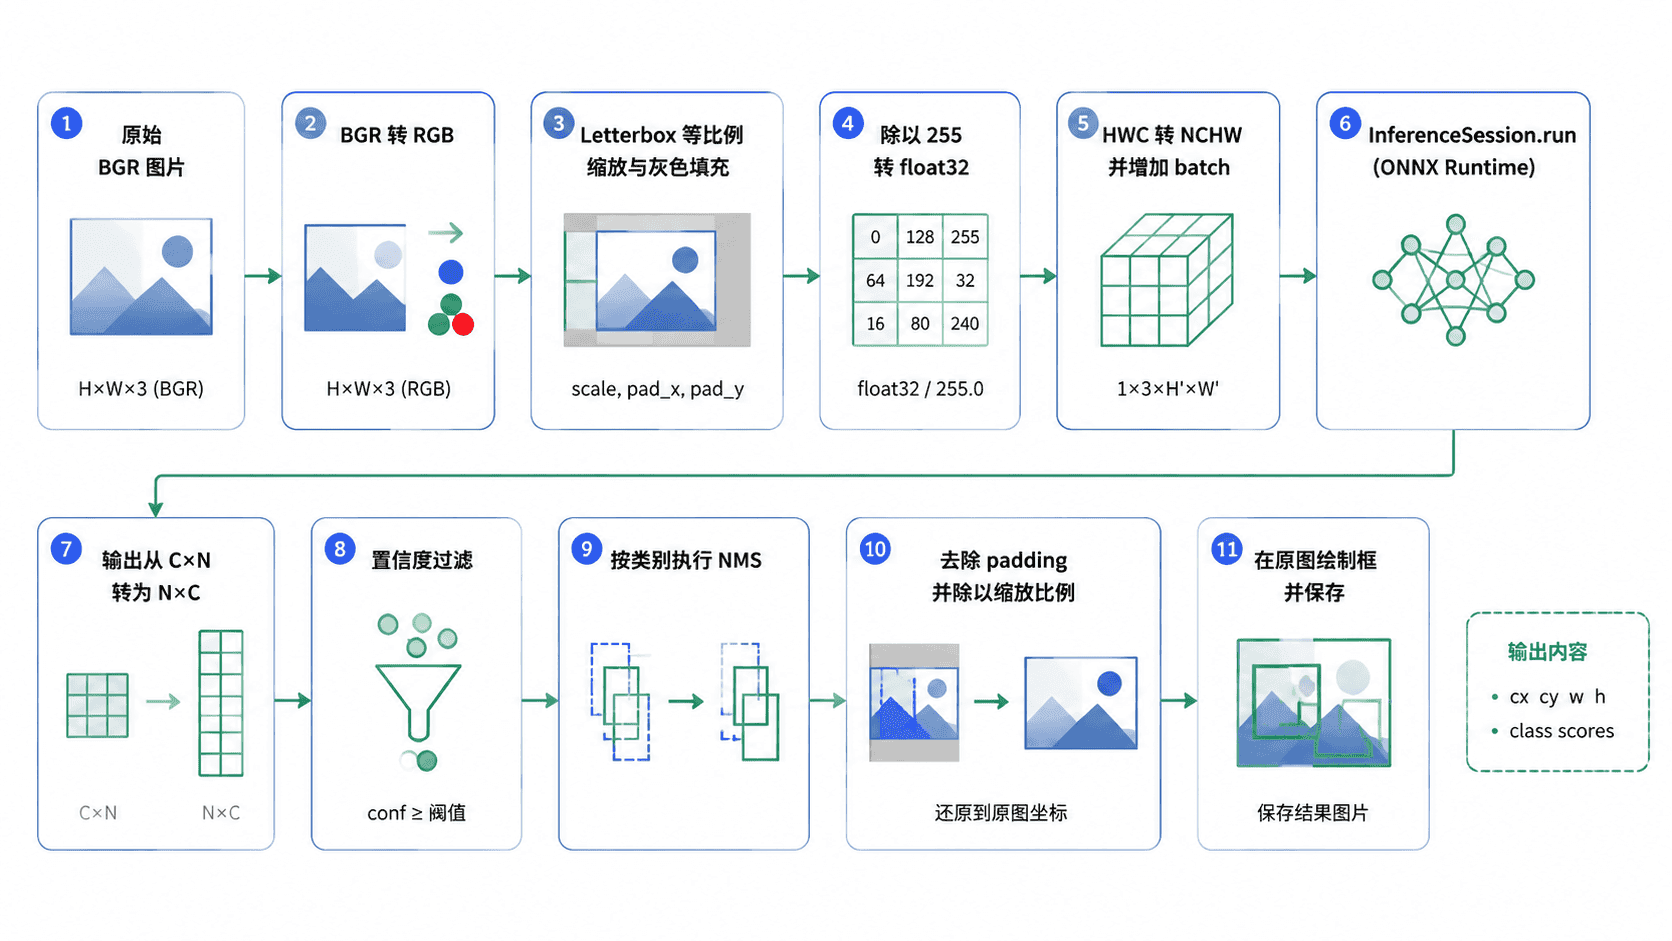
预处理阶段保留 scale、pad_x 和 pad_y,因为模型输出坐标基于填充后的输入画布。绘制到原图前,需要先减去填充量,再除以缩放比例,最后把坐标裁剪到原图边界。
安装运行依赖
CPU 环境安装 onnxruntime;NVIDIA GPU 环境通常改用与本机 CUDA 兼容的 onnxruntime-gpu,两者不要在同一虚拟环境中混装。
python -m pip install -U onnxruntime opencv-python numpy预期结果
命令以退出码 0 结束,onnxruntime、opencv-python 和 numpy 安装成功。
具体版本号与下载日志会因环境而不同。
实现推理与后处理
下面程序面向未内置 NMS 的标准 YOLOv8 Detect ONNX 输出。它兼容常见的 [1, 4+类别数, 候选框数] 与 [1, 候选框数, 4+类别数] 排列,并按类别分别执行 NMS,避免不同类别的重叠框互相抑制。
将代码保存为 infer_onnx.py,准备 best.onnx 和一张 test.jpg,再执行 python infer_onnx.py --model best.onnx --image test.jpg --output result.jpg。
import argparse
from pathlib import Path

import cv2
import numpy as np
import onnxruntime as ort

def letterbox(
    image: np.ndarray,
    target_height: int,
    target_width: int,
) -> tuple[np.ndarray, float, float, float]:
    height, width = image.shape[:2]
    scale = min(target_width / width, target_height / height)

    resized_width = round(width * scale)
    resized_height = round(height * scale)
    resized = cv2.resize(
        image,
        (resized_width, resized_height),
        interpolation=cv2.INTER_LINEAR,
    )

    pad_x = (target_width - resized_width) / 2
    pad_y = (target_height - resized_height) / 2
    left, right = round(pad_x - 0.1), round(pad_x + 0.1)
    top, bottom = round(pad_y - 0.1), round(pad_y + 0.1)

    padded = cv2.copyMakeBorder(
        resized,
        top,
        bottom,
        left,
        right,
        cv2.BORDER_CONSTANT,
        value=(114, 114, 114),
    )

    # OpenCV 读取 BGR;模型输入使用 RGB、float32、NCHW 和 0~1 归一化。
    tensor = cv2.cvtColor(padded, cv2.COLOR_BGR2RGB)
    tensor = tensor.astype(np.float32) / 255.0
    tensor = np.transpose(tensor, (2, 0, 1))
    tensor = np.expand_dims(tensor, axis=0)
    return np.ascontiguousarray(tensor), scale, pad_x, pad_y

def class_aware_nms(
    boxes_xywh: np.ndarray,
    scores: np.ndarray,
    class_ids: np.ndarray,
    confidence_threshold: float,
    iou_threshold: float,
) -> list[int]:
    kept: list[int] = []

    # 每个类别单独做 NMS,防止不同类别的框因位置重叠而互相删除。
    for class_id in np.unique(class_ids):
        indices = np.where(class_ids == class_id)[0]
        selected = cv2.dnn.NMSBoxes(
            boxes_xywh[indices].tolist(),
            scores[indices].tolist(),
            confidence_threshold,
            iou_threshold,
        )
        if len(selected) == 0:
            continue

        selected = np.asarray(selected).reshape(-1)
        kept.extend(indices[selected].tolist())

    return sorted(kept, key=lambda index: float(scores[index]), reverse=True)

def decode(
    output: np.ndarray,
    confidence_threshold: float,
    iou_threshold: float,
) -> tuple[np.ndarray, np.ndarray, np.ndarray]:
    if output.ndim != 3 or output.shape[0] != 1:
        raise ValueError(f"不支持的输出形状: {output.shape}")

    prediction = output[0]

    # 常见导出结果为 [C, N];转置后统一成 [N, C]。
    if prediction.shape[0] < prediction.shape[1]:
        prediction = prediction.T
    if prediction.shape[1] < 5:
        raise ValueError(f"输出通道不足: {prediction.shape}")

    boxes_cxcywh = prediction[:, :4]
    class_scores = prediction[:, 4:]
    class_ids = np.argmax(class_scores, axis=1)
    scores = class_scores[np.arange(class_scores.shape[0]), class_ids]

    valid = scores >= confidence_threshold
    boxes_cxcywh = boxes_cxcywh[valid]
    scores = scores[valid]
    class_ids = class_ids[valid]

    boxes_xywh = boxes_cxcywh.copy()
    boxes_xywh[:, 0] -= boxes_xywh[:, 2] / 2
    boxes_xywh[:, 1] -= boxes_xywh[:, 3] / 2

    kept = class_aware_nms(
        boxes_xywh,
        scores,
        class_ids,
        confidence_threshold,
        iou_threshold,
    )
    return boxes_xywh[kept], scores[kept], class_ids[kept]

def main() -> None:
    parser = argparse.ArgumentParser()
    parser.add_argument("--model", required=True)
    parser.add_argument("--image", required=True)
    parser.add_argument("--output", default="result.jpg")
    parser.add_argument("--imgsz", type=int, default=640)
    parser.add_argument("--conf", type=float, default=0.25)
    parser.add_argument("--iou", type=float, default=0.45)
    args = parser.parse_args()

    model_path = Path(args.model)
    image_path = Path(args.image)
    if not model_path.is_file():
        raise FileNotFoundError(f"模型不存在: {model_path}")
    if not image_path.is_file():
        raise FileNotFoundError(f"图片不存在: {image_path}")

    session = ort.InferenceSession(
        str(model_path),
        providers=["CPUExecutionProvider"],
    )
    input_meta = session.get_inputs()[0]
    input_shape = input_meta.shape

    # 固定模型读取声明尺寸;动态模型使用命令行给出的基准尺寸。
    input_height = input_shape[2] if isinstance(input_shape[2], int) else args.imgsz
    input_width = input_shape[3] if isinstance(input_shape[3], int) else args.imgsz

    image = cv2.imread(str(image_path))
    if image is None:
        raise ValueError(f"OpenCV 无法读取图片: {image_path}")

    tensor, scale, pad_x, pad_y = letterbox(
        image,
        input_height,
        input_width,
    )
    raw_output = session.run(None, {input_meta.name: tensor})[0]
    boxes, scores, class_ids = decode(raw_output, args.conf, args.iou)

    original_height, original_width = image.shape[:2]
    for box, score, class_id in zip(boxes, scores, class_ids):
        x, y, width, height = box

        # 将输入画布坐标逆变换回原图坐标,并限制在图像边界内。
        x1 = int(np.clip((x - pad_x) / scale, 0, original_width - 1))
        y1 = int(np.clip((y - pad_y) / scale, 0, original_height - 1))
        x2 = int(np.clip((x + width - pad_x) / scale, 0, original_width - 1))
        y2 = int(np.clip((y + height - pad_y) / scale, 0, original_height - 1))

        cv2.rectangle(image, (x1, y1), (x2, y2), (0, 255, 0), 2)
        label = f"class={int(class_id)} score={float(score):.2f}"
        cv2.putText(
            image,
            label,
            (x1, max(20, y1 - 8)),
            cv2.FONT_HERSHEY_SIMPLEX,
            0.55,
            (0, 255, 0),
            2,
        )

    if not cv2.imwrite(args.output, image):
        raise OSError(f"结果图片保存失败: {args.output}")

    print(f"输入名称: {input_meta.name}")
    print(f"输入张量: {tensor.shape}, dtype={tensor.dtype}")
    print(f"原始输出: {raw_output.shape}")
    print(f"保留目标: {len(boxes)}")
    print(f"结果文件: {args.output}")

if __name__ == "__main__":
    main()
预期输出
输入名称: images
输入张量: (1, 3, 640, 640), dtype=float32
原始输出: (1, <4+类别数>, <候选框数>)
保留目标: <N>
结果文件: result.jpg
<N> 由图片内容和阈值决定,可能为 0。程序即使没有检测到目标,也应正常生成 result.jpg;这能区分“模型成功执行但无结果”和“推理程序异常退出”两种情况。
核对解码边界
本例假定每个候选框前 4 个值是 cx、cy、w、h,后续全部是类别分数,不额外乘目标置信度。这符合常见的 YOLOv8 Detect 原始导出结构,但不适用于带内置 NMS、YOLOv5 风格 objectness、分割掩码或姿态关键点输出。
若框整体偏移,优先检查逆 Letterbox 公式;若类别和置信度明显异常,检查输出是否需要转置;若所有结果都为空,先把 --conf 临时调低到 0.10,再确认 RGB 转换、归一化和输入尺寸是否与导出模型一致。
使用 GPU 时,应先安装匹配环境的 onnxruntime-gpu,再把执行提供程序改为 CUDAExecutionProvider 并保留 CPU 回退。能创建会话不代表 GPU 已启用,实际可用提供程序应通过运行环境查询和日志确认。
验收结果
打开 result.jpg,检查检测框是否贴合原始目标,且图像没有被拉伸。再用同一张图片运行原 .pt 模型:主要目标的类别与位置应基本一致,置信度允许存在小幅浮点差异。
部署验收还应覆盖横图、竖图、无目标图片和多目标重叠图片。横竖图用于检查填充坐标,多目标重叠图用于验证分类别 NMS,无目标图用于验证空数组处理。