
计算机视觉 / 系统课时
批量处理图像
批量处理图像
本课把单图预测扩展为可重复执行的批处理工具:递归扫描目录、过滤支持的图像、跳过损坏文件、统一生成不冲突的结果文件名,并把失败原因写入清单,便于后续补跑和排查。
学习目标
- 规划批量输入、输出目录和稳定的文件命名规则
- 只加载一次模型并连续处理多张图像
- 记录损坏文件和推理异常,完成批次验收
设计批处理规则
批处理应先确定三个约束。输入目录允许包含子目录;输出文件名必须能反映原始相对路径,避免同名图片互相覆盖;单个文件失败时不能中断整个批次,而应记录到 failed.csv。
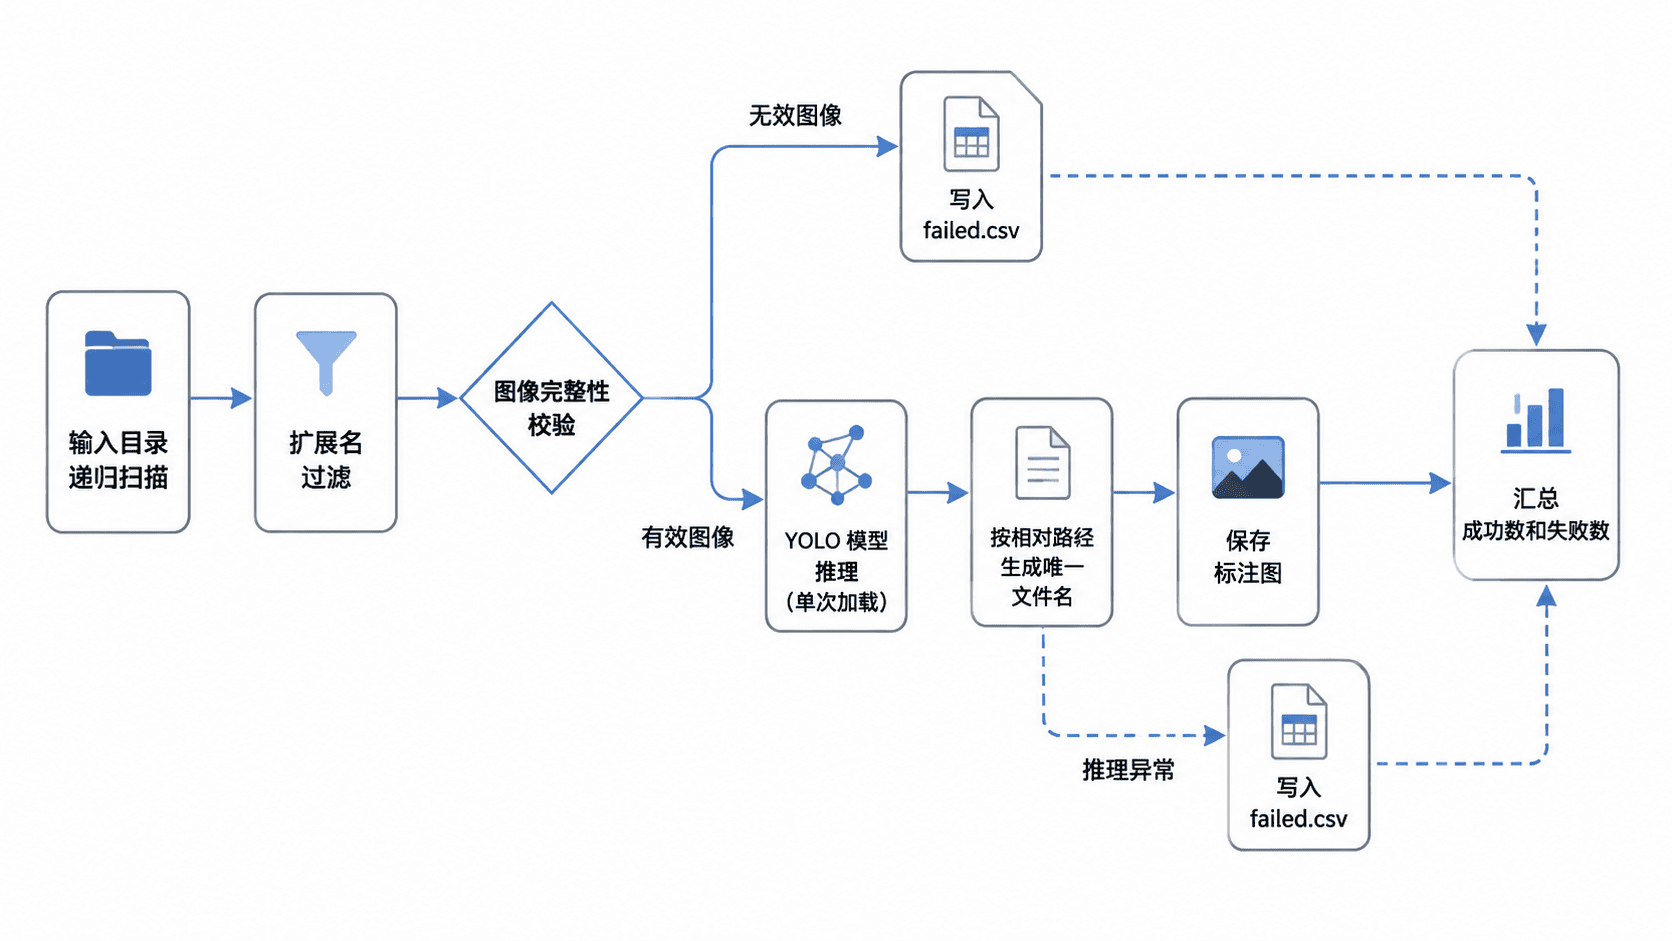
这种设计把“发现文件、验证输入、执行预测、保存结果、记录失败”拆成独立步骤。即使某张图片损坏,其他图片仍可继续处理,最终也能明确知道哪些文件需要重新准备。
编写批量推理程序
下面的脚本支持 jpg、jpeg、png、bmp 和 webp。模型只在循环开始前加载一次;输出名会把原始子目录拼入文件名,并保留原扩展名标识,因此不同目录或不同格式的同名文件不会互相覆盖。
import csv
from pathlib import Path

import torch
from PIL import Image
from ultralytics import YOLO

weight_path = Path("runs/detect/train/weights/best.pt")
input_dir = Path("data/images")
output_dir = Path("runs/predict/batch")
failed_file = output_dir / "failed.csv"
supported = {".jpg", ".jpeg", ".png", ".bmp", ".webp"}

if not weight_path.is_file():
    raise FileNotFoundError(f"找不到权重文件: {weight_path}")
if not input_dir.is_dir():
    raise NotADirectoryError(f"找不到输入目录: {input_dir}")

output_dir.mkdir(parents=True, exist_ok=True)
image_paths = sorted(
    path for path in input_dir.rglob("*")
    if path.is_file() and path.suffix.lower() in supported
)

device = 0 if torch.cuda.is_available() else "cpu"
model = YOLO(str(weight_path))
success_count = 0
failures = []

for image_path in image_paths:
    try:
        # 先验证文件结构,损坏图片不会进入模型推理。
        with Image.open(image_path) as image:
            image.verify()

        result = model.predict(
            source=str(image_path),
            imgsz=640,
            conf=0.25,
            device=device,
            verbose=False,
        )[0]

        relative = image_path.relative_to(input_dir)
        name_parts = [
            *relative.parts[:-1],
            f"{relative.stem}_{relative.suffix[1:].lower()}",
        ]
        output_file = output_dir / ("__".join(name_parts) + ".jpg")

        # result.plot() 返回 BGR 数组,保存前转换为 RGB。
        annotated = result.plot()
        Image.fromarray(annotated[:, :, ::-1]).save(output_file, quality=90)
        success_count += 1
    except Exception as exc:
        failures.append((str(image_path), type(exc).__name__, str(exc)))

with failed_file.open("w", newline="", encoding="utf-8-sig") as file:
    writer = csv.writer(file)
    writer.writerow(["file", "error_type", "message"])
    writer.writerows(failures)

print(f"运行设备: {device}")
print(f"发现图像: {len(image_paths)}")
print(f"处理成功: {success_count}")
print(f"处理失败: {len(failures)}")
print(f"结果目录: {output_dir.resolve()}")
print(f"失败清单: {failed_file.resolve()}")
预期输出
运行设备: <DEVICE>
发现图像: <TOTAL>
处理成功: <SUCCESS>
处理失败: <FAILED>
结果目录: <PATH>/runs/predict/batch
失败清单: <PATH>/runs/predict/batch/failed.csv<TOTAL>、<SUCCESS> 和 <FAILED> 取决于实际文件数量与质量。即使失败数为零,脚本仍会生成只包含表头的 failed.csv,便于自动化流程稳定读取。
运行与验收
在项目根目录执行脚本后,先核对“发现图像”等于输入目录中受支持格式的文件数。然后确认“处理成功 + 处理失败 = 发现图像”,否则说明扫描范围或异常处理逻辑被修改。
输出目录中的标注图应逐一对应输入文件。原始路径 shop-a/day1/a.jpg 会生成类似 shop-a__day1__a_jpg.jpg 的文件名。这样既保留来源信息,又不会因为不同子目录中存在 a.jpg 而覆盖结果。
打开 failed.csv 检查失败原因。UnidentifiedImageError 通常表示文件损坏或扩展名与内容不符;显存错误可通过降低 imgsz、改用 cpu 或分批执行解决。修复输入后,可以删除旧结果并重新运行整批,也可以根据失败清单单独补跑。