
计算机视觉 / 系统课时
实现文档透视校正
实现文档透视校正
把倾斜拍摄的纸张变成接近扫描仪效果的正视图,需要先找到文档四角,再建立四个角点到矩形画布的对应关系。本课使用 OpenCV 4.x 的轮廓检测、getPerspectiveTransform 与 warpPerspective 完成一条可运行的文档校正流程。
学习目标
- 用边缘与多边形逼近从照片中筛出四边形文档轮廓。
- 按左上、右上、右下、左下排序角点,并计算目标画布尺寸。
- 生成透视变换矩阵,输出正视文档和高对比扫描效果。
从轮廓中找到文档四角
文档检测可以先把问题缩小成“找面积较大的凸四边形”。对边缘清楚的桌面照片,可用 GaussianBlur 的 5×5 核抑制细碎纹理,再用 Canny(gray, 50, 150) 提取边缘;随后按面积从大到小检查轮廓,用 approxPolyDP 将轮廓简化为多边形,逼近精度先取轮廓周长的 2%。
四个点必须保持稳定顺序,否则透视结果会扭曲或翻转。常用排序规则是:x+y 最小的点作为左上、最大的点作为右下;y-x 最小的点作为右上、最大的点作为左下。检测后还应确认候选只有四个顶点并且是凸四边形。
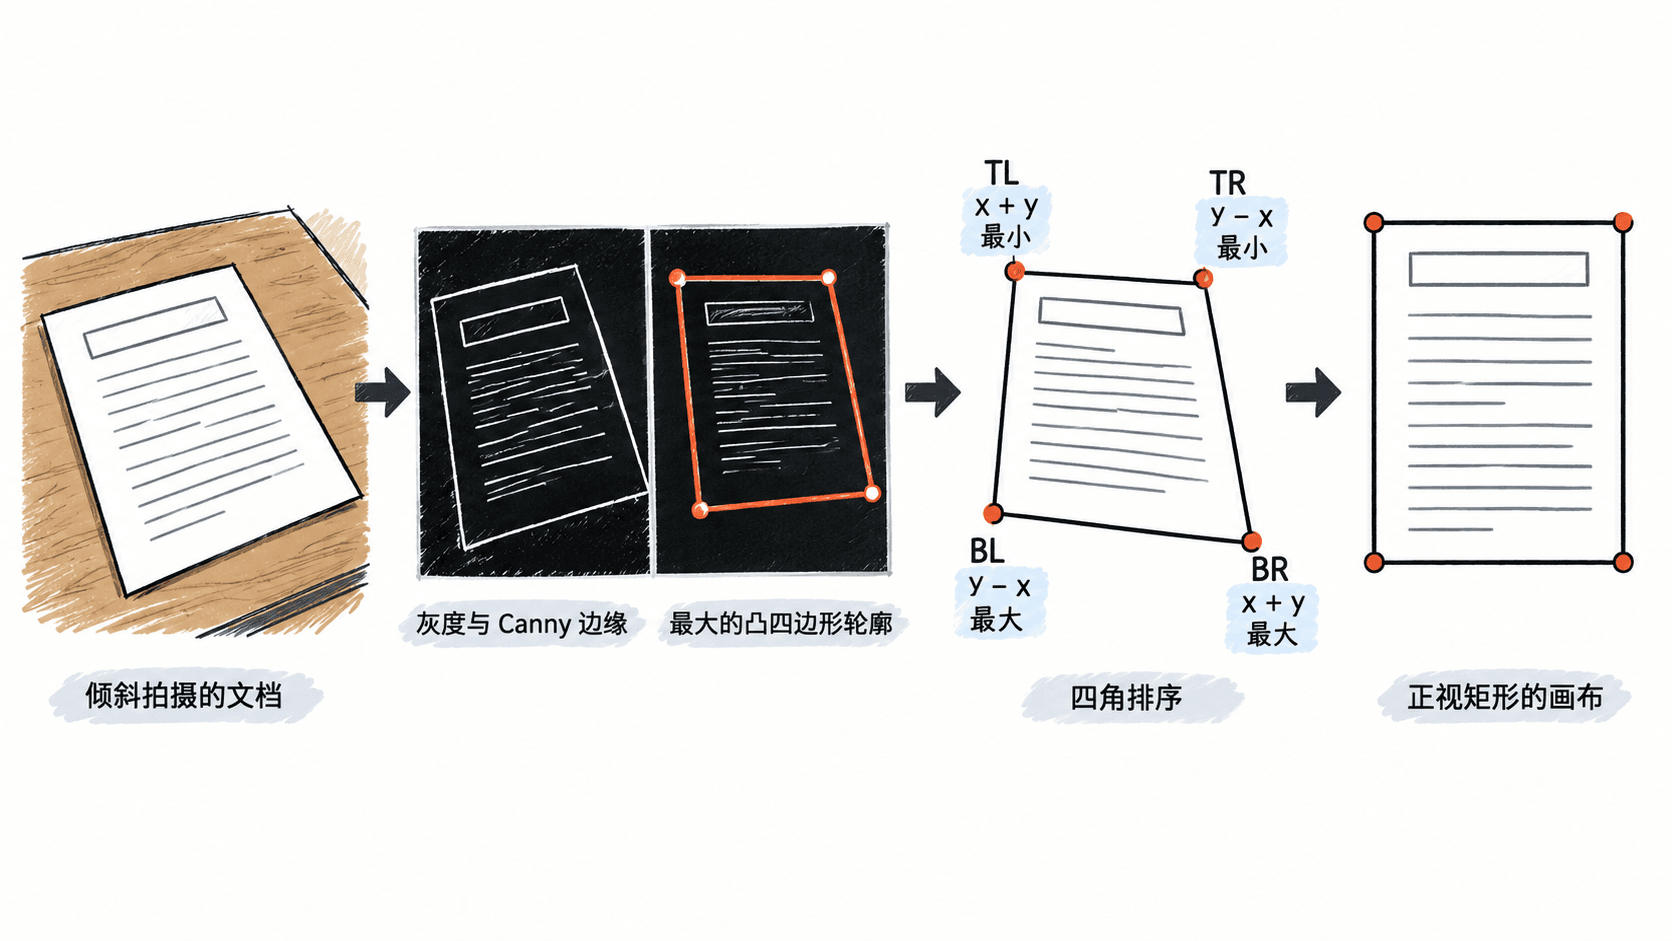
按边长计算输出画布
目标画布不能直接照搬原图尺寸,否则容易把纸张拉长或压扁。设四角已经按 tl、tr、br、bl 排序,宽度取上边 tl→tr 与下边 bl→br 长度的较大值,高度取左边 tl→bl 与右边 tr→br 长度的较大值,再四舍五入到整数像素。
例如上边约 812 px、下边约 846 px、左边约 1160 px、右边约 1142 px,就建立 846×1160 的目标画布。目标四角依次为 (0,0)、(845,0)、(845,1159)、(0,1159),顺序必须与源图四角完全对应。
完整实现四点透视校正
下面脚本读取命令行指定的照片,默认文件名为 document.jpg。它自动寻找最大的凸四边形,输出保留颜色的 rectified.png,再用 31×31 自适应高斯阈值生成 scanned.png。二值扫描图适合黑字白纸;含彩色图片的文档应保留 rectified.png。
import sys
from pathlib import Path

import cv2 as cv
import numpy as np


def order_points(points: np.ndarray) -> np.ndarray:
    pts = points.reshape(4, 2).astype(np.float32)
    ordered = np.zeros((4, 2), dtype=np.float32)

    sums = pts.sum(axis=1)
    diffs = np.diff(pts, axis=1).ravel()  # y - x

    ordered[0] = pts[np.argmin(sums)]   # top-left
    ordered[2] = pts[np.argmax(sums)]   # bottom-right
    ordered[1] = pts[np.argmin(diffs)]  # top-right
    ordered[3] = pts[np.argmax(diffs)]  # bottom-left
    return ordered


def find_document_corners(image: np.ndarray) -> np.ndarray:
    gray = cv.cvtColor(image, cv.COLOR_BGR2GRAY)
    blurred = cv.GaussianBlur(gray, (5, 5), 0)
    edges = cv.Canny(blurred, 50, 150)

    contours, _ = cv.findContours(
        edges, cv.RETR_EXTERNAL, cv.CHAIN_APPROX_SIMPLE
    )

    for contour in sorted(contours, key=cv.contourArea, reverse=True)[:10]:
        perimeter = cv.arcLength(contour, True)
        approx = cv.approxPolyDP(contour, 0.02 * perimeter, True)

        if len(approx) == 4 and cv.isContourConvex(approx):
            return order_points(approx)

    raise RuntimeError("No convex document quadrilateral found")


def warp_document(image: np.ndarray, corners: np.ndarray) -> np.ndarray:
    tl, tr, br, bl = corners

    width_top = np.linalg.norm(tr - tl)
    width_bottom = np.linalg.norm(br - bl)
    height_left = np.linalg.norm(bl - tl)
    height_right = np.linalg.norm(br - tr)

    width = max(2, int(round(max(width_top, width_bottom))))
    height = max(2, int(round(max(height_left, height_right))))

    destination = np.array(
        [[0, 0], [width - 1, 0],
         [width - 1, height - 1], [0, height - 1]],
        dtype=np.float32,
    )

    matrix = cv.getPerspectiveTransform(corners, destination)
    return cv.warpPerspective(image, matrix, (width, height))


def main() -> None:
    image_path = Path(sys.argv[1] if len(sys.argv) > 1 else "document.jpg")
    image = cv.imread(str(image_path))

    if image is None:
        raise FileNotFoundError(f"Cannot read image: {image_path}")

    corners = find_document_corners(image)
    rectified = warp_document(image, corners)

    gray = cv.cvtColor(rectified, cv.COLOR_BGR2GRAY)
    scanned = cv.adaptiveThreshold(
        gray,
        255,
        cv.ADAPTIVE_THRESH_GAUSSIAN_C,
        cv.THRESH_BINARY,
        31,
        15,
    )

    if not cv.imwrite("rectified.png", rectified):
        raise RuntimeError("Failed to write rectified.png")
    if not cv.imwrite("scanned.png", scanned):
        raise RuntimeError("Failed to write scanned.png")

    print("corners =", np.rint(corners).astype(int).tolist())
    print(f"output_size = {rectified.shape[1]}x{rectified.shape[0]}")
    print("saved = rectified.png, scanned.png")


if __name__ == "__main__":
    main()
预期输出如下,角点坐标和尺寸会随输入照片变化。
corners = [[<X0>, <Y0>], [<X1>, <Y1>], [<X2>, <Y2>], [<X3>, <Y3>]]
output_size = <WIDTH>x<HEIGHT>
saved = rectified.png, scanned.png
检查结果并修正常见失败
先检查 rectified.png 的四条纸边是否接近水平或垂直,文字行是否保持直线。如果四角顺序错误,常见现象是图像折叠、翻转或极端拉伸;此时应先在原图上标记四个检测点确认顺序,而不是盲目调整 warpPerspective。
如果完全找不到四边形,可把 Canny 阈值从 50/150 尝试调整为 30/100,或把 approxPolyDP 的系数在 0.015~0.03 之间测试。若背景中存在比文档更明显的大矩形,可增加面积条件,例如只接受轮廓面积达到整幅图 20% 以上的候选。
scanned.png 如果文字断裂,可把自适应阈值的 C 从 15 降到 8~12;如果阴影仍被保留下来,可尝试把 blockSize 从 31 提高到 41 或 51。blockSize 必须是大于 1 的奇数。文档边缘已经被照片裁掉时,自动四角法没有完整几何信息,应改成人工点选四角或使用文档分割模型。