
游戏引擎 / 系统课时
用 UI Toolkit 搭建运行时 HUD
用 UI Toolkit 搭建运行时 HUD
把第三人称关卡中的生命值、当前任务和交互提示放到同一套屏幕界面里,并让它们在窗口缩放后仍位于预期区域。完成后会得到可运行的 UXML、USS、Panel Settings、UIDocument 和一个负责刷新文本及血条的 C# 组件。
学习目标
- 创建运行时 UXML、USS 与场景中的 UIDocument,并明确各自职责。
- 用定位和屏幕缩放参数布置生命值、任务与交互提示。
- 通过 C# 更新 HUD,并在三种分辨率下验收布局。
创建 HUD 的 UXML 结构
以 Unity 6.3 LTS(6000.3) 为操作版本。在 Project 窗口建立 Assets/UI/HUD/,依次使用 Create > UI Toolkit > UI Document 和 Create > UI Toolkit > Style Sheet 创建 GameHUD.uxml、GameHUD.uss。两者放在同一目录,便于使用相对路径引用样式。
UXML 只定义控件及其名称:hud-root 覆盖屏幕;status 放生命值;task 放任务;interaction 放底部提示。后续 C# 通过 name 查询元素,改名后必须同步修改脚本。
<ui:UXML xmlns:ui="UnityEngine.UIElements">
    <Style src="GameHUD.uss" />
    <ui:VisualElement name="hud-root">
        <ui:VisualElement name="status" class="hud-card">
            <ui:Label text="生命值" />
            <ui:Label name="health-value" text="100 / 100" />
            <ui:VisualElement name="health-track">
                <ui:VisualElement name="health-fill" />
            </ui:VisualElement>
        </ui:VisualElement>
        <ui:VisualElement name="task" class="hud-card">
            <ui:Label text="当前任务" />
            <ui:Label name="objective-label" text="等待任务" />
        </ui:VisualElement>
        <ui:VisualElement name="interaction">
            <ui:Label name="interaction-hint" text="E 交互" />
        </ui:VisualElement>
    </ui:VisualElement>
</ui:UXML>
双击 GameHUD.uxml 打开 UI Builder,在 Hierarchy 中应看到三个区域;如果 USS 导入失败,先检查 <Style> 的相对路径是否与实际文件位置一致。
用 USS 布置三块区域
把三个信息区分散到左上、右上和底部中央,避免挡住角色与准星。position: absolute 以覆盖全屏的 hud-root 为定位容器;生命值条由底轨与内层填充条组成,脚本只改变填充条的百分比宽度。
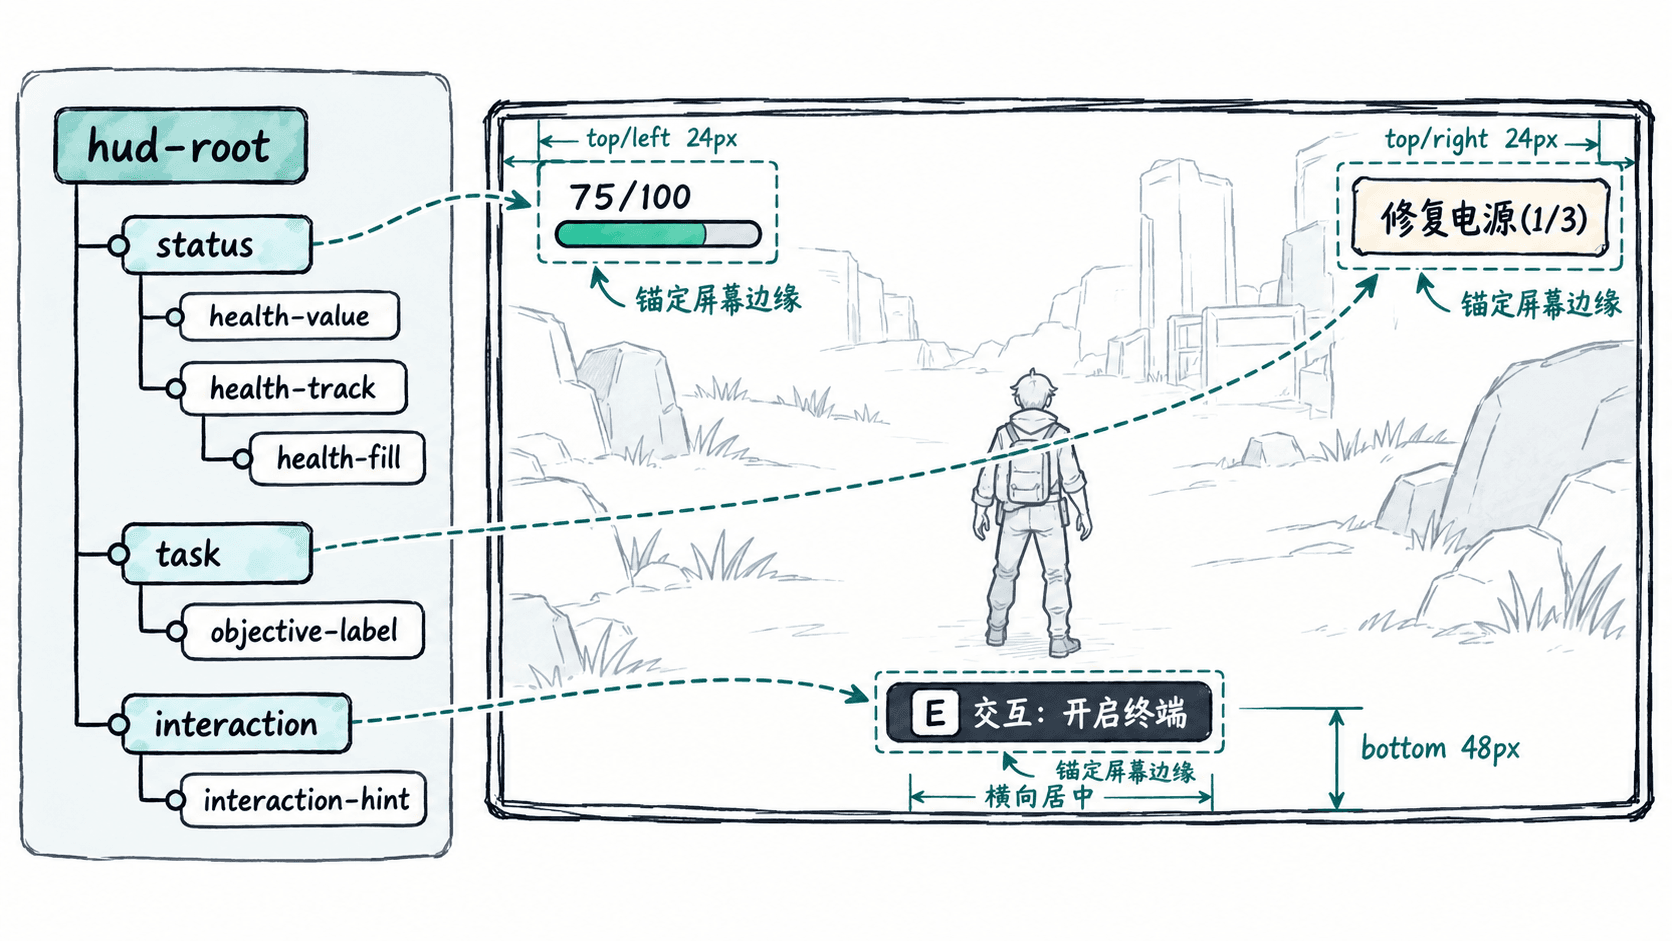
将以下内容保存为 GameHUD.uss。width: 100% 使根节点覆盖面板,左右两侧卡片分别宽 260 和 320 像素;交互容器左右贴边后,用 align-items: center 居中其内部标签。
#hud-root { width: 100%; height: 100%; position: relative; }
Label { color: #FFFFFF; font-size: 20px; }
.hud-card {
    position: absolute;
    padding: 16px;
    background-color: rgba(15, 26, 42, 0.85);
    border-radius: 8px;
}
#status { top: 24px; left: 24px; width: 260px; }
#task { top: 24px; right: 24px; width: 320px; }
#health-track {
    width: 100%;
    height: 16px;
    margin-top: 8px;
    background-color: #45576B;
}
#health-fill {
    width: 100%;
    height: 100%;
    background-color: #55CE89;
}
#interaction {
    position: absolute;
    left: 0;
    right: 0;
    bottom: 48px;
    align-items: center;
}
#interaction-hint {
    padding: 10px 20px;
    background-color: rgba(15, 26, 42, 0.85);
    border-radius: 8px;
}
预期效果是任务和生命值各有半透明底板,绿色血条贴合灰色底轨,交互提示始终在下方居中;调整 USS 后可在 UI Builder 预览布局。
连接 Panel Settings 与场景
- 在 Hierarchy 选择
GameObject > UI Toolkit > UI Document,Unity 会创建带UIDocument组件的对象,并自动准备可用的 Panel Settings 资产。对象重命名为GameHUD。 - 在
UIDocumentInspector 中,将Source Asset指向GameHUD.uxml,Panel Settings指向刚创建的面板资产,Sort Order保持0(单 HUD 情况)。 - 选中 Panel Settings 资产,设置
Scale Mode = Scale with Screen Size、Reference Resolution = 1920 × 1080、Screen Match Mode = Match Width or Height、Match = 0.5;Target Texture留空,使界面显示到 Game 视图。 - 进入 Play Mode。面板负责绘制和整体缩放,UIDocument 负责将指定 UXML 挂到这个面板;不要把 UXML 误当成场景里的 Canvas。
用 C# 刷新生命值与任务
在 Assets/UI/HUD/ 创建 GameHudController.cs,将脚本添加到 GameHUD 对象。Q<T>(name) 查找 UXML 元素;血量先截断到 0~max,再转换为 0~100 的填充百分比,防止负值或超出底轨。交互对象离开范围时,传入空字符串即可隐藏提示。
using UnityEngine;
using UnityEngine.UIElements;

[RequireComponent(typeof(UIDocument))]
public class GameHudController : MonoBehaviour
{
    private Label healthValue;
    private VisualElement healthFill;
    private Label objectiveLabel;
    private Label interactionHint;

    private void OnEnable()
    {
        // UIDocument 在启用时构建视觉树,重新启用时要重新查询节点。
        var root = GetComponent<UIDocument>().rootVisualElement;
        healthValue = root.Q<Label>("health-value");
        healthFill = root.Q<VisualElement>("health-fill");
        objectiveLabel = root.Q<Label>("objective-label");
        interactionHint = root.Q<Label>("interaction-hint");

        if (healthValue == null || healthFill == null ||
            objectiveLabel == null || interactionHint == null)
        {
            Debug.LogError("HUD 元素名称与 UXML 不一致", this);
            return;
        }

        // 初始演示数据;接入玩家生命值与任务系统后替换这些调用。
        SetHealth(75, 100);
        SetObjective("修复电源 (1/3)");
        SetInteraction("E 交互:开启终端");
    }

    public void SetHealth(int current, int max)
    {
        int limit = Mathf.Max(1, max);
        int safeValue = Mathf.Clamp(current, 0, limit);
        healthValue.text = $"{safeValue} / {limit}";
        healthFill.style.width = Length.Percent(safeValue * 100f / limit);
    }

    public void SetObjective(string text)
    {
        objectiveLabel.text = text;
    }

    public void SetInteraction(string text)
    {
        interactionHint.text = text;
        interactionHint.style.display = string.IsNullOrEmpty(text)
            ? DisplayStyle.None : DisplayStyle.Flex;
    }

    [ContextMenu("Preview Damage")]
    private void PreviewDamage()
    {
        // Play Mode 中通过组件右上角菜单触发,检查血条是否随数值变化。
        if (healthFill != null) SetHealth(30, 100);
    }
}
预期结果: 进入 Play Mode 后左上显示 75 / 100、血条宽度为 75%,右上显示“修复电源 (1/3)”,下方显示交互提示。运行中在 GameHudController 组件的菜单执行 Preview Damage,应变为 30 / 100 且血条缩至 30%。正式接入时由玩家受伤、任务变化、目标进入与离开交互范围的事件调用这三个公开方法,而不是每帧重复改写所有标签。
验收缩放与定位
在 Game 视图的分辨率菜单分别检查 1920 × 1080、1280 × 720、1024 × 768。前两种均为 16:9,应保持三块信息区位置与整体比例;4:3 下要确认左右卡片不重叠、文字未被裁切、底部提示仍完整可见。
- 界面完全不显示: 确认
GameHUD对象启用,UIDocument.Source Asset和Panel Settings均已赋值,且 Panel Settings 的Target Texture为空。 - 有文本但无底板: 检查
GameHUD.uxml的<Style src="GameHUD.uss" />与文件名,查看 Console 是否有 USS 导入错误。 - 生命值不刷新: 对照 UXML 的
health-value、health-fill与脚本查询名称;出现错误日志时优先修正这些标识。 - 窄屏发生遮挡: 先缩短任务文字并调整
#task的宽度和字号,不要通过任意提高Sort Order掩盖布局冲突。
验收完成后,保留 UXML 的稳定元素名,把脚本里的演示初始值替换为角色生命值、任务状态与交互检测的真实数据源。