
计算机视觉 / 系统课时
扫描并矫正文档
扫描并矫正文档
拍摄纸张时,文档往往带有倾斜、透视收缩和背景区域。本节把一张包含完整纸面的照片处理成近似正视扫描图:先找出纸张四边形,再计算透视变换,将四个角映射到规则矩形。
学习目标
- 用边缘与轮廓找到最可能的文档四边形。
- 按固定顺序整理四个角点并计算透视矩阵。
- 生成矫正后的平面文档图,并识别检测失败的边界情况。
从照片到平面扫描图
文档扫描的关键不是简单裁剪,而是建立“原图四边形到目标矩形”的几何对应关系。边缘检测先强化纸张边界,轮廓近似再寻找四个角点,最后由 cv2.getPerspectiveTransform 和 cv2.warpPerspective 完成透视矫正。
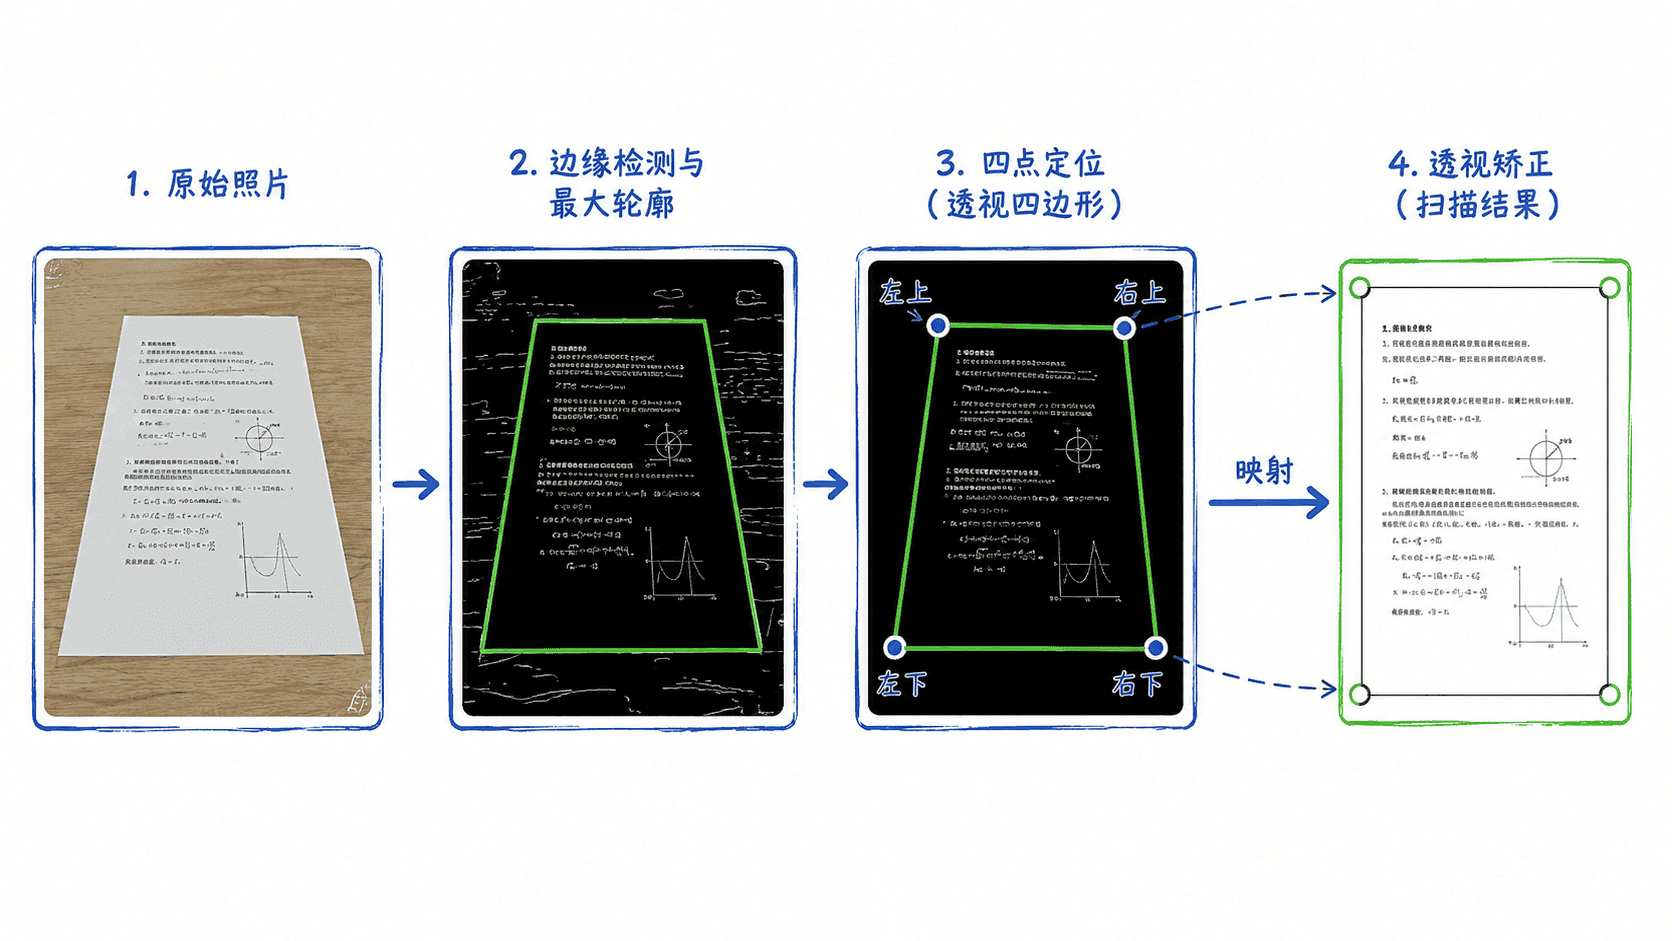
如果照片中纸张边缘被遮挡、与背景对比太弱,或者画面里存在更大的四边形物体,单纯依赖最大四边形轮廓就可能失败。因此实现时既要给出成功路径,也要明确无四角轮廓时的错误处理。
实现四点透视矫正
下面的程序读取 document.jpg,用灰度、模糊和 Canny 提取边缘,再从面积较大的轮廓中寻找四边形。角点按左上、右上、右下、左下排序后,依据两组对边长度确定输出尺寸。
import cv2
import numpy as np

def order_points(points):
    pts = np.asarray(points, dtype=np.float32).reshape(4, 2)
    ordered = np.zeros((4, 2), dtype=np.float32)
    sums = pts.sum(axis=1)
    diffs = np.diff(pts, axis=1).reshape(-1)
    ordered[0] = pts[np.argmin(sums)]   # 左上
    ordered[2] = pts[np.argmax(sums)]   # 右下
    ordered[1] = pts[np.argmin(diffs)]  # 右上
    ordered[3] = pts[np.argmax(diffs)]  # 左下
    return ordered

def four_point_transform(image, points):
    tl, tr, br, bl = order_points(points)
    width_top = np.linalg.norm(tr - tl)
    width_bottom = np.linalg.norm(br - bl)
    height_left = np.linalg.norm(bl - tl)
    height_right = np.linalg.norm(br - tr)
    width = max(1, int(round(max(width_top, width_bottom))))
    height = max(1, int(round(max(height_left, height_right))))
    destination = np.array([
        [0, 0],
        [width - 1, 0],
        [width - 1, height - 1],
        [0, height - 1],
    ], dtype=np.float32)
    matrix = cv2.getPerspectiveTransform(
        np.array([tl, tr, br, bl], dtype=np.float32),
        destination,
    )
    return cv2.warpPerspective(image, matrix, (width, height))

image = cv2.imread("document.jpg")
if image is None:
    raise FileNotFoundError("无法读取 document.jpg")

gray = cv2.cvtColor(image, cv2.COLOR_BGR2GRAY)
blurred = cv2.GaussianBlur(gray, (5, 5), 0)
edges = cv2.Canny(blurred, 75, 200)
contours, _ = cv2.findContours(
    edges,
    cv2.RETR_LIST,
    cv2.CHAIN_APPROX_SIMPLE,
)

document_contour = None
for contour in sorted(contours, key=cv2.contourArea, reverse=True)[:10]:
    perimeter = cv2.arcLength(contour, True)
    approx = cv2.approxPolyDP(contour, 0.02 * perimeter, True)
    if len(approx) == 4:
        document_contour = approx
        break

if document_contour is None:
    raise RuntimeError("未检测到四边形文档边界")

scanned = four_point_transform(image, document_contour)
cv2.imwrite("scanned.png", scanned)
print("已写出: scanned.png")
print("输出尺寸:", scanned.shape[1], "x", scanned.shape[0])
预期输出
已写出: scanned.png
输出尺寸: <VALUE> x <VALUE>
实际像素尺寸取决于输入照片中四条边的长度,因此 <VALUE> 会随图片变化。程序成功后还应打开 scanned.png 检查四条纸边是否接近水平或垂直,以及正文是否发生明显拉伸。
为什么要排序四个角点
透视矩阵依赖点与点之间的一一对应。如果原图角点顺序随机,却直接映射到目标矩形,输出可能旋转、翻转甚至严重扭曲。这里通过坐标和与坐标差,将四个点稳定整理为左上、右上、右下、左下,再按相同顺序构造目标点。
提高检测稳定性
固定的 Canny 阈值 75 和 200 适合演示,但不同光照和背景下不一定可靠。实际项目可先缩放大图以降低噪声和计算量,再依据图像亮度调整边缘阈值,并加入形态学闭运算连接断裂边缘。
轮廓筛选也不应只看“是否四个点”。可以同时检查面积占比、凸性、长宽比以及四边形是否位于合理区域。若始终找不到可信轮廓,应提示用户重新拍摄,而不是强行对错误区域做透视变换。
最终验收标准很明确:输出只保留文档主体,四边接近矩形,文本没有明显梯形收缩。只要四角定位可靠,透视变换本身通常是整个扫描流程中最稳定的一步。