
计算机视觉 / 系统课时
图像与视频推理
图像与视频推理
本课把同一份 YOLO 权重接到图片、视频文件和摄像头三类输入上,统一完成逐帧检测、结果绘制与结构化保存。完成后,你将得到一个可直接运行的推理脚本,并能根据输出文件验证类别、置信度和边界框是否正确。
学习目标
- 理解图片推理与视频逐帧推理的共同链路
- 使用同一脚本处理图片、视频和摄像头输入
- 保存带框画面以及类别、置信度和坐标结果
统一理解三类输入
图片只包含一帧,视频文件和摄像头则持续产生帧。三者进入模型后的核心步骤相同:读取画面、执行预测、解析检测框、绘制结果、保存输出。差别主要在于视频需要循环读取,并保持原始分辨率和帧率写回文件。
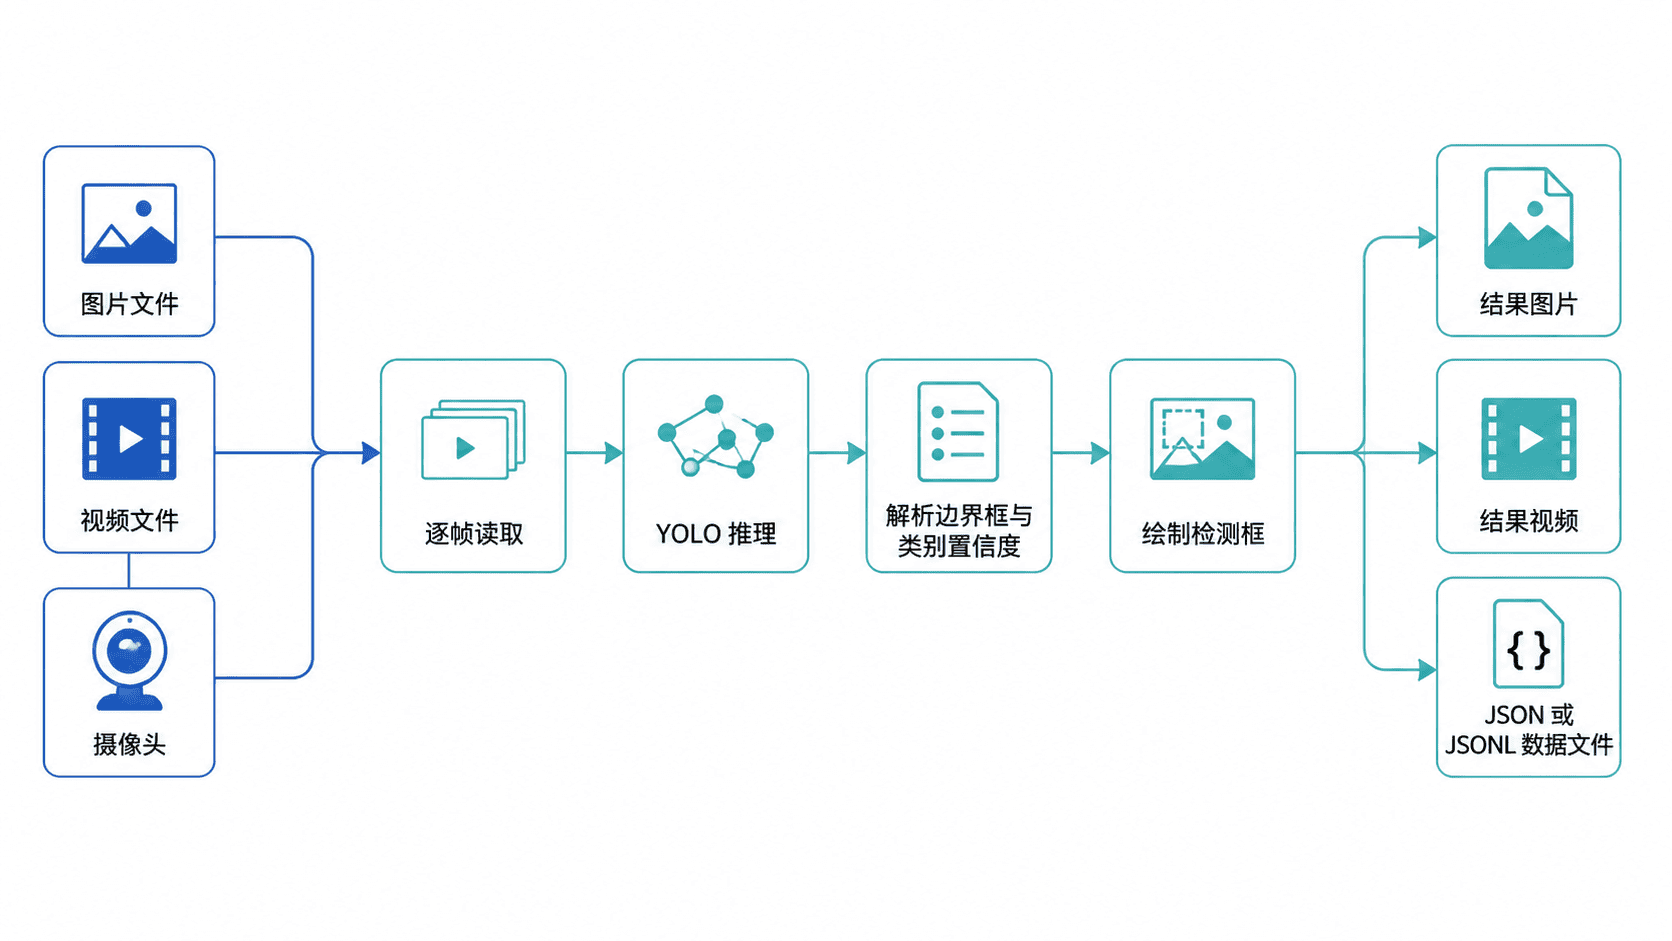
图片结果适合保存为一张标注图和一个 JSON 文件;视频与摄像头结果更适合保存为 MP4 和 JSONL。JSONL 每行对应一帧,后续统计、检索或回放时不必一次加载整个文件。
准备运行环境
示例使用 ultralytics 加载 YOLO 权重,使用 OpenCV 读取和写入媒体。建议在独立虚拟环境中执行以下命令。
python -m pip install ultralytics opencv-python
python -c "import cv2, ultralytics; print('环境可用')"
预期输出
环境可用安装日志和版本号可能不同,只要最后能够正常导入两个包即可。将训练得到的 best.pt、测试图片或视频放到当前目录;摄像头通常使用编号 0,外接摄像头可能是 1 或更大的编号。
编写统一推理脚本
下面的脚本把图片与连续帧分开处理,但复用同一个检测结果解析函数。视频模式会保留原始宽高,并把每帧检测结果写入 detections.jsonl。
import argparse
import json
from pathlib import Path

import cv2
from ultralytics import YOLO

def extract_detections(result):
    """把 Ultralytics 结果转换为可序列化的数据。"""
    detections = []
    # 坐标保留为原图像素,业务端可直接绘制或存档。
    for box in result.boxes:
        class_id = int(box.cls[0].item())
        x1, y1, x2, y2 = [round(value, 2) for value in box.xyxy[0].tolist()]
        detections.append(
            {
                "classId": class_id,
                "className": result.names[class_id],
                "confidence": round(float(box.conf[0].item()), 4),
                "box": {"x1": x1, "y1": y1, "x2": x2, "y2": y2},
            }
        )
    return detections

def run_image(model, source, output_dir, confidence):
    image = cv2.imread(source)
    if image is None:
        raise ValueError(f"无法读取图片:{source}")

    result = model.predict(image, conf=confidence, verbose=False)[0]
    image_path = output_dir / "result.jpg"
    data_path = output_dir / "detections.json"

    cv2.imwrite(str(image_path), result.plot())
    data_path.write_text(
        json.dumps(extract_detections(result), ensure_ascii=False, indent=2),
        encoding="utf-8",
    )
    print(f"图片结果:{image_path}")
    print(f"检测数据:{data_path}")

def run_stream(model, source, output_dir, confidence, max_frames):
    capture_source = int(source) if source.isdigit() else source
    capture = cv2.VideoCapture(capture_source)
    if not capture.isOpened():
        raise ValueError(f"无法打开视频或摄像头:{source}")

    width = int(capture.get(cv2.CAP_PROP_FRAME_WIDTH))
    height = int(capture.get(cv2.CAP_PROP_FRAME_HEIGHT))
    fps = capture.get(cv2.CAP_PROP_FPS)
    # 部分摄像头不会报告帧率,此时使用稳定的默认值。
    if fps <= 0:
        fps = 25.0

    video_path = output_dir / "result.mp4"
    data_path = output_dir / "detections.jsonl"
    writer = cv2.VideoWriter(
        str(video_path),
        cv2.VideoWriter_fourcc(*"mp4v"),
        fps,
        (width, height),
    )

    frame_index = 0
    with data_path.open("w", encoding="utf-8") as data_file:
        while True:
            success, frame = capture.read()
            if not success:
                break

            result = model.predict(frame, conf=confidence, verbose=False)[0]
            writer.write(result.plot())
            # JSONL 一行记录一帧,适合后续流式读取。
            record = {
                "frameIndex": frame_index,
                "detections": extract_detections(result),
            }
            data_file.write(json.dumps(record, ensure_ascii=False) + "\n")
            frame_index += 1

            # 摄像头测试时可限制帧数,避免脚本持续运行。
            if max_frames > 0 and frame_index >= max_frames:
                break

    capture.release()
    writer.release()
    print(f"处理帧数:{frame_index}")
    print(f"视频结果:{video_path}")
    print(f"检测数据:{data_path}")

def main():
    parser = argparse.ArgumentParser()
    parser.add_argument("--model", required=True, help="YOLO 权重路径")
    parser.add_argument("--source", required=True, help="图片、视频路径或摄像头编号")
    parser.add_argument("--mode", choices=["image", "stream"], required=True)
    parser.add_argument("--output", default="runs/inference")
    parser.add_argument("--conf", type=float, default=0.25)
    parser.add_argument("--max-frames", type=int, default=0)
    args = parser.parse_args()

    output_dir = Path(args.output)
    output_dir.mkdir(parents=True, exist_ok=True)
    # 整个任务只加载一次权重,避免逐帧重复初始化。
    model = YOLO(args.model)

    if args.mode == "image":
        run_image(model, args.source, output_dir, args.conf)
    else:
        run_stream(model, args.source, output_dir, args.conf, args.max_frames)

if __name__ == "__main__":
    main()
预期结果
脚本定义完成;执行命令后会创建指定输出目录并打印结果文件路径。脚本将模型原始坐标保存为左上角和右下角形式,即 x1、y1、x2、y2。置信度阈值由 --conf 控制;阈值越高,保留的候选框通常越少,但也可能漏掉难以识别的目标。
运行并检查结果
分别执行以下命令即可测试图片、视频和默认摄像头。摄像头示例只处理 300 帧,实际运行时可调整该值。
python infer_media.py --model best.pt --source demo.jpg --mode image --output runs/image
python infer_media.py --model best.pt --source demo.mp4 --mode stream --output runs/video
python infer_media.py --model best.pt --source 0 --mode stream --max-frames 300 --output runs/camera
预期结果
图片结果:runs/image/result.jpg
检测数据:runs/image/detections.json
处理帧数:<FRAME_COUNT>
视频结果:runs/video/result.mp4
检测数据:runs/video/detections.jsonl
处理帧数:300
视频结果:runs/camera/result.mp4
检测数据:runs/camera/detections.jsonl
<FRAME_COUNT> 取决于视频长度。打开结果图片或视频,确认检测框位置与类别名称合理;再检查数据文件,确认每个框都包含类别编号、类别名称、置信度和坐标。若视频无法打开,优先检查输入路径、摄像头编号和 OpenCV 是否支持当前编码格式。