
Web 图形与 3D / 系统课时
展厅多个展位如何组织镜头导览
展厅多个展位如何组织镜头导览
多个展位若分别编写镜头动画,很容易出现文案与画面错位、手动跳转打断自动播放等问题。本篇用一份展位配置统一管理相机位置、观察目标和说明内容,做出可以手动切换、自动巡游且允许自由观察的三展位数字展厅。
学习目标
- 用展位数据描述镜头位置、观察目标和讲解内容。
- 实现镜头与观察目标的同步缓动,以及转场中的交互锁定。
- 完成手动导航、自动导览、结束停止和窗口缩放验证。
用展位配置定义导览
每个展位都使用同一组字段,按钮与自动播放只改变当前索引,不直接修改产品模型。示例展厅沿 X 轴依次放置三个展品,间隔 6 个场景单位;相机统一位于展品前方 Z=8 的位置,并朝向略高于展台的目标点。
| 字段 | 展位 A 示例 | 用途 |
|---|---|---|
name |
智能音箱 |
面板标题 |
description |
查看机身与接口 |
展品讲解 |
camera |
[-6, 3.4, 8] |
镜头最终位置 |
target |
[-6, 1.3, 0] |
镜头最终观察中心 |
这些坐标是 Three.js 场景单位,不自动等于真实米数。展位 B、C 只需把 camera 与 target 的 X 坐标改为 0 和 6,导航逻辑就能复用。相机位置和观察目标必须一起插值;只移动相机会让画面在转场过程中偏离展品。
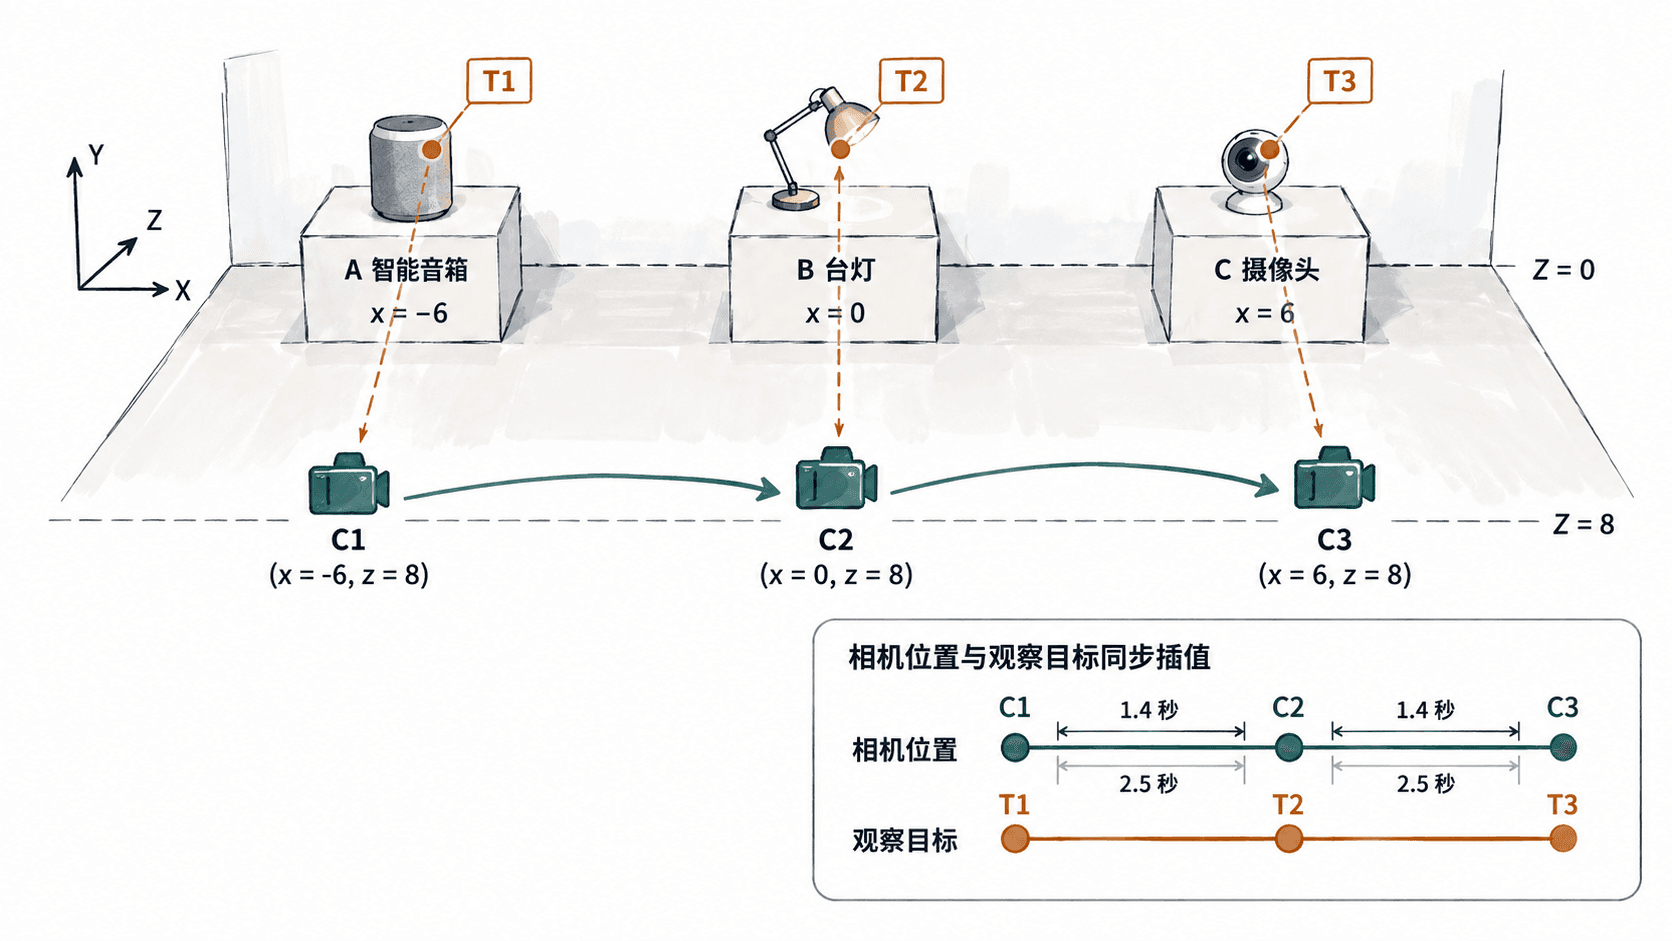
编写可运行的三展位演示
以下使用 Three.js 0.180.0 和 OrbitControls,仅需一个 index.html。场景中三个不同颜色的展品对应三个配置;goTo() 每次从当前相机与目标位置出发,因此连续点击下一展位也不会瞬移。转场时暂时关闭鼠标控制,完成后重新启用。
<!doctype html>
<html lang="zh-CN">
<head>
  <meta charset="utf-8">
  <meta name="viewport" content="width=device-width, initial-scale=1">
  <title>多展位镜头导览</title>
  <style>
    html, body { margin: 0; width: 100%; height: 100%; font-family: system-ui; }
    #stage { position: fixed; inset: 0; }
    #panel { position: fixed; top: 16px; left: 16px; width: 260px;
      padding: 16px; background: #fffffff0; border-radius: 12px; }
    button { margin: 8px 4px 0 0; }
  </style>
  <script type="importmap">
    {
      "imports": {
        "three": "https://cdn.jsdelivr.net/npm/three@0.180.0/build/three.module.js",
        "three/addons/": "https://cdn.jsdelivr.net/npm/three@0.180.0/examples/jsm/"
      }
    }
  </script>
</head>
<body>
  <div id="stage"></div>
  <aside id="panel">
    <strong id="name"></strong>
    <p id="description"></p>
    <span id="progress"></span>
    <div>
      <button id="prev">上一展位</button>
      <button id="next">下一展位</button>
      <button id="tour">开始自动导览</button>
    </div>
  </aside>
  <script type="module">
    import * as THREE from 'three';
    import { OrbitControls } from 'three/addons/controls/OrbitControls.js';

    // 一份配置同时驱动镜头、导航和讲解面板。
    const booths = [
      { name: '智能音箱', description: '查看机身与接口',
        camera: [-6, 3.4, 8], target: [-6, 1.3, 0] },
      { name: '氛围台灯', description: '观察灯罩与底座',
        camera: [0, 3.4, 8], target: [0, 1.3, 0] },
      { name: '室内摄像头', description: '观察镜头与支架',
        camera: [6, 3.4, 8], target: [6, 1.3, 0] }
    ];
    const $ = id => document.getElementById(id);
    const scene = new THREE.Scene();
    scene.background = new THREE.Color(0xf1f6f8);
    const camera = new THREE.PerspectiveCamera(
      52, innerWidth / innerHeight, 0.1, 100
    );
    const renderer = new THREE.WebGLRenderer({ antialias: true });
    renderer.setPixelRatio(Math.min(devicePixelRatio, 2));
    renderer.setSize(innerWidth, innerHeight);
    $('stage').appendChild(renderer.domElement);
    scene.add(new THREE.HemisphereLight(0xffffff, 0x91a0ad, 2.5));

    const floor = new THREE.Mesh(
      new THREE.PlaneGeometry(26, 14),
      new THREE.MeshStandardMaterial({ color: 0xdbe5e9 })
    );
    floor.rotation.x = -Math.PI / 2;
    scene.add(floor);

    booths.forEach((booth, i) => {
      const x = booth.target[0];
      const base = new THREE.Mesh(
        new THREE.CylinderGeometry(1.5, 1.5, 0.5, 48),
        new THREE.MeshStandardMaterial({ color: 0xffffff })
      );
      base.position.set(x, 0.25, 0);
      scene.add(base);
      const product = new THREE.Mesh(
        new THREE.BoxGeometry(1.4, 1.8, 1.2),
        new THREE.MeshStandardMaterial({
          color: [0x31a89b, 0xe7a65c, 0x6387c5][i]
        })
      );
      product.position.set(x, 1.4, 0);
      scene.add(product);
    });

    camera.position.set(...booths[0].camera);
    const controls = new OrbitControls(camera, renderer.domElement);
    controls.target.set(...booths[0].target);
    controls.enablePan = false;
    controls.minDistance = 3;
    controls.maxDistance = 14;
    controls.update();

    let current = 0;
    let moving = null;
    let autoTour = false;
    let nextAt = Infinity;

    function updatePanel() {
      $('name').textContent = booths[current].name;
      $('description').textContent = booths[current].description;
      $('progress').textContent = `${current + 1} / ${booths.length}`;
      $('prev').disabled = current === 0;
      $('next').disabled = current === booths.length - 1;
      $('tour').textContent = autoTour ? '停止自动导览' : '开始自动导览';
    }

    function goTo(index, fromTour = false) {
      if (index < 0 || index >= booths.length) return;
      if (!fromTour) autoTour = false;
      const booth = booths[index];
      // 取实时位置而非上个展位配置,快速连点也能连续转场。
      moving = {
        fromCamera: camera.position.clone(),
        toCamera: new THREE.Vector3(...booth.camera),
        fromTarget: controls.target.clone(),
        toTarget: new THREE.Vector3(...booth.target),
        start: performance.now(),
        duration: 1400
      };
      current = index;
      nextAt = Infinity;
      controls.enabled = false;
      updatePanel();
    }

    $('prev').addEventListener('click', () => goTo(current - 1));
    $('next').addEventListener('click', () => goTo(current + 1));
    $('tour').addEventListener('click', () => {
      autoTour = !autoTour;
      if (autoTour) {
        goTo(0, true); // 先恢复首站预设机位,再顺序导览
      }
      updatePanel();
    });

    function animate(time) {
      requestAnimationFrame(animate);
      if (moving) {
        const t = Math.min((time - moving.start) / moving.duration, 1);
        const eased = t * t * (3 - 2 * t);
        camera.position.lerpVectors(moving.fromCamera, moving.toCamera, eased);
        controls.target.lerpVectors(moving.fromTarget, moving.toTarget, eased);
        if (t >= 1) {
          moving = null;
          controls.enabled = true;
          nextAt = time + 2500;
        }
      }
      controls.update();
      if (autoTour && !moving && time >= nextAt) {
        if (current < booths.length - 1) goTo(current + 1, true);
        else {
          autoTour = false; // 最后一站停下,不无限循环
          updatePanel();
        }
      }
      renderer.render(scene, camera);
    }
    window.addEventListener('resize', () => {
      camera.aspect = innerWidth / innerHeight;
      camera.updateProjectionMatrix();
      renderer.setSize(innerWidth, innerHeight);
    });
    updatePanel();
    requestAnimationFrame(animate);
  </script>
</body>
</html>
预期结果:页面能看到三个颜色不同的展品及左上角信息面板。点击“下一展位”,画面在约 1.4 秒内平滑移至下一个展位,面板同步更新;点击“开始自动导览”,从首站起每站停留 2.5 秒,最后一站结束后停止自动前进。
本地运行与逐项验收
把上面的内容保存为 index.html。在该文件所在目录执行以下命令(需要已安装 Python 3),再用浏览器访问 http://localhost:8000。示例通过 CDN 加载 Three.js,因此首次打开需要网络连接,不要直接双击使用 file:// 打开。
python3 -m http.server 8000预期结果:终端启动监听 8000 端口的本地 HTTP 服务;浏览器打开后应正常渲染展厅。若端口已被占用,可将命令中的 8000 换成空闲端口,并同步修改浏览器地址。
- 依次按“下一展位”,面板应按智能音箱、氛围台灯、室内摄像头顺序更新;首站“上一展位”和末站“下一展位”应禁用。
- 在转场未结束时再次点击切换,镜头应从当时的位置继续移动,不应跳回上一个展位。
- 点击自动导览,观察约 1.4 秒转场和 2.5 秒停留;最后一站应自动停止。中途按“停止自动导览”,当前转场仍会完成,但不再前往下一站。
- 转场结束后拖动鼠标应可绕展品观察;调整浏览器宽度后,展品比例不应拉伸。
处理导览中的典型问题
镜头走到了展台背面: 先核对 camera 和 target 的坐标系。此例展品在 Z=0,相机在 Z=8;替换真实 GLB 模型后,应依据展品包围盒重新测定观察目标,不要照抄 [x, 1.3, 0]。
自动导览与手动操作互相抢控制权: 程序在手动 goTo() 时将 autoTour 设为 false,并在转场期间将 controls.enabled 设为 false。若删掉这两个约束,用户拖动时动画会持续覆盖相机。
转场末尾突然抖动: 必须同时更新 camera.position 与 controls.target,并在每帧调用 controls.update();不要只用 camera.lookAt(),却让 OrbitControls 仍保存旧目标。正式项目可在配置中增加展品 ID、镜头时长及可访问的文字说明,但应继续让镜头状态和面板内容共用同一个展位索引。