
Web 图形与 3D / 系统课时
Bloom 辉光如何保留主体细节
Bloom 辉光如何保留主体细节
展厅灯带和发光标识需要柔和光晕,但直接提高全屏辉光会让产品边缘、材质纹理一起泛白。这里使用 UnrealBloomPass 搭建可切换参数的演示场景,先筛选真正明亮的区域,再控制光晕扩散,最终让灯带醒目而主体轮廓清晰。
学习目标
- 解释
threshold、strength和radius的实际作用。 - 配置
EffectComposer、UnrealBloomPass与OutputPass。 - 在固定视角下比较辉光参数,并定位整屏泛白的原因。
辉光怎样叠回场景
UnrealBloomPass 对渲染结果做亮度筛选,把通过阈值的高亮区域进行多尺度模糊,再叠加回原图。因此它不只识别“发光材质”:过亮的镜面高光、白色展台也可能被提取。threshold 越低,参与扩散的普通表面越多;单纯降低 strength 只能让这些错误区域的光晕变淡。
在后处理链中先用 RenderPass 渲染线性 HDR 场景,再执行 Bloom,最后由 OutputPass 完成色调映射和输出色彩空间转换。不要在提取亮部之前就把 HDR 亮度压到显示范围内。
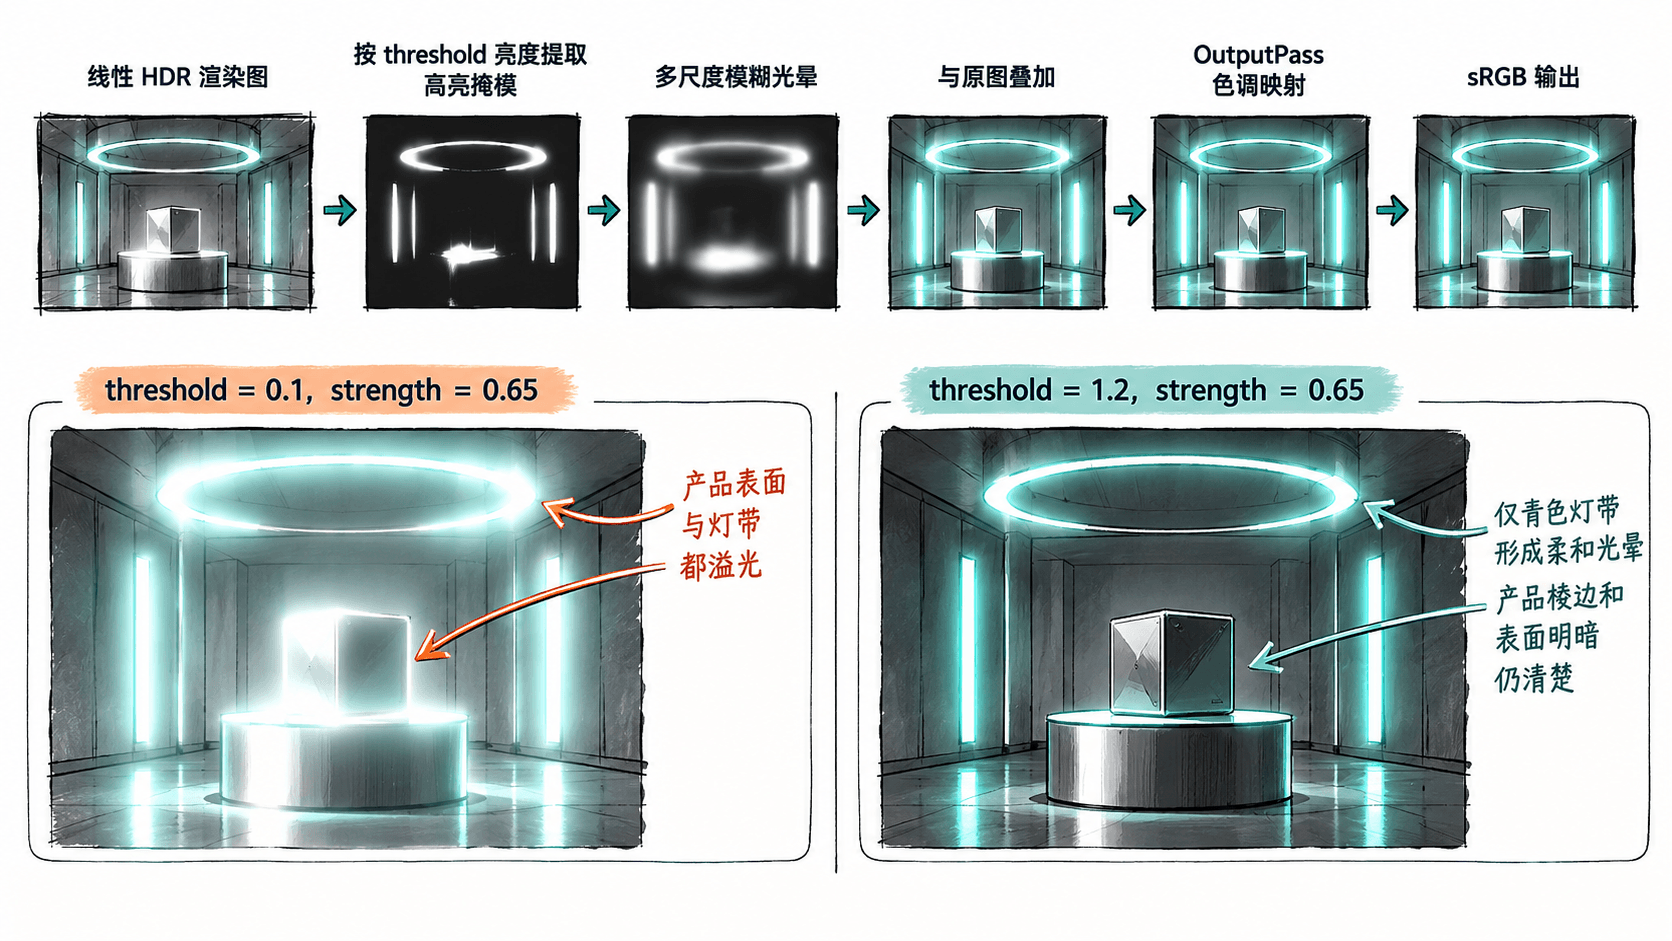
三个参数如何配合
| 参数 | 本例起点 | 调节依据 |
|---|---|---|
threshold |
1.2 |
线性 HDR 亮度门槛;先提高它以排除普通表面 |
strength |
0.65 |
已提取光晕的叠加强度;过大会遮盖灯带轮廓 |
radius |
0.2 |
多尺度模糊的扩散权重,范围 0~1;不是像素半径 |
emissiveIntensity |
4.0 |
只提高灯带材质的自发光,让其亮度越过门槛 |
以上数值是此演示场景的起点,不是适用于所有曝光和材质的固定配方。正确调节顺序是:保持相机、光照和曝光不变,先调 threshold 选亮部,再调 strength 控制强弱,最后微调 radius 观察光晕边缘。emissiveIntensity 不是 Bloom 参数,而是灯带材质的亮度来源。
跑通可切换的演示
使用 Three.js 0.180.0 的 WebGL 后处理 API。把下面内容保存为 index.html,在所在目录运行 python -m http.server 8000,浏览器访问 http://localhost:8000/;需要网络连接加载固定版本的 Three.js 模块。
<!doctype html>
<html lang="zh-CN">
<head>
<meta charset="utf-8">
<meta name="viewport" content="width=device-width,initial-scale=1">
<title>Bloom 参数对比</title>
<style>
body { margin: 0; overflow: hidden; background: #101820; }
#hint { position: fixed; top: 12px; left: 16px; color: white; font: 14px sans-serif; }
</style>
<script type="importmap">
{"imports":{
  "three":"https://cdn.jsdelivr.net/npm/three@0.180.0/build/three.module.js",
  "three/addons/":"https://cdn.jsdelivr.net/npm/three@0.180.0/examples/jsm/"
}}
</script>
</head>
<body>
<div id="hint"></div>
<script type="module">
import * as THREE from 'three';
import { EffectComposer } from 'three/addons/postprocessing/EffectComposer.js';
import { RenderPass } from 'three/addons/postprocessing/RenderPass.js';
import { UnrealBloomPass } from 'three/addons/postprocessing/UnrealBloomPass.js';
import { OutputPass } from 'three/addons/postprocessing/OutputPass.js';

const scene = new THREE.Scene();
scene.background = new THREE.Color(0x101820);
const camera = new THREE.PerspectiveCamera(45, innerWidth / innerHeight, 0.1, 100);
camera.position.set(3, 2.3, 5);
camera.lookAt(0, 0.85, 0);

const renderer = new THREE.WebGLRenderer({ antialias: true });
renderer.setSize(innerWidth, innerHeight);
renderer.toneMapping = THREE.ACESFilmicToneMapping;
renderer.toneMappingExposure = 1;
document.body.appendChild(renderer.domElement);

// 普通产品只反射灯光,不人为设置高自发光。
const product = new THREE.Mesh(
  new THREE.BoxGeometry(1.6, 1.3, 0.9),
  new THREE.MeshStandardMaterial({ color: 0x7289a1, metalness: 0.25, roughness: 0.4 })
);
product.position.y = 0.75;
scene.add(product);

const floor = new THREE.Mesh(
  new THREE.PlaneGeometry(20, 20),
  new THREE.MeshStandardMaterial({ color: 0x222c3a, roughness: 0.9 })
);
floor.rotation.x = -Math.PI / 2;
scene.add(floor);
scene.add(new THREE.AmbientLight(0xffffff, 0.6));
const keyLight = new THREE.DirectionalLight(0xffffff, 1.2);
keyLight.position.set(3, 5, 4);
scene.add(keyLight);

// 灯带使用超过阈值的 HDR 自发光,不必抬高全场照明。
const strip = new THREE.Mesh(
  new THREE.BoxGeometry(2.4, 0.09, 0.15),
  new THREE.MeshStandardMaterial({ color: 0x08303e, emissive: 0x00e5ff, emissiveIntensity: 4 })
);
strip.position.set(0, 1.75, 0.3);
scene.add(strip);

const composer = new EffectComposer(renderer);
composer.addPass(new RenderPass(scene, camera));
const bloom = new UnrealBloomPass(new THREE.Vector2(innerWidth, innerHeight), 0.65, 0.2, 1.2);
composer.addPass(bloom);
composer.addPass(new OutputPass());

const presets = {
  '1': { threshold: 0.1, strength: 0.65 },
  '2': { threshold: 1.2, strength: 0.65 },
  '3': { threshold: 1.2, strength: 2.0 }
};
function applyPreset(key) {
  bloom.threshold = presets[key].threshold;
  bloom.strength = presets[key].strength;
  document.querySelector('#hint').textContent =
    `按 1/2/3 切换 | threshold=${bloom.threshold} | strength=${bloom.strength}`;
  composer.render();
}
addEventListener('keydown', event => {
  if (presets[event.key]) applyPreset(event.key);
});
addEventListener('resize', () => {
  camera.aspect = innerWidth / innerHeight;
  camera.updateProjectionMatrix();
  renderer.setSize(innerWidth, innerHeight);
  composer.setSize(innerWidth, innerHeight);
  composer.render();
});
applyPreset('2');
</script>
</body>
</html>
预期结果:页面展示灰蓝色产品方块、地面和青色发光灯带。按 1 降低阈值,更多表面亮部可能出现光晕;按 2 恢复受控辉光,主体边界清楚;按 3 保持阈值但增强光晕,灯带周围的泛白明显加重。窗口改变大小后画面比例保持正常。
泛白时按什么顺序修复
- 先排除误选亮部:固定
strength=0.65,从threshold=0.1提到1.2,观察产品的高光是否停止扩散;若仍泛白,先检查主体照明和材质亮度。 - 再限制光晕扩散:保持阈值,逐步把
strength从2.0降到0.65,radius从0.5降到0.2;以灯带边缘仍可分辨为验收标准。 - 最后检查曝光与性能:固定
toneMappingExposure=1做 A/B 比较,确认OutputPass位于末尾,并在窗口缩放时同步调用composer.setSize。移动端若帧率下降,先降低渲染像素比和后处理分辨率,再考虑减少后处理效果。
验收时锁定同一视角,对比参数 1、2 和 3 的画面:参数 2 应仅在灯带周围出现适度光晕,且产品棱边、接触地面的明暗仍清楚,才算保留了主体细节。