
Web 图形与 3D / 系统课时
零件拆解与热点讲解如何组合
零件拆解与热点讲解如何组合
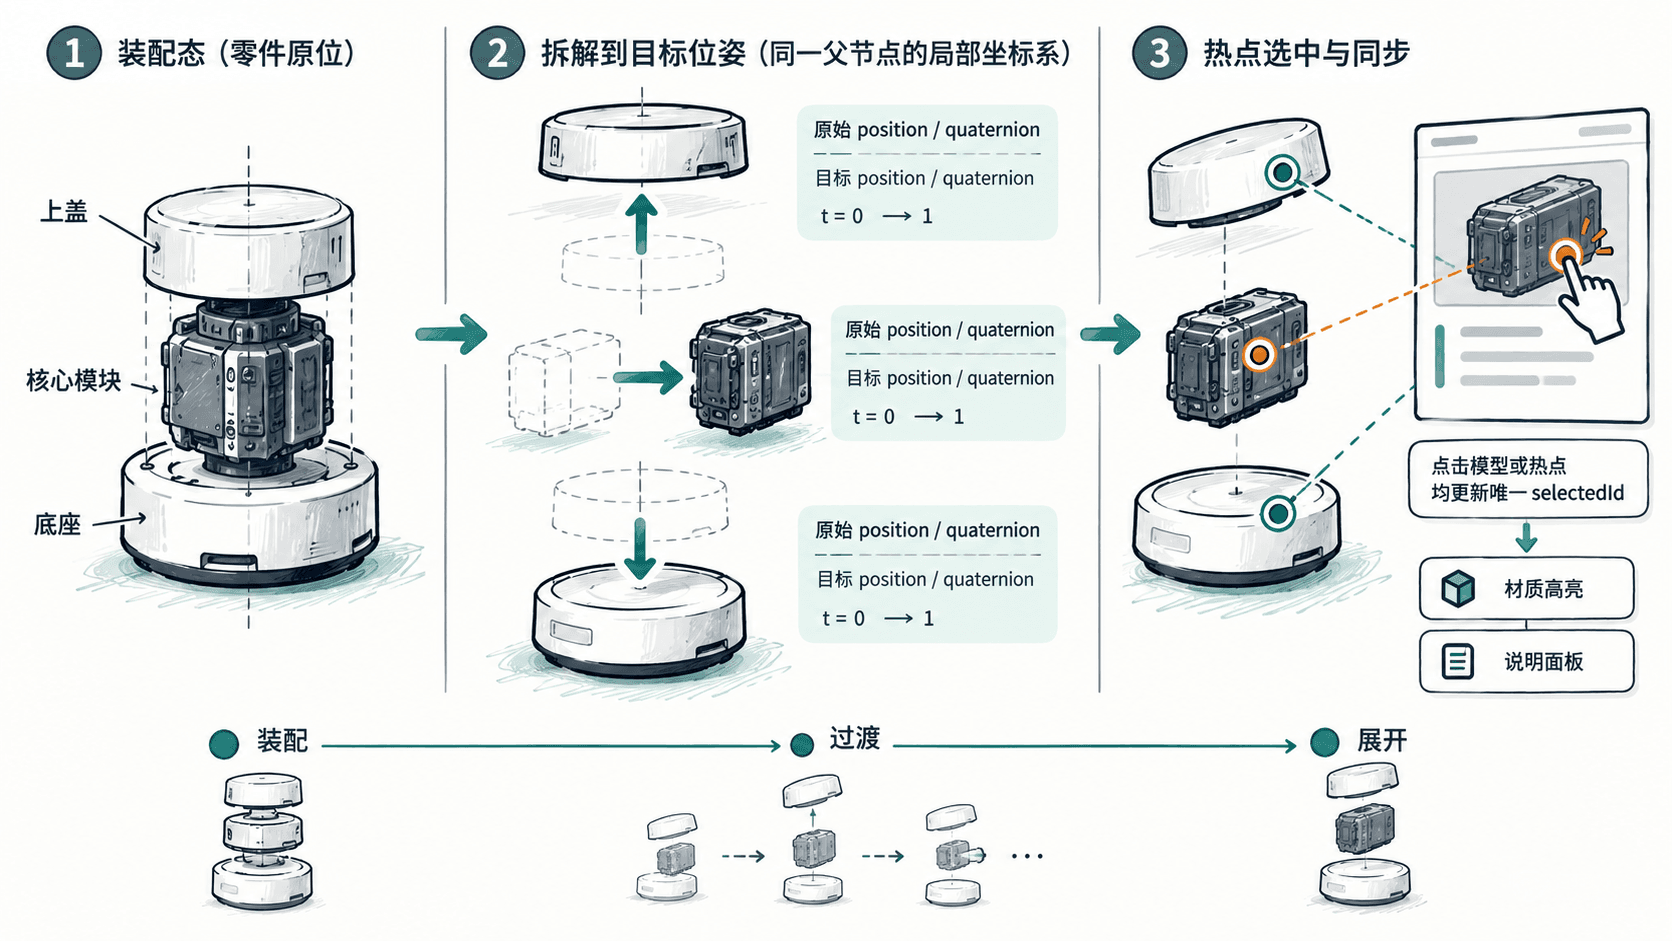
产品拆解展示要让每个零件从装配位置平滑移动到说明位置,还要保证点击模型与点击热点得到同一份讲解。这里用三个盒体模拟底座、核心模块和上盖,完成可反复展开、复位、选中高亮的交互,并保留替换为真实 glTF 模型的接口思路。
学习目标
- 保存零件的初始局部位姿并定义可复现的拆解目标位姿。
- 用统一动画进度控制展开与复位,避免连续点击造成跳变。
- 让三维拾取、屏幕热点、高亮材质和文字说明共用选中状态。
组织零件和目标位姿
以同一个 THREE.Group 为产品根节点,每个可拆解零件是其直接子节点。给底座、核心模块和上盖分别设置稳定的业务 ID;不要依赖导入顺序或运行时 Object3D.id。记录各节点原始的 position 和 quaternion,并将目标位置定义为初始位置加局部偏移量,而不是每次在当前位置累加偏移。
本例采用模型单位:底座向左 1.5、向下 0.45;核心模块向前 1.5;上盖向上 1.4 并绕局部 Y 轴转 0.26 弧度(约 15°)。拆解进度固定为 0~1:0 表示装配完成,1 表示完全展开,中间值用于插值。三个节点处于同一父坐标系,因此偏移量可以直接比较。
实现展开动画与热点联动
下例适用于 Three.js r186(0.186.1),使用标准 ES 模块,不依赖动画库。保存为 index.html;需要可联网获取 CDN 资源、浏览器支持 WebGL,并用本地 HTTP 服务打开。热点由普通 HTML 按钮绘制,逐帧把零件的世界位置投影到屏幕,避免拆解时热点停留在旧位置。
<!doctype html>
<html lang='zh-CN'>
<head>
<meta charset='utf-8'>
<meta name='viewport' content='width=device-width, initial-scale=1'>
<title>零件拆解与热点</title>
<style>
  body { margin: 0; font: 14px/1.5 sans-serif; }
  #stage { position: relative; width: 100vw; height: 100vh; overflow: hidden; }
  canvas { display: block; }
  #toolbar, #info { position: absolute; z-index: 3; padding: 10px; background: #ffffffdd; border-radius: 8px; }
  #toolbar { top: 12px; left: 12px; }
  #info { bottom: 12px; left: 12px; max-width: 300px; }
  .hotspot { position: absolute; z-index: 2; transform: translate(-50%, -50%); border: 1px solid #0c827a; border-radius: 18px; padding: 4px 9px; background: white; cursor: pointer; }
  .hotspot.active { background: #0c827a; color: white; }
</style>
</head>
<body>
<div id='stage'>
  <div id='toolbar'>
    <button id='explode'>展开</button>
    <button id='reset'>复位</button>
  </div>
  <div id='info'>点击零件或热点查看说明</div>
</div>
<script type='module'>
import * as THREE from 'https://cdn.jsdelivr.net/npm/three@0.186.1/build/three.module.js';

const stage = document.querySelector('#stage');
const info = document.querySelector('#info');
const scene = new THREE.Scene();
scene.background = new THREE.Color(0xf2f6fa);
const camera = new THREE.PerspectiveCamera(45, 1, 0.1, 100);
camera.position.set(4, 3, 6);
camera.lookAt(0, 0.2, 0);
camera.updateMatrixWorld();

const renderer = new THREE.WebGLRenderer({ antialias: true });
renderer.setPixelRatio(Math.min(window.devicePixelRatio, 2));
stage.prepend(renderer.domElement);
scene.add(new THREE.HemisphereLight(0xffffff, 0x7d8a9d, 2));
const sun = new THREE.DirectionalLight(0xffffff, 2);
sun.position.set(3, 5, 4);
scene.add(sun);
const product = new THREE.Group();
scene.add(product);

const specs = [
  { id: 'base', name: '底座', tip: '固定整机并承托内部模块。',
    size: [2.4, 0.35, 1.4], pos: [0, -0.65, 0],
    offset: [-1.5, -0.45, 0], turn: 0, color: 0x546a7d },
  { id: 'core', name: '核心模块', tip: '集中展示内部功能单元。',
    size: [1.55, 0.72, 1], pos: [0, -0.1, 0],
    offset: [0, 0, 1.5], turn: 0, color: 0x20aa9c },
  { id: 'cover', name: '上盖', tip: '遮护模块并可拆卸检修。',
    size: [2.35, 0.25, 1.35], pos: [0, 0.55, 0],
    offset: [0, 1.4, 0], turn: 0.26, color: 0x91a0b0 }
];
const yAxis = new THREE.Vector3(0, 1, 0);
const parts = specs.map(spec => {
  const mesh = new THREE.Mesh(
    new THREE.BoxGeometry(...spec.size),
    new THREE.MeshStandardMaterial({ color: spec.color, emissive: 0x000000 })
  );
  mesh.position.set(...spec.pos);
  product.add(mesh);
  // 快照只记录一次,防止来回拆解产生累积漂移。
  const original = { p: mesh.position.clone(), q: mesh.quaternion.clone() };
  const target = {
    p: original.p.clone().add(new THREE.Vector3(...spec.offset)),
    q: original.q.clone().multiply(
      new THREE.Quaternion().setFromAxisAngle(yAxis, spec.turn)
    )
  };
  const hotspot = document.createElement('button');
  hotspot.className = 'hotspot';
  hotspot.textContent = spec.name;
  stage.append(hotspot);
  hotspot.addEventListener('click', () => selectPart(spec.id));
  return { spec, mesh, original, target, hotspot };
});

let selectedId = null;
function selectPart(id) {
  selectedId = id;
  for (const part of parts) {
    const active = part.spec.id === selectedId;
    part.mesh.material.emissive.setHex(active ? 0x087e72 : 0x000000);
    part.hotspot.classList.toggle('active', active);
  }
  const selected = parts.find(part => part.spec.id === selectedId);
  info.textContent = selected
    ? `${selected.spec.name}:${selected.spec.tip}`
    : '点击零件或热点查看说明';
}

let progress = 0, from = 0, to = 0, startedAt = 0;
function moveTo(next) {
  // 动画被打断时,从当前进度重新出发,而非强制跳到端点。
  from = progress;
  to = next;
  startedAt = performance.now();
}
document.querySelector('#explode').addEventListener('click', () => moveTo(1));
document.querySelector('#reset').addEventListener('click', () => {
  moveTo(0);
  selectPart(null);
});

const raycaster = new THREE.Raycaster();
const pointer = new THREE.Vector2();
renderer.domElement.addEventListener('pointerup', event => {
  const box = renderer.domElement.getBoundingClientRect();
  pointer.set(
    (event.clientX - box.left) / box.width * 2 - 1,
    -(event.clientY - box.top) / box.height * 2 + 1
  );
  raycaster.setFromCamera(pointer, camera);
  const hit = raycaster.intersectObjects(parts.map(part => part.mesh), false)[0];
  selectPart(hit ? parts.find(part => part.mesh === hit.object).spec.id : null);
});

function resize() {
  const width = stage.clientWidth, height = stage.clientHeight;
  camera.aspect = width / height;
  camera.updateProjectionMatrix();
  renderer.setSize(width, height);
}
window.addEventListener('resize', resize);
resize();

const screen = new THREE.Vector3();
function frame(now) {
  const t = Math.min((now - startedAt) / 900, 1);
  const eased = t * t * (3 - 2 * t);
  progress = THREE.MathUtils.lerp(from, to, eased);
  for (const part of parts) {
    part.mesh.position.copy(part.original.p).lerp(part.target.p, progress);
    part.mesh.quaternion.copy(part.original.q).slerp(part.target.q, progress);
    // 更新矩阵后投影,热点位置始终由对应零件计算。
    part.mesh.updateWorldMatrix(true, false);
    part.mesh.getWorldPosition(screen);
    screen.y += part.spec.size[1] / 2 + 0.2;
    screen.project(camera);
    part.hotspot.style.left = `${(screen.x * 0.5 + 0.5) * stage.clientWidth}px`;
    part.hotspot.style.top = `${(-screen.y * 0.5 + 0.5) * stage.clientHeight}px`;
    part.hotspot.hidden = screen.z < -1 || screen.z > 1;
  }
  renderer.render(scene, camera);
  requestAnimationFrame(frame);
}
requestAnimationFrame(frame);
</script>
</body>
</html>
预期结果:页面出现三层简化产品模型及三个热点。点击“展开”后,零件在约 900 毫秒内移动并旋转到目标位姿;点击任一零件或热点,对应热点变色、模型高亮且说明更新;点“复位”后恢复初始位姿并清除选中状态。
使用已安装 Python 3 的环境,在 index.html 所在目录运行:
python -m http.server 8000预期结果:终端提示 HTTP 服务监听 8000 端口,在浏览器访问 http://localhost:8000/index.html 可打开示例。服务日志中的主机地址与访问时间可能不同。
检查连续操作与真实模型边界
- 点击核心模块的模型表面,再点击“上盖”热点:说明应立即切换为上盖,且始终只高亮一件;点击空白区域则取消选中。
- 在展开动画进行到一半时立即点击“复位”,随后再次“展开”:零件应从当下位置连续运动,不跳回起点,也不会越移越远。
- 缩放浏览器窗口:热点应继续跟随对应零件,不应固定在旧像素坐标。
替换为 glTF 时,应按模型的业务节点或独立零件组建立 partId 映射,并保存加载完成后的初始变换。如果零件分属带旋转或缩放的不同父节点,不能直接把世界坐标偏移加到它们的局部 position;应先统一拆解枢轴,或把目标世界坐标转换到各自父节点的局部坐标。复杂零件命中子网格时,要沿 parent 查找到带业务 ID 的零件根节点。
本例的 HTML 热点只做位置跟随,可能被前方零件视觉遮挡却仍可点击。正式展厅应补充遮挡检测与触摸命中区策略,并在卸载页面时移除监听器、销毁几何体和材质、调用 renderer.dispose()。