
Java 后端 / 系统课时
使用 Spring Cache
使用 Spring Cache
本课解决“查询结果如何缓存、更新后如何同步、删除后如何失效”三个问题。你将基于 Redis 配置 Spring Cache,并用注解完成一套可验证的用户查询缓存流程。
学习目标
- 配置基于 Redis 的
CacheManager - 正确使用
@Cacheable、@CachePut与@CacheEvict - 通过接口调用和 Redis 命令验证缓存命中与失效
Spring Cache 的工作方式
Spring Cache 是缓存抽象层,业务代码只描述“何时读缓存、写缓存或删缓存”,具体存储由 CacheManager 决定。切换为 Redis 后,注解本身通常不需要变化。
@Cacheable 在方法执行前查缓存,命中时直接返回;未命中时执行方法并写入结果。@CachePut 总会执行方法,再用返回值刷新缓存。@CacheEvict 用于删除指定键,适合删除数据或无法直接得到最新返回值的更新操作。
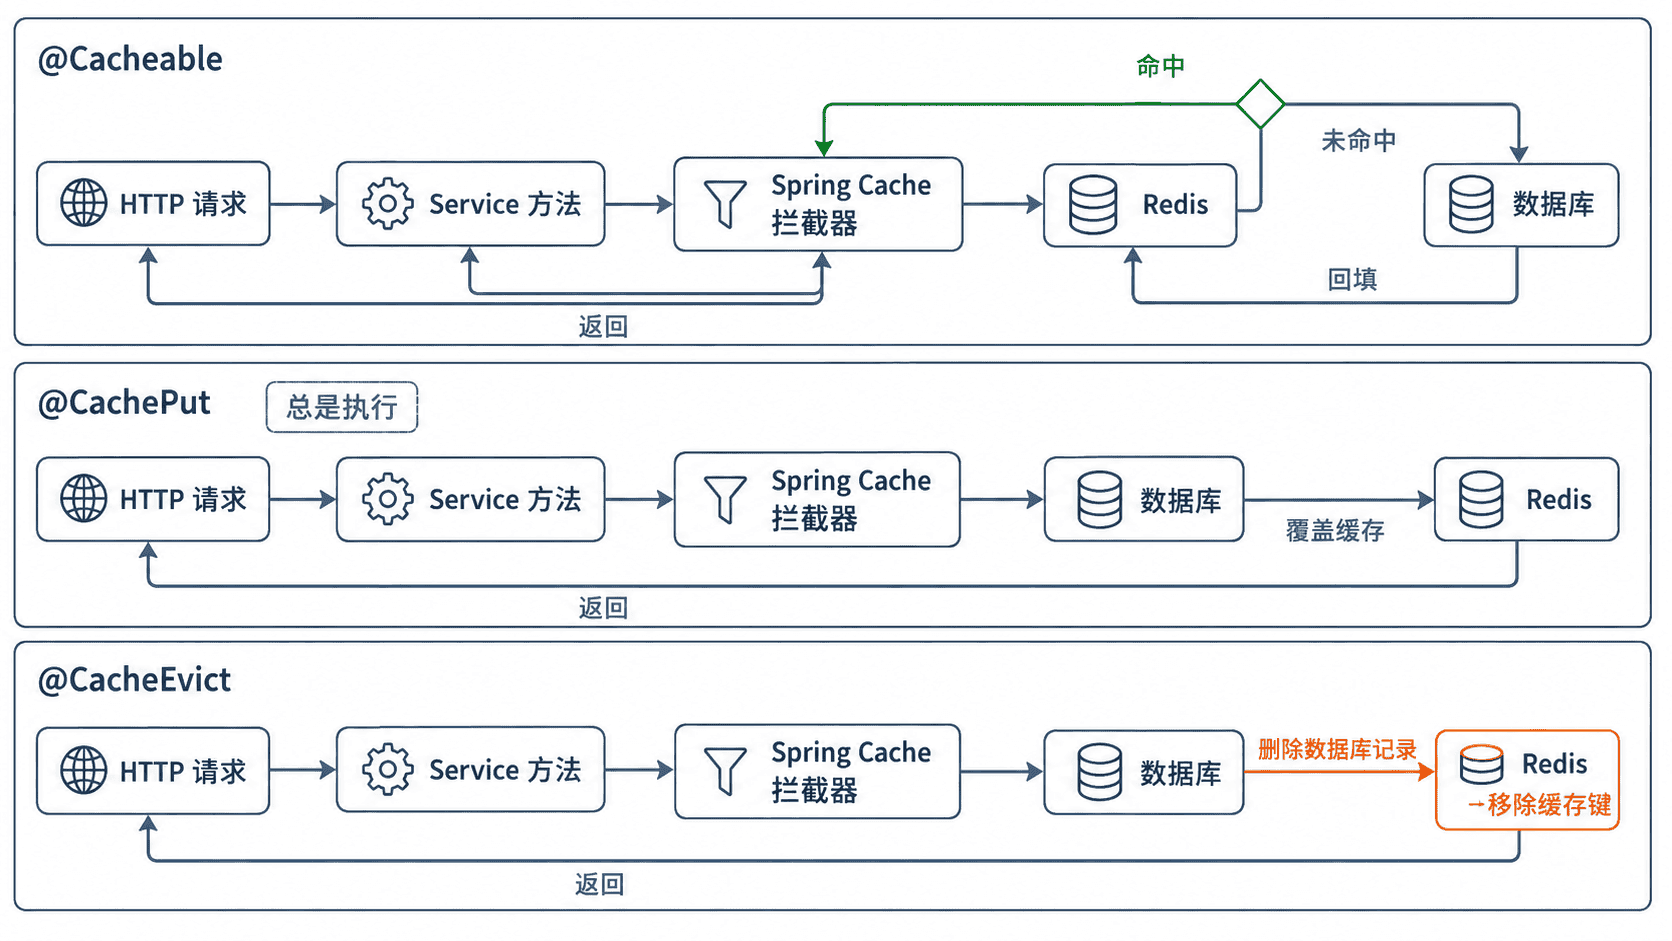
配置 Redis 缓存管理器
项目需要启用缓存抽象和 Redis 客户端。以下依赖由 Spring Boot 3 的依赖管理统一控制版本。
<dependencies>
    <dependency>
        <groupId>org.springframework.boot</groupId>
        <artifactId>spring-boot-starter-cache</artifactId>
    </dependency>
    <dependency>
        <groupId>org.springframework.boot</groupId>
        <artifactId>spring-boot-starter-data-redis</artifactId>
    </dependency>
</dependencies>
这是 Maven 配置片段。保存后执行 mvn dependency:tree,应能看到 spring-context-support 与 spring-data-redis 已被解析。
连接参数放在 application.yml。示例假设 Redis 运行在本机,实际端口和密码应按环境替换。
spring:
  data:
    redis:
      host: 127.0.0.1
      port: 6379
      timeout: 2s
配置生效后,应用启动时不应出现 Redis 连接异常;第一次访问缓存方法时会实际建立连接。
下面的配置为 user-detail 缓存设置 10 分钟过期时间,并采用字符串键和 JSON 值,便于跨实例共享。
package com.example.cache;

import java.time.Duration;
import java.util.Map;

import org.springframework.cache.CacheManager;
import org.springframework.cache.annotation.EnableCaching;
import org.springframework.context.annotation.Bean;
import org.springframework.context.annotation.Configuration;
import org.springframework.data.redis.cache.RedisCacheConfiguration;
import org.springframework.data.redis.cache.RedisCacheManager;
import org.springframework.data.redis.connection.RedisConnectionFactory;
import org.springframework.data.redis.serializer.GenericJackson2JsonRedisSerializer;
import org.springframework.data.redis.serializer.RedisSerializationContext;
import org.springframework.data.redis.serializer.StringRedisSerializer;

@Configuration
@EnableCaching
public class CacheConfig {

    @Bean
    CacheManager cacheManager(RedisConnectionFactory connectionFactory) {
        RedisCacheConfiguration defaults = RedisCacheConfiguration.defaultCacheConfig()
                .disableCachingNullValues()
                .serializeKeysWith(RedisSerializationContext.SerializationPair
                        .fromSerializer(new StringRedisSerializer()))
                .serializeValuesWith(RedisSerializationContext.SerializationPair
                        .fromSerializer(new GenericJackson2JsonRedisSerializer()))
                .entryTtl(Duration.ofMinutes(30));

        RedisCacheConfiguration userDetail = defaults.entryTtl(Duration.ofMinutes(10));

        return RedisCacheManager.builder(connectionFactory)
                .cacheDefaults(defaults)
                .withInitialCacheConfigurations(Map.of("user-detail", userDetail))
                .build();
    }
}
验证方法是启动应用后调用一次查询接口,再执行 redis-cli --scan --pattern 'user-detail*';出现对应键说明缓存管理器已工作。
用注解完成查询、更新和删除
下面的服务用内存 Map 模拟数据库,便于独立验证缓存行为。真实项目只需把 Map 操作替换为 Repository 或 Mapper 调用。
package com.example.cache;

import java.util.Map;
import java.util.concurrent.ConcurrentHashMap;
import java.util.concurrent.atomic.AtomicInteger;

import org.springframework.cache.annotation.CacheEvict;
import org.springframework.cache.annotation.CachePut;
import org.springframework.cache.annotation.Cacheable;
import org.springframework.stereotype.Service;

@Service
public class UserService {

    private final Map<Long, UserView> database = new ConcurrentHashMap<>();
    private final AtomicInteger queryCount = new AtomicInteger();

    public UserService() {
        database.put(1L, new UserView(1L, "Alice"));
    }

    @Cacheable(cacheNames = "user-detail", key = "#id", unless = "#result == null")
    public UserView findById(Long id) {
        System.out.println("query database, count=" + queryCount.incrementAndGet());
        return database.get(id);
    }

    @CachePut(cacheNames = "user-detail", key = "#result.id")
    public UserView update(Long id, String name) {
        UserView updated = new UserView(id, name);
        database.put(id, updated);
        return updated;
    }

    @CacheEvict(cacheNames = "user-detail", key = "#id")
    public void delete(Long id) {
        database.remove(id);
    }

    public record UserView(Long id, String name) {
    }
}
控制器暴露三个接口,分别对应查询、更新和删除。
package com.example.cache;

import org.springframework.http.ResponseEntity;
import org.springframework.web.bind.annotation.DeleteMapping;
import org.springframework.web.bind.annotation.GetMapping;
import org.springframework.web.bind.annotation.PathVariable;
import org.springframework.web.bind.annotation.PutMapping;
import org.springframework.web.bind.annotation.RequestBody;
import org.springframework.web.bind.annotation.RequestMapping;
import org.springframework.web.bind.annotation.RestController;

@RestController
@RequestMapping("/users")
public class UserController {

    private final UserService userService;

    public UserController(UserService userService) {
        this.userService = userService;
    }

    @GetMapping("/{id}")
    public ResponseEntity<UserService.UserView> find(@PathVariable Long id) {
        return ResponseEntity.ofNullable(userService.findById(id));
    }

    @PutMapping("/{id}")
    public UserService.UserView update(
            @PathVariable Long id,
            @RequestBody UpdateUserRequest request) {
        return userService.update(id, request.name());
    }

    @DeleteMapping("/{id}")
    public ResponseEntity<Void> delete(@PathVariable Long id) {
        userService.delete(id);
        return ResponseEntity.noContent().build();
    }

    public record UpdateUserRequest(String name) {
    }
}
连续执行两次查询,只应打印一次数据库查询日志;更新后再次查询应直接得到新值;删除后查询应返回 404。
curl -s http://localhost:<PORT>/users/1
curl -s http://localhost:<PORT>/users/1
curl -s -X PUT http://localhost:<PORT>/users/1 \
  -H 'Content-Type: application/json' \
  -d '{"name":"Bob"}'
curl -s -o /dev/null -w '%{http_code}\n' \
  -X DELETE http://localhost:<PORT>/users/1
curl -s -o /dev/null -w '%{http_code}\n' \
  http://localhost:<PORT>/users/1
预期结果
{"id":1,"name":"Alice"}
{"id":1,"name":"Alice"}
{"id":1,"name":"Bob"}
204
404
控制台中的 query database 在前两次 GET 期间只出现一次。<PORT> 为应用实际端口。
关键边界与常见错误
缓存注解依赖 Spring AOP 代理。同一个类内部使用 this.findById() 调用缓存方法会绕过代理,因此不会触发缓存。需要把缓存方法拆到独立 Bean,或从代理对象发起调用。
键表达式必须稳定且唯一。key = "#id" 适合单一资源;多租户系统应把租户标识纳入键。更新方法若可能返回空值,不要使用 key = "#result.id",否则会在计算键时抛出异常。
缓存不是数据库事务的一部分。数据库更新成功但缓存刷新失败时,应允许后续读取回源并重建;对强一致场景,可以在事务提交后删除缓存,而不是先删缓存再提交数据库。