
游戏引擎 / 系统课时
让摄像机平滑跟随角色
让摄像机平滑跟随角色
角色一移动,摄像机如果直接复制角色坐标,画面会紧贴目标跳动;如果只调整镜头旋转,又容易丢失跟随距离。本课在 Cocos Creator 3.8 中实现独立的第三人称跟随组件,让镜头保持固定偏移、平滑追近角色,并稳定朝向角色上半身。
学习目标
- 区分角色位置、期望机位和镜头注视点。
- 使用
lateUpdate、Vec3.lerp实现与帧率关联较小的平滑跟随。 - 在场景中挂载组件,检查跟随距离、延迟和异常跳动。
用两个目标点定义跟随镜头
场景里需要一个可移动的 Player 节点,以及一个带 Camera 组件的独立 FollowCamera 节点。不要把摄像机直接设为角色的子节点:那样角色移动或旋转时,摄像机会被父节点立即带走,难以单独控制阻尼。
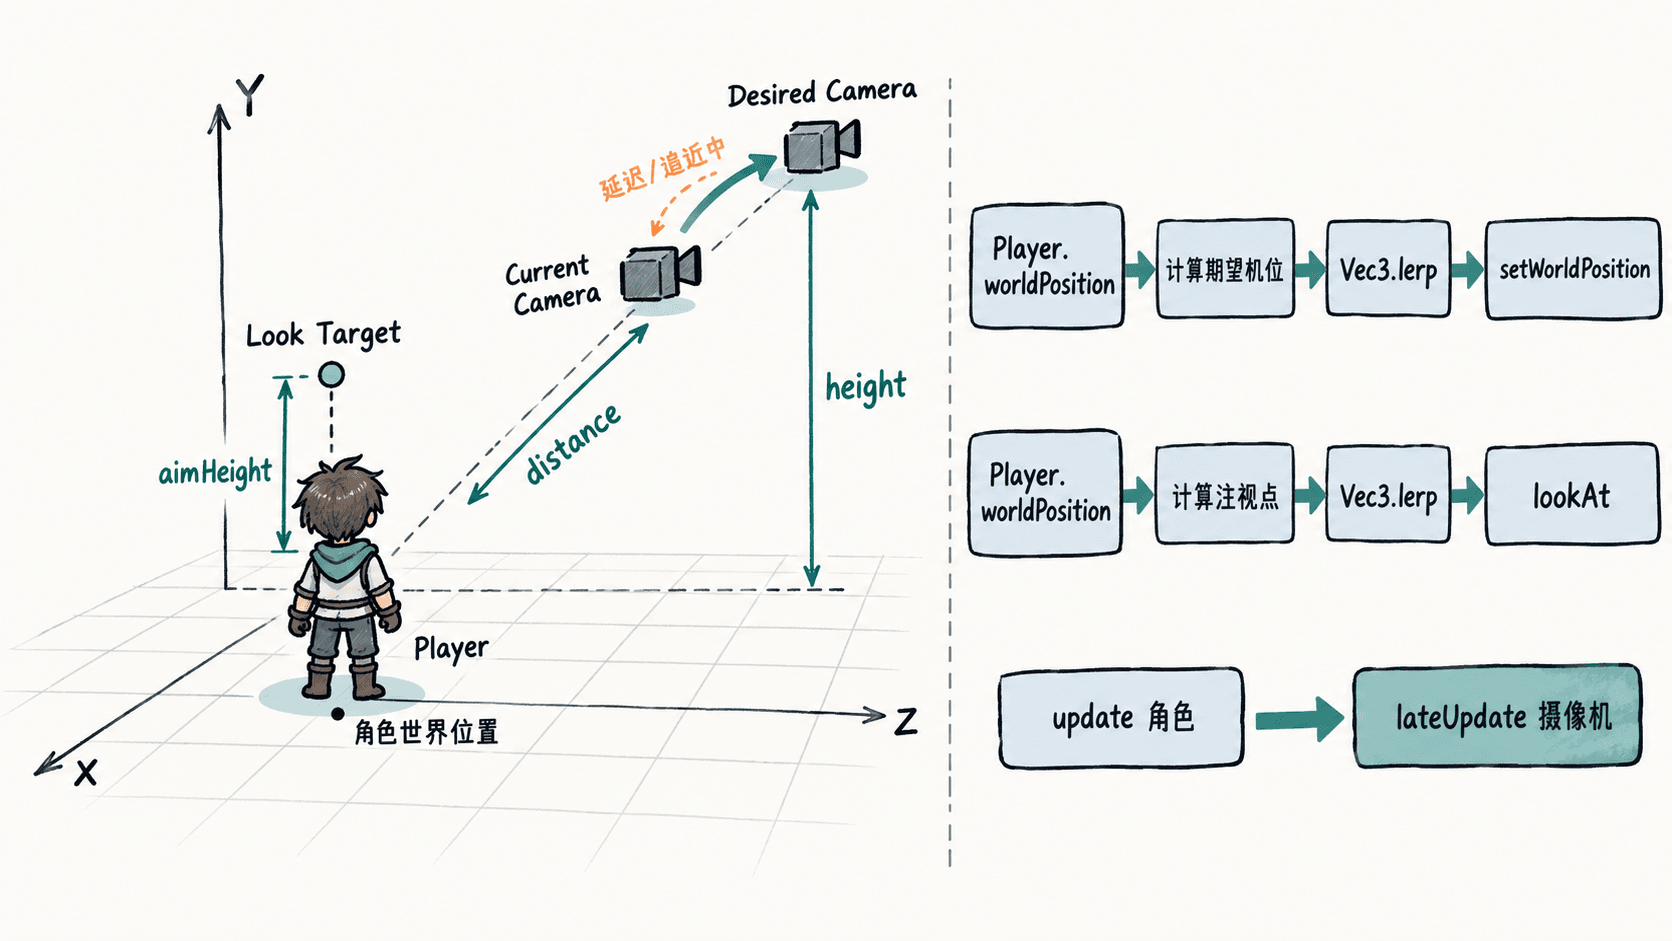
先采用世界坐标固定偏移:角色位于 (x, y, z) 时,期望机位是 (x, y + height, z + distance);注视点是 (x, y + aimHeight, z)。height 控制镜头高度,distance 控制从角色后方观察的距离,aimHeight 避免镜头只盯着脚底。这里的“后方”特指世界 +Z 方向,并不会随角色转身而改变。
编写平滑跟随组件
创建 SmoothFollow.ts,将以下完整组件挂到 FollowCamera。先在 start 初始化机位,避免开场从场景原点缓慢飞向角色;以后每帧只让镜头靠近期望机位,并同时平滑注视点。
import { _decorator, Component, Node, Vec3 } from 'cc';
const { ccclass, property } = _decorator;

@ccclass('SmoothFollow')
export class SmoothFollow extends Component {
    @property({ type: Node })
    target: Node | null = null;

    @property height = 3;
    @property distance = 6;
    @property aimHeight = 1.3;
    @property followSharpness = 8;

    private desired = new Vec3();
    private nextPosition = new Vec3();
    private desiredAim = new Vec3();
    private smoothAim = new Vec3();

    private calculateTargets(): void {
        if (!this.target) return;
        const p = this.target.worldPosition;
        this.desired.set(p.x, p.y + this.height, p.z + this.distance);
        this.desiredAim.set(p.x, p.y + this.aimHeight, p.z);
    }

    start(): void {
        if (!this.target) return;
        this.calculateTargets();
        // 初始化到正确机位,避免开场长距离追赶。
        this.node.setWorldPosition(this.desired);
        this.smoothAim.set(this.desiredAim);
        this.node.lookAt(this.smoothAim, Vec3.UP);
    }

    lateUpdate(dt: number): void {
        if (!this.target) return;
        this.calculateTargets();
        // 指数插值把每秒追近程度与实际帧时长关联。
        const k = Math.max(0, this.followSharpness);
        const t = 1 - Math.exp(-k * Math.max(0, dt));
        Vec3.lerp(this.nextPosition, this.node.worldPosition, this.desired, t);
        Vec3.lerp(this.smoothAim, this.smoothAim, this.desiredAim, t);
        this.node.setWorldPosition(this.nextPosition);
        this.node.lookAt(this.smoothAim, Vec3.UP);
    }
}
预期结果:将 target 指向 Player 并运行预览后,镜头初始就位。角色匀速移动时,画面平稳追随且与期望机位存在少量滞后;角色停止时,镜头逐渐收敛到设定的高度和距离。此组件不主动打印日志。
理解插值与更新时机
每帧的插值比例为 $t = 1 - e^{-k\Delta t}$,其中 k 对应 followSharpness,Δt 是帧间隔。与每帧固定使用 0.1 不同,这种写法在常见帧率变化下能保持较接近的跟随手感。k 越大,追随越紧;k 越小,拖尾越明显。k = 0 会让镜头停在当前位置。
角色通常在 update 中修改位置,摄像机在 lateUpdate 里读取本帧更新后的目标,更容易避免“镜头比角色慢一帧”的抖动。这里使用 worldPosition 与 setWorldPosition 配套操作,不直接修改只读的世界位置属性。实际项目如果由物理系统驱动角色,还要检查角色渲染插值与物理步进是否匹配。
验证与边界处理
先把 followSharpness 依次调成 3、8、18,观察转向和急停时的镜头滞后;再调整 distance 与 height,确认不会遮住角色。若目标节点未绑定,组件会安全跳过更新;摄像机距注视点也不能为零,否则朝向无定义。
这套方案适合初期的固定方位第三人称镜头;需要自由环绕或墙体防穿时,应保留“期望机位→修正→最终机位”的结构,再分别加入角度控制和碰撞查询。