
Web 图形与 3D / 系统课时
处理 GPUDevice 丢失后的恢复
处理 GPUDevice 丢失后的恢复
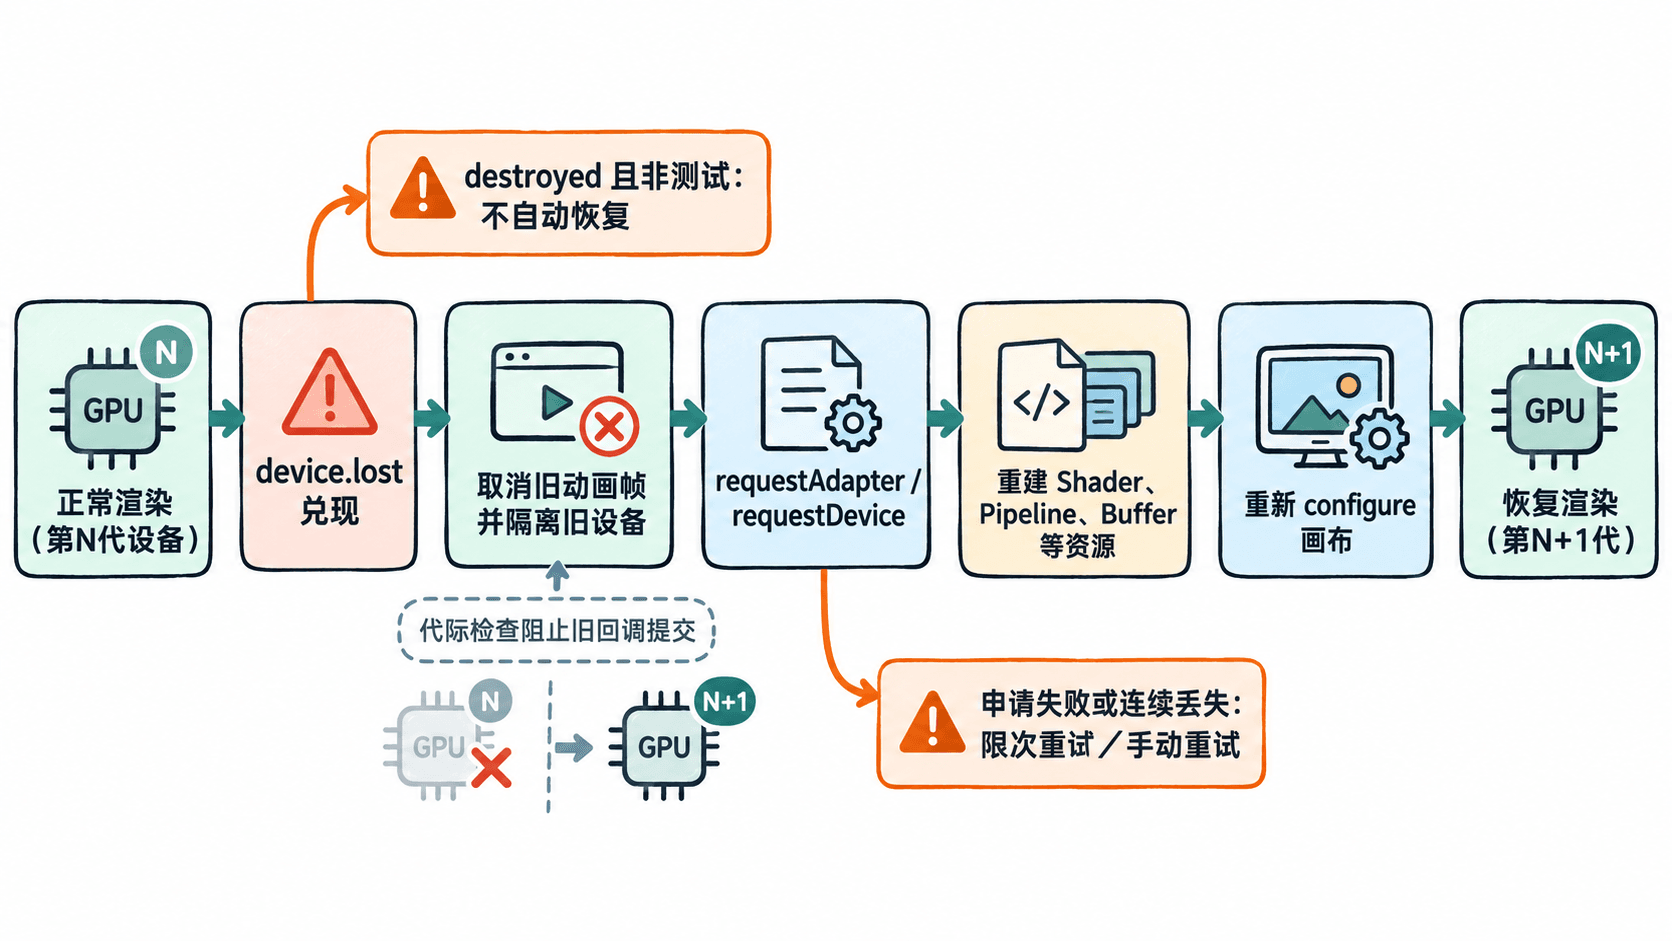
浏览器回收 GPU 资源、驱动重置或应用主动销毁设备后,原来的 GPUDevice 不能继续提交命令。本篇用一个能持续更新背景色的三角形页面,实现丢失监听、旧帧隔离、新设备申请、资源重建和画面恢复,并通过按钮验证整条恢复链路。
学习目标
- 使用
device.lost判断设备失效,区分主动销毁与非预期丢失。 - 重新创建 GPU 资源和渲染管线,并把画布绑定到新设备。
- 通过模拟丢失检验恢复效果,避免旧异步任务重复提交命令。
识别丢失并隔离旧资源
GPUDevice.lost 是一个 Promise,不是需要 addEventListener 的事件。它在设备失效时兑现,得到包含 reason 和 message 的信息。reason === "destroyed" 通常说明代码调用了 device.destroy();其他情况按非预期丢失处理。message 仅供日志诊断,不要依赖其文字做分支判断;接口行为可参阅 MDN 的设备丢失文档。
旧设备创建的 GPUBuffer、GPUTexture、GPURenderPipeline、GPUBindGroup 和命令编码器都不能搬到新设备上。恢复时保留 CPU 侧的场景数据与 WGSL 源码,但必须重新申请设备、创建 GPU 对象、执行 GPUCanvasContext.configure()。还要取消旧的 requestAnimationFrame,使用代际编号拦住晚到的回调。
实现可恢复的渲染循环
将以下完整页面保存为 index.html。在文件所在目录运行 python3 -m http.server 8000,再用支持 WebGPU 的浏览器访问 http://localhost:8000/;localhost 可作为安全上下文,普通远程 HTTP 页面通常无法使用 WebGPU。示例以两个按钮分别测试主动销毁后的恢复和人工重新初始化。
<!doctype html>
<html lang="zh-CN">
<head>
  <meta charset="utf-8">
  <title>WebGPU 设备恢复</title>
</head>
<body>
  <p id="status">准备中</p>
  <canvas id="screen" width="640" height="360"></canvas>
  <p>
    <button id="simulate">模拟设备丢失</button>
    <button id="retry">手动重试</button>
  </p>
  <script type="module">
    const status = document.querySelector("#status");
    const canvas = document.querySelector("#screen");
    const context = canvas.getContext("webgpu");
    let device = null, pipeline = null, frameId = 0;
    let generation = 0, retries = 0, simulated = false;

    const wgsl = `
      @vertex fn vs(@builtin(vertex_index) id: u32)
          -> @builtin(position) vec4f {
        let points = array<vec2f, 3>(
          vec2f(0.0, 0.7), vec2f(-0.7, -0.7), vec2f(0.7, -0.7)
        );
        return vec4f(points[id], 0.0, 1.0);
      }
      @fragment fn fs() -> @location(0) vec4f {
        return vec4f(0.15, 0.82, 0.72, 1.0);
      }`;

    async function start() {
      const current = ++generation;
      simulated = false;
      cancelAnimationFrame(frameId);
      frameId = 0;
      device?.destroy();
      device = null;
      pipeline = null;
      status.textContent = "正在申请设备";

      try {
        if (!navigator.gpu || !context) {
          throw new Error("需要受支持的 WebGPU 与安全上下文");
        }
        const adapter = await navigator.gpu.requestAdapter();
        if (!adapter) throw new Error("没有可用的 GPUAdapter");
        const next = await adapter.requestDevice();
        if (current !== generation) {
          next.destroy();
          return;
        }
        device = next;

        // 每代设备独立监听丢失,旧代回调不得修改新代状态。
        next.lost.then(info => {
          if (current !== generation) return;
          cancelAnimationFrame(frameId);
          frameId = 0;
          device = null;
          pipeline = null;
          console.warn("GPUDevice lost:", info.reason, info.message);
          const recover = simulated || info.reason !== "destroyed";
          simulated = false;
          status.textContent = `设备丢失:${info.reason ?? "unknown"}`;
          if (recover && retries < 3) {
            const delay = 500 * ++retries;
            setTimeout(() => {
              if (current === generation) void start();
            }, delay);
          } else if (recover) {
            status.textContent += ";请手动重试";
          }
        });

        // Shader、Pipeline 和画布配置必须绑定到新设备。
        const format = navigator.gpu.getPreferredCanvasFormat();
        const shader = next.createShaderModule({ code: wgsl });
        pipeline = next.createRenderPipeline({
          layout: "auto",
          vertex: { module: shader, entryPoint: "vs" },
          fragment: { module: shader, entryPoint: "fs",
                      targets: [{ format }] },
          primitive: { topology: "triangle-list" }
        });
        context.configure({ device: next, format, alphaMode: "opaque" });

        function draw(time) {
          if (current !== generation || device !== next) return;
          try {
            const encoder = next.createCommandEncoder();
            const pass = encoder.beginRenderPass({
              colorAttachments: [{
                view: context.getCurrentTexture().createView(),
                clearValue: {
                  r: 0.10 + 0.04 * Math.sin(time / 500),
                  g: 0.13, b: 0.20, a: 1
                },
                loadOp: "clear", storeOp: "store"
              }]
            });
            pass.setPipeline(pipeline);
            pass.draw(3);
            pass.end();
            next.queue.submit([encoder.finish()]);
            status.textContent = `运行中:第 ${current} 代设备`;
            frameId = requestAnimationFrame(draw);
          } catch (error) {
            status.textContent = `帧提交暂停:${error.message}`;
          }
        }
        frameId = requestAnimationFrame(draw);
      } catch (error) {
        if (current !== generation) return;
        status.textContent = `初始化失败:${error.message}`;
        const failed = device;
        device = null;
        pipeline = null;
        failed?.destroy();
      }
    }

    document.querySelector("#simulate").onclick = () => {
      if (device) {
        simulated = true; // 仅测试时允许主动 destroy 后自动恢复。
        device.destroy();
      }
    };
    document.querySelector("#retry").onclick = () => {
      retries = 0;
      void start();
    };
    void start();
  </script>
</body>
</html>
预期结果:画布中央显示青绿色三角形,深色背景亮度缓慢变化,页面提示“运行中:第 1 代设备”。点击“模拟设备丢失”后,旧设备由 destroy() 主动失效;约 500 毫秒后重新初始化,三角形与背景动画恢复,代际编号增大。实际耗时取决于浏览器和 GPU,控制台中的丢失说明也可能不同。
验证失败与恢复边界
按以下顺序检查,避免把“重新获得 GPUDevice”误判为“画面已恢复”:
- 点击“模拟设备丢失”,观察状态变化,并在开发者工具 Console 中确认出现设备丢失日志;测试按钮特意允许
destroyed进入恢复流程。 - 确认三角形重新出现、背景仍在变化,且代际编号从 1 增大。若画布空白,检查新管线创建与
context.configure({ device: next, ... })是否执行。 - 在恢复过程中点击“手动重试”,确认最终只有一条渲染循环继续工作。
generation检查用于阻止旧的异步申请和绘制回调操作当前设备。 - 若连续丢失,示例最多自动重试 3 次,间隔依次为 500、1000、1500 毫秒,然后提示手动重试。真实项目可改用指数退避,并在页面隐藏时暂停高频恢复尝试。
此示例只需重建着色器模块和管线;粒子模拟或多 Pass 项目还须重建存储缓冲区、纹理、绑定组、深度附件及其依赖关系,并从 CPU 快照或可重算的初始数据恢复 GPU 状态。