
Web 图形与 3D / 系统课时
配置顶点属性格式与步长
配置顶点属性格式与步长
把位置和颜色连续写入同一个顶点缓冲区后,GPU 并不知道每几个字节算一个顶点,也不知道哪些字节对应 WGSL 输入。本课用一个彩色三角形将 arrayStride、offset、format 和 shaderLocation 对齐,并通过实际绘制验证读取顺序。
学习目标
- 根据交错顶点数据计算每个属性的字节偏移和顶点步长。
- 将
GPUVertexBufferLayout中的属性位置对应到 WGSL@location。 - 绘制彩色三角形,识别步长、偏移和输入位置配置错误。
用字节而不是元素数描述布局
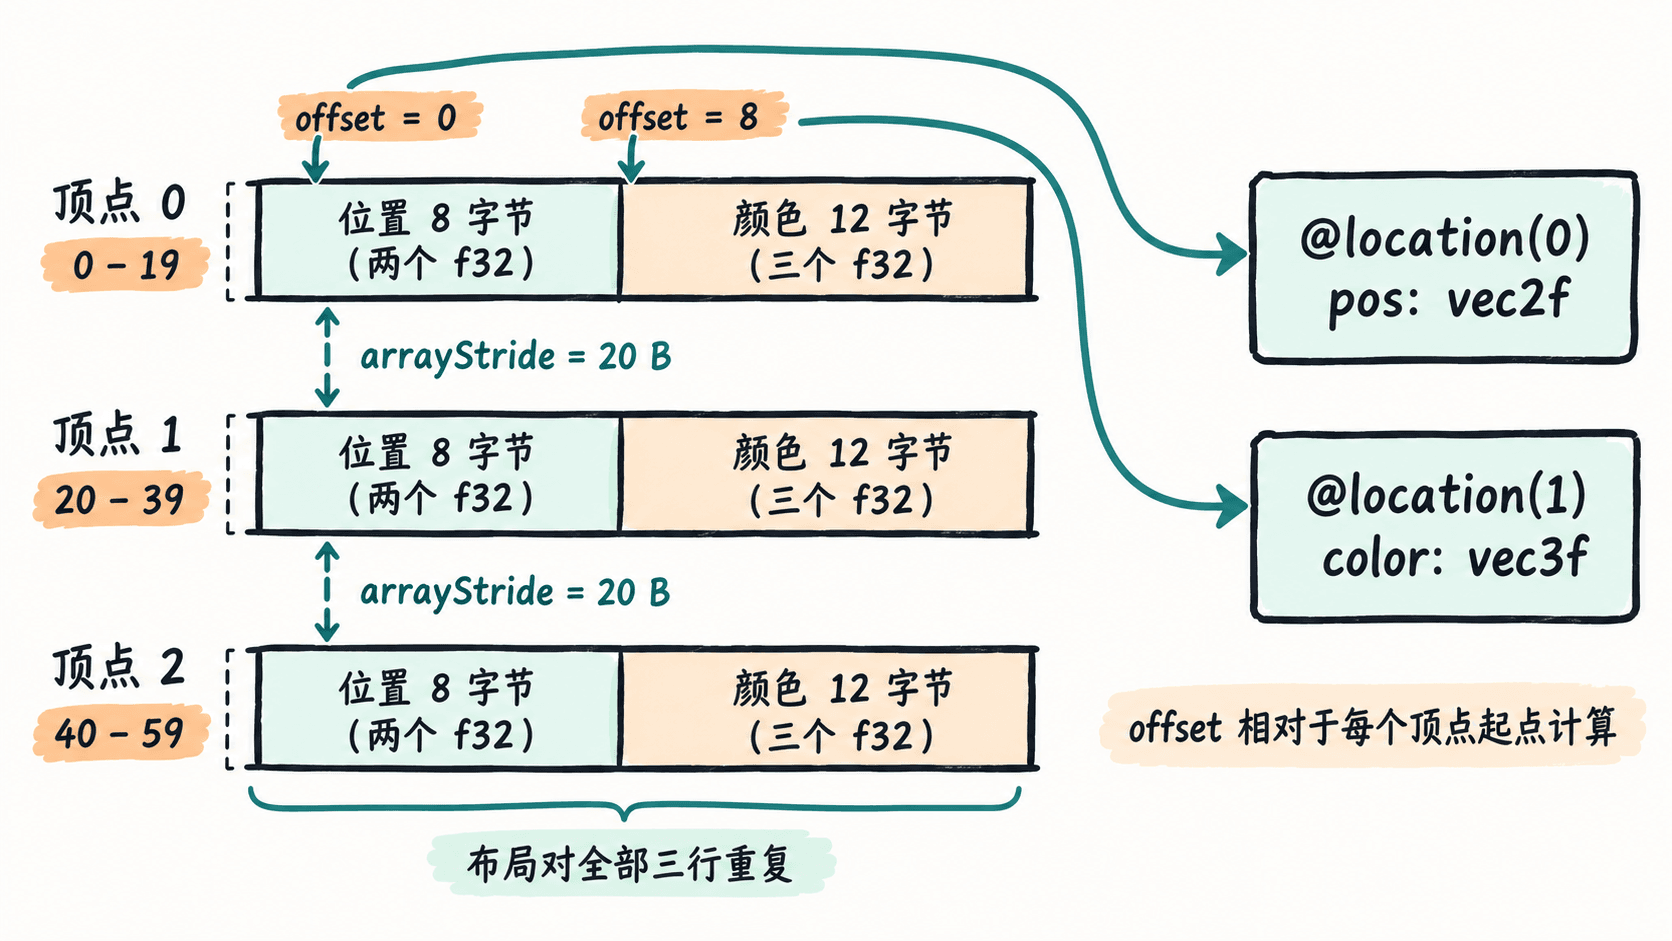
假设一个顶点依次存储二维位置 (x, y) 和 RGB 颜色 (r, g, b),共 5 个 f32。每个 f32 占 4 字节,因此每个顶点是 20 字节,三个顶点是 60 字节。
| 属性 | 数据格式 | 相对顶点起点的 offset |
对应 WGSL 输入 |
|---|---|---|---|
| 位置 | float32x2,8 字节 |
0 |
@location(0) pos: vec2f |
| 颜色 | float32x3,12 字节 |
8 |
@location(1) color: vec3f |
arrayStride: 20 表示处理下一个顶点时,基地址向后移动 20 字节;offset 是该顶点内部属性的字节偏移,不是 Float32Array 的元素下标。shaderLocation 指向着色器的 @location,与资源绑定的 @binding 无关。
在浏览器中实际绘制
在支持 WebGPU 的桌面浏览器中打开 HTTPS 页面或 localhost,把下列完整 JavaScript 粘贴到开发者工具 Console 执行。代码自行创建画布,不依赖 HTML 模板或第三方库。
(async () => {
  if (!isSecureContext || !navigator.gpu) {
    throw new Error("需要安全上下文及支持 WebGPU 的浏览器");
  }
  const adapter = await navigator.gpu.requestAdapter();
  if (!adapter) throw new Error("没有可用的 GPU 适配器");
  const device = await adapter.requestDevice();

  const canvas = document.createElement("canvas");
  canvas.width = 640;
  canvas.height = 360;
  document.body.append(canvas);
  const context = canvas.getContext("webgpu");
  if (!context) throw new Error("无法创建 WebGPU 画布上下文");
  const format = navigator.gpu.getPreferredCanvasFormat();
  context.configure({ device, format, alphaMode: "opaque" });

  // 每五个浮点数对应一个顶点:先位置,后 RGB。
  const vertices = new Float32Array([
    -0.65, -0.60, 1, 0, 0,
     0.65, -0.60, 0, 1, 0,
     0.00,  0.65, 0, 0, 1,
  ]);
  const buffer = device.createBuffer({
    size: vertices.byteLength,
    usage: GPUBufferUsage.VERTEX | GPUBufferUsage.COPY_DST,
  });
  device.queue.writeBuffer(buffer, 0, vertices);

  const shader = device.createShaderModule({ code: `
    struct VSOut {
      @builtin(position) position: vec4f,
      @location(0) color: vec3f,
    };

    @vertex fn vs_main(
      @location(0) pos: vec2f,
      @location(1) color: vec3f
    ) -> VSOut {
      var out: VSOut;
      out.position = vec4f(pos, 0.0, 1.0);
      out.color = color;
      return out;
    }

    @fragment fn fs_main(@location(0) color: vec3f)
      -> @location(0) vec4f {
      return vec4f(color, 1.0);
    }
  ` });

  const pipeline = device.createRenderPipeline({
    layout: "auto",
    vertex: {
      module: shader,
      entryPoint: "vs_main",
      buffers: [{
        arrayStride: 20, // 五个 f32,每个四字节
        stepMode: "vertex",
        attributes: [
          { shaderLocation: 0, offset: 0, format: "float32x2" },
          { shaderLocation: 1, offset: 8, format: "float32x3" },
        ],
      }],
    },
    fragment: {
      module: shader,
      entryPoint: "fs_main",
      targets: [{ format }],
    },
    primitive: { topology: "triangle-list" },
  });

  const encoder = device.createCommandEncoder();
  const pass = encoder.beginRenderPass({
    colorAttachments: [{
      view: context.getCurrentTexture().createView(),
      loadOp: "clear",
      storeOp: "store",
      clearValue: { r: 0.08, g: 0.11, b: 0.16, a: 1 },
    }],
  });
  pass.setPipeline(pipeline);
  pass.setVertexBuffer(0, buffer); // 绑定到 buffers[0] 对应的槽位
  pass.draw(3);
  pass.end();
  device.queue.submit([encoder.finish()]);
  console.log(`顶点数 3;步长 20 字节;缓冲区 ${vertices.byteLength} 字节`);
})().catch(console.error);
预期输出(Console):
顶点数 3;步长 20 字节;缓冲区 60 字节页面下方出现一个深色背景的三角形,三个顶点依次为红、绿、蓝,内部颜色平滑插值。画布尺寸为 640×360;如果页面 CSS 限制画布显示宽度,实际呈现尺寸可能变化,但缓冲区仍为 60 字节。
按读取顺序排查错位
GPU 先通过 setVertexBuffer(0, buffer) 找到顶点缓冲槽位 0,再以每顶点 20 字节的步长推进地址,最后依 offset 取属性并按 shaderLocation 送到顶点着色器。attributes 数组的排列顺序不负责决定输入位置,真正决定映射的是位置编号。
- 把
arrayStride误设为5:它的单位是字节且要求为 4 的倍数,会触发布局验证错误;应改为20。 - 把颜色
offset误写成2:这是浮点数下标而非字节偏移,不满足float32x3的 4 字节对齐;应使用8。 - 把位置与颜色的
shaderLocation交换:数据会送到错误的 WGSL 输入,可能出现坐标扭曲和颜色异常;应按@location(0)和@location(1)对应。 - 把
stepMode改为"instance":每实例而非每顶点推进数据;当前仅绘制一个实例时,三个顶点读取同一记录,三角形通常退化成一个点。这里保持"vertex"。
当三个顶点的坐标与颜色均正确时,就能确定 CPU 数组的字节布局、管线顶点属性描述和 WGSL 输入已对齐。