
Web 图形与 3D / 系统课时
生成阴影贴图并采样深度
生成阴影贴图并采样深度
这次要让场景中的立方体在地面投出可见阴影。我们先从光源视角将最近表面深度写进纹理,再从相机视角绘制场景,并比较每个片元在光源空间中的深度与贴图记录。完成后,你会得到不依赖第三方图形库的 WebGPU 双通道示例。
学习目标
- 创建可供后续采样的 1024×1024 光源深度纹理。
- 正确换算光源裁剪坐标,使用比较采样器判断阴影。
- 通过画面变化验证深度偏移和通道执行顺序。
从光源视角保存最近深度
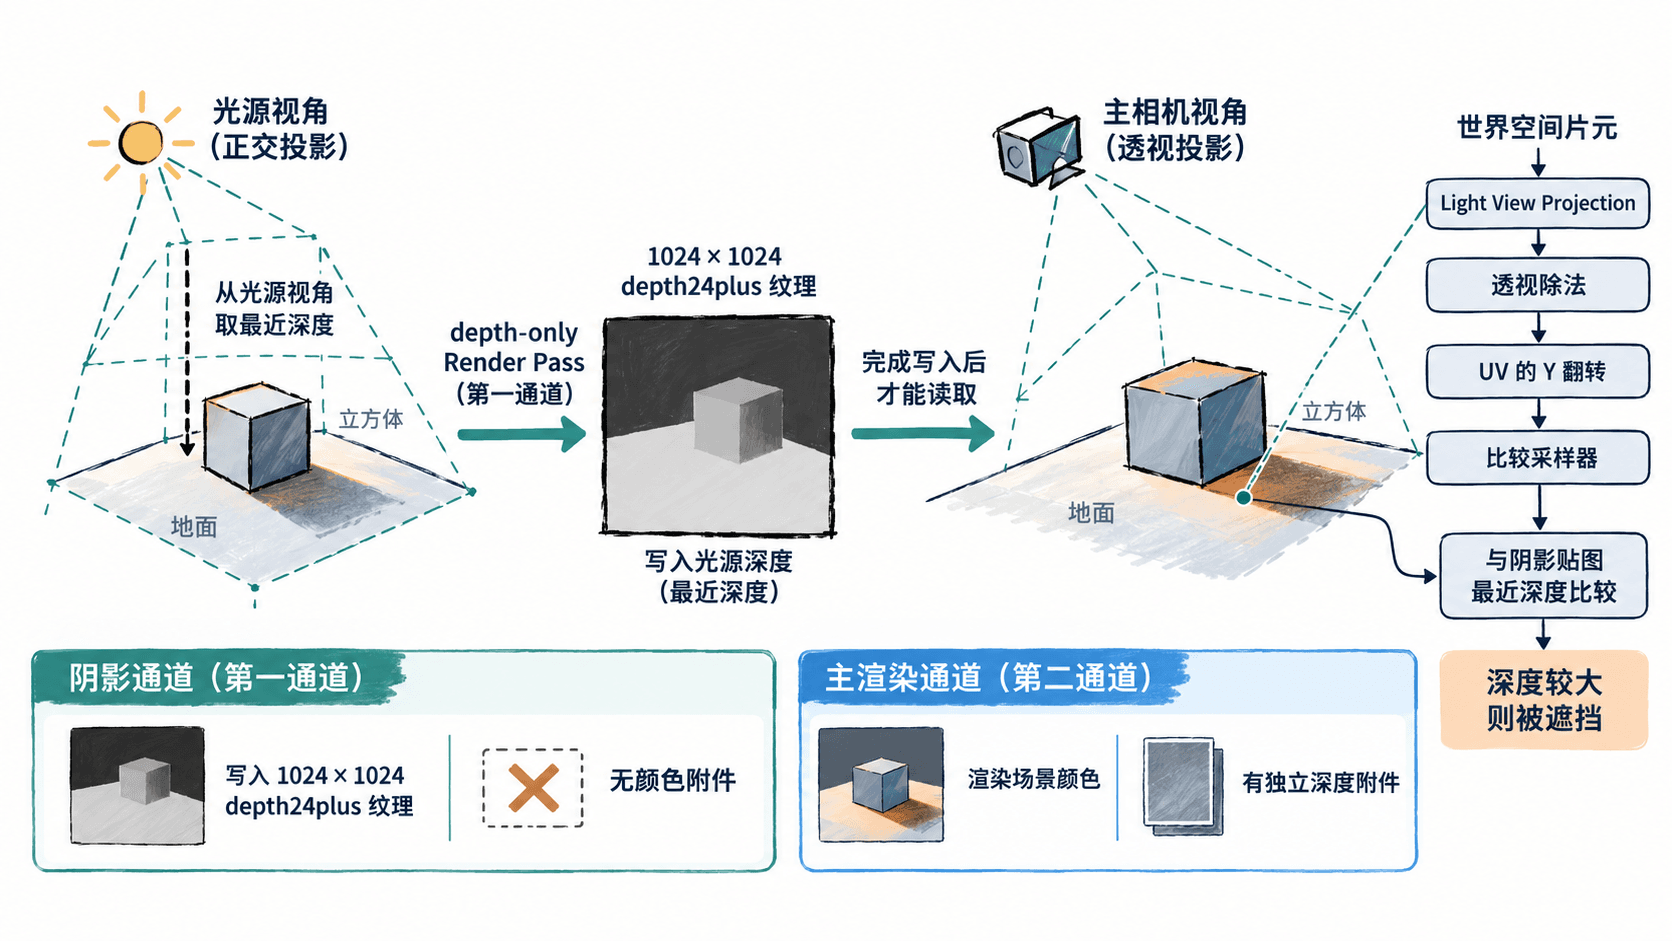
阴影贴图不是一张黑白颜色图片,而是一张只保存最近遮挡表面深度的 depth24plus 纹理。第一遍绘制把同一套几何送入光源的视图投影矩阵,深度测试使用 less,清除值为 1.0。纹理同时声明 RENDER_ATTACHMENT 和 TEXTURE_BINDING,才能先写入、后采样。
第二遍使用相机矩阵确定屏幕位置,同时使用光源矩阵得到每个片元的光源裁剪坐标。做透视除法后,WebGPU 的深度 z 已在 0~1;x 从 [-1,1] 转成纹理 u,y 还需翻转为向下增长的 v。如果片元深度大于光源贴图记录的最近深度,它就在其他表面后方,应当变暗。
在浏览器运行完整示例
将下列内容保存为 shadow.html。在文件所在目录用 Python 3 执行 python3 -m http.server 8000,再用支持 WebGPU 的浏览器打开 http://localhost:8000/shadow.html。localhost 属于可使用 WebGPU 的安全上下文;其他网络地址通常需要 HTTPS。场景用一块地面和一个立方体复用同一顶点缓冲,光源采用范围 -4.5~4.5、近远裁剪面 0.1/20 的正交投影。
<!doctype html>
<html lang='zh-CN'>
<meta charset='utf-8'>
<title>WebGPU shadow map</title>
<canvas width='800' height='500' style='max-width:100%'></canvas>
<script type='module'>
const adapter = await navigator.gpu?.requestAdapter();
if (!adapter) {
  document.body.textContent = 'WebGPU 不可用:请检查浏览器与安全上下文。';
  throw new Error('WebGPU unavailable');
}
const device = await adapter.requestDevice();
const canvas = document.querySelector('canvas');
const context = canvas.getContext('webgpu');
const format = navigator.gpu.getPreferredCanvasFormat();
context.configure({ device, format, alphaMode: 'opaque' });

// WebGPU 的深度范围是 0..1;以下矩阵均按列主序存储。
const sub = (a, b) => a.map((v, i) => v - b[i]);
const unit = a => a.map(v => v / Math.hypot(...a));
const dot = (a, b) => a.reduce((sum, v, i) => sum + v * b[i], 0);
const cross = (a, b) => [
  a[1] * b[2] - a[2] * b[1],
  a[2] * b[0] - a[0] * b[2],
  a[0] * b[1] - a[1] * b[0]
];
function lookAt(eye, target) {
  const z = unit(sub(eye, target));
  const x = unit(cross([0, 1, 0], z));
  const y = cross(z, x);
  return [
    x[0], y[0], z[0], 0, x[1], y[1], z[1], 0,
    x[2], y[2], z[2], 0,
    -dot(x, eye), -dot(y, eye), -dot(z, eye), 1
  ];
}
function mul(a, b) {
  const result = new Float32Array(16);
  for (let c = 0; c < 4; c++)
    for (let r = 0; r < 4; r++)
      for (let k = 0; k < 4; k++)
        result[c * 4 + r] += a[k * 4 + r] * b[c * 4 + k];
  return result;
}
function perspective(fovy, aspect, near, far) {
  const f = 1 / Math.tan(fovy / 2);
  return [
    f / aspect, 0, 0, 0, 0, f, 0, 0,
    0, 0, far / (near - far), -1,
    0, 0, (near * far) / (near - far), 0
  ];
}
function orthographic(l, r, b, t, n, f) {
  return [
    2 / (r - l), 0, 0, 0, 0, 2 / (t - b), 0, 0,
    0, 0, 1 / (n - f), 0,
    -(r + l) / (r - l), -(t + b) / (t - b), n / (n - f), 1
  ];
}
const camera = mul(
  perspective(Math.PI / 3, canvas.width / canvas.height, 0.1, 30),
  lookAt([5, 4, 6], [0, 0.5, 0])
);
const light = mul(
  orthographic(-4.5, 4.5, -4.5, 4.5, 0.1, 20),
  lookAt([-3, 7, 4], [0, 0, 0])
);
const uniforms = device.createBuffer({
  size: 128,
  usage: GPUBufferUsage.UNIFORM | GPUBufferUsage.COPY_DST
});
device.queue.writeBuffer(uniforms, 0, new Float32Array([...camera, ...light]));

// 共用几何:两片地面三角形,以及一个立方体的六个面。
const positions = [
  -3, 0, -3, 3, 0, -3, 3, 0, 3,
  -3, 0, -3, 3, 0, 3, -3, 0, 3
];
const corners = [
  [-0.6, 0, -0.6], [0.6, 0, -0.6],
  [0.6, 1.2, -0.6], [-0.6, 1.2, -0.6],
  [-0.6, 0, 0.6], [0.6, 0, 0.6],
  [0.6, 1.2, 0.6], [-0.6, 1.2, 0.6]
];
for (const [a, b, c, d] of [
  [0, 1, 2, 3], [4, 7, 6, 5], [0, 4, 5, 1],
  [3, 2, 6, 7], [1, 5, 6, 2], [4, 0, 3, 7]
]) {
  for (const i of [a, b, c, a, c, d]) positions.push(...corners[i]);
}
const vertices = new Float32Array(positions);
const vertexBuffer = device.createBuffer({
  size: vertices.byteLength,
  usage: GPUBufferUsage.VERTEX | GPUBufferUsage.COPY_DST
});
device.queue.writeBuffer(vertexBuffer, 0, vertices);
const vertexLayout = {
  arrayStride: 12,
  attributes: [{ shaderLocation: 0, offset: 0, format: 'float32x3' }]
};

const shadowWGSL = `
struct Scene { camera: mat4x4f, light: mat4x4f, };
@group(0) @binding(0) var<uniform> scene: Scene;
@vertex fn vs(@location(0) p: vec3f) -> @builtin(position) vec4f {
  return scene.light * vec4f(p, 1.0);
}`;
const mainWGSL = `
struct Scene { camera: mat4x4f, light: mat4x4f, };
@group(0) @binding(0) var<uniform> scene: Scene;
@group(0) @binding(1) var shadowMap: texture_depth_2d;
@group(0) @binding(2) var shadowSampler: sampler_comparison;
struct Varyings {
  @builtin(position) position: vec4f,
  @location(0) lightClip: vec4f,
  @location(1) world: vec3f,
};
@vertex fn vs(@location(0) p: vec3f) -> Varyings {
  var v: Varyings;
  v.position = scene.camera * vec4f(p, 1.0);
  v.lightClip = scene.light * vec4f(p, 1.0);
  v.world = p;
  return v;
}
@fragment fn fs(input: Varyings) -> @location(0) vec4f {
  let ndc = input.lightClip.xyz / input.lightClip.w;
  let uv = vec2f(ndc.x * 0.5 + 0.5, 0.5 - ndc.y * 0.5);
  // 比较采样必须在片元统一控制流中执行。
  var lit = textureSampleCompare(shadowMap, shadowSampler, uv, ndc.z - 0.002);
  if (uv.x < 0.0 || uv.x > 1.0 || uv.y < 0.0 || uv.y > 1.0 ||
      ndc.z < 0.0 || ndc.z > 1.0) {
    lit = 1.0; // 光源投影范围之外在此示例中视作受光。
  }
  let base = select(vec3f(0.14, 0.54, 0.76),
                    vec3f(0.85, 0.87, 0.90), input.world.y < 0.01);
  return vec4f(base * (0.28 + 0.72 * lit), 1.0);
}`;
const shadowModule = device.createShaderModule({ code: shadowWGSL });
const mainModule = device.createShaderModule({ code: mainWGSL });
const shadowPipeline = device.createRenderPipeline({
  layout: 'auto',
  vertex: { module: shadowModule, entryPoint: 'vs', buffers: [vertexLayout] },
  primitive: { topology: 'triangle-list' },
  depthStencil: {
    format: 'depth24plus', depthWriteEnabled: true, depthCompare: 'less',
    depthBias: 2, depthBiasSlopeScale: 1.5
  }
});
const mainPipeline = device.createRenderPipeline({
  layout: 'auto',
  vertex: { module: mainModule, entryPoint: 'vs', buffers: [vertexLayout] },
  fragment: { module: mainModule, entryPoint: 'fs', targets: [{ format }] },
  primitive: { topology: 'triangle-list' },
  depthStencil: {
    format: 'depth24plus', depthWriteEnabled: true, depthCompare: 'less'
  }
});
const shadowTexture = device.createTexture({
  size: [1024, 1024],
  format: 'depth24plus',
  usage: GPUTextureUsage.RENDER_ATTACHMENT | GPUTextureUsage.TEXTURE_BINDING
});
const mainDepth = device.createTexture({
  size: [canvas.width, canvas.height],
  format: 'depth24plus',
  usage: GPUTextureUsage.RENDER_ATTACHMENT
});
const sampler = device.createSampler({ compare: 'less-equal' });
const shadowGroup = device.createBindGroup({
  layout: shadowPipeline.getBindGroupLayout(0),
  entries: [{ binding: 0, resource: { buffer: uniforms } }]
});
const mainGroup = device.createBindGroup({
  layout: mainPipeline.getBindGroupLayout(0),
  entries: [
    { binding: 0, resource: { buffer: uniforms } },
    { binding: 1, resource: shadowTexture.createView() },
    { binding: 2, resource: sampler }
  ]
});

// 先结束光源深度通道,再在主通道采样它,避免读写冲突。
const encoder = device.createCommandEncoder();
const depthPass = encoder.beginRenderPass({
  colorAttachments: [],
  depthStencilAttachment: {
    view: shadowTexture.createView(),
    depthClearValue: 1, depthLoadOp: 'clear', depthStoreOp: 'store'
  }
});
depthPass.setPipeline(shadowPipeline);
depthPass.setBindGroup(0, shadowGroup);
depthPass.setVertexBuffer(0, vertexBuffer);
depthPass.draw(vertices.length / 3);
depthPass.end();

const colorPass = encoder.beginRenderPass({
  colorAttachments: [{
    view: context.getCurrentTexture().createView(),
    clearValue: { r: 0.97, g: 0.98, b: 1, a: 1 },
    loadOp: 'clear', storeOp: 'store'
  }],
  depthStencilAttachment: {
    view: mainDepth.createView(),
    depthClearValue: 1, depthLoadOp: 'clear', depthStoreOp: 'discard'
  }
});
colorPass.setPipeline(mainPipeline);
colorPass.setBindGroup(0, mainGroup);
colorPass.setVertexBuffer(0, vertexBuffer);
colorPass.draw(vertices.length / 3);
colorPass.end();
device.queue.submit([encoder.finish()]);
</script>
</html>
预期结果:页面显示灰色地面、青蓝色立方体,以及地面上朝远离光源方向延伸的深色阴影。第一通道只生成深度数据,因此不会额外出现一幅深度图;第二通道用比较结果给地面和立方体调节亮度。开发者工具控制台不应出现 WGSL 编译错误或 WebGPU 验证错误。
确认深度比较有效
可先将片元着色器最后一行改为 return vec4f(base, 1.0); 并刷新页面:所有表面都会按原色显示,投射阴影消失。恢复原来的 base * (0.28 + 0.72 * lit) 后,阴影应重新出现。比较采样器设置为 less-equal,因此参考深度小于等于贴图深度时返回受光结果;示例使用最近邻比较,阴影边界可能稍硬。
必须先结束写入阴影贴图的渲染通道,再把它绑定到主通道采样,不能在同一通道中把同一纹理一边作为深度附件写入、一边当作采样纹理读取。主相机使用单独的 800×500 深度附件,防止资源读写冲突。
校准阴影偏移与边缘
阴影表面出现不规则细条纹时,通常是深度精度造成的自阴影。示例同时使用阴影通道的 depthBias: 2、depthBiasSlopeScale: 1.5,以及比较时的 ndc.z - 0.002。这些只是当前场景的起始值:阴影贴到物体表面可适度增大偏移,阴影与物体底部明显分离则应减小,不能套用一个值到所有光源范围。
若阴影方向、大小不对,先检查两个通道是否使用完全相同的光源矩阵,以及 UV 的 v = 0.5 - y × 0.5 是否翻转;不要把 WebGPU 已经处于 0~1 的深度再当作 OpenGL 深度映射一次。若边缘呈台阶状,可将阴影图提高到 2048×2048,或将比较采样器的 minFilter 与 magFilter 改成 linear,获得基础的过滤效果,但会增加存储或采样代价。
这套方法适合单个方向光或聚光灯的基本硬阴影;加入更多光源时,应为各光源组织相应的阴影数据并管理通道执行次序。