
Web 图形与 3D / 系统课时
使用实例化减少重复绘制
使用实例化减少重复绘制
多个物体共用同一份网格,却各有位置和颜色时,不必为每个物体分别调用 draw()。下面用一个顶点缓冲区和一个实例缓冲区,让一次 draw(3, 3) 画出三个三角形,并检查实例编号、数据步长和绘制数量的对应关系。
学习目标
- 区分逐顶点数据与逐实例数据,正确配置
stepMode和字节偏移。 - 读取
@builtin(instance_index),通过一次draw()绘制多份网格。 - 验证绘制结果,并判断实例化相比循环绘制节省了什么。
两种数据按不同频率读取
普通顶点缓冲区的 stepMode: 'vertex' 表示每处理一个顶点就前进一条记录;实例缓冲区的 stepMode: 'instance' 则在切换到下一实例时才前进。两个缓冲区在同一个顶点着色器中汇合,不必复制三份三角形顶点。
本例把每个顶点的位置存成 float32x2,所以单条顶点记录占 8 字节;每个实例存一个二维位移和一个 RGB 颜色,共 5 个 f32,占 20 字节。实例布局如下:
| 实例记录内偏移 | 属性 | 格式 | WGSL 输入 |
|---|---|---|---|
| 0 字节 | 位移 (x, y) |
float32x2 |
@location(1) |
| 8 字节 | 颜色 (r, g, b) |
float32x3 |
@location(2) |
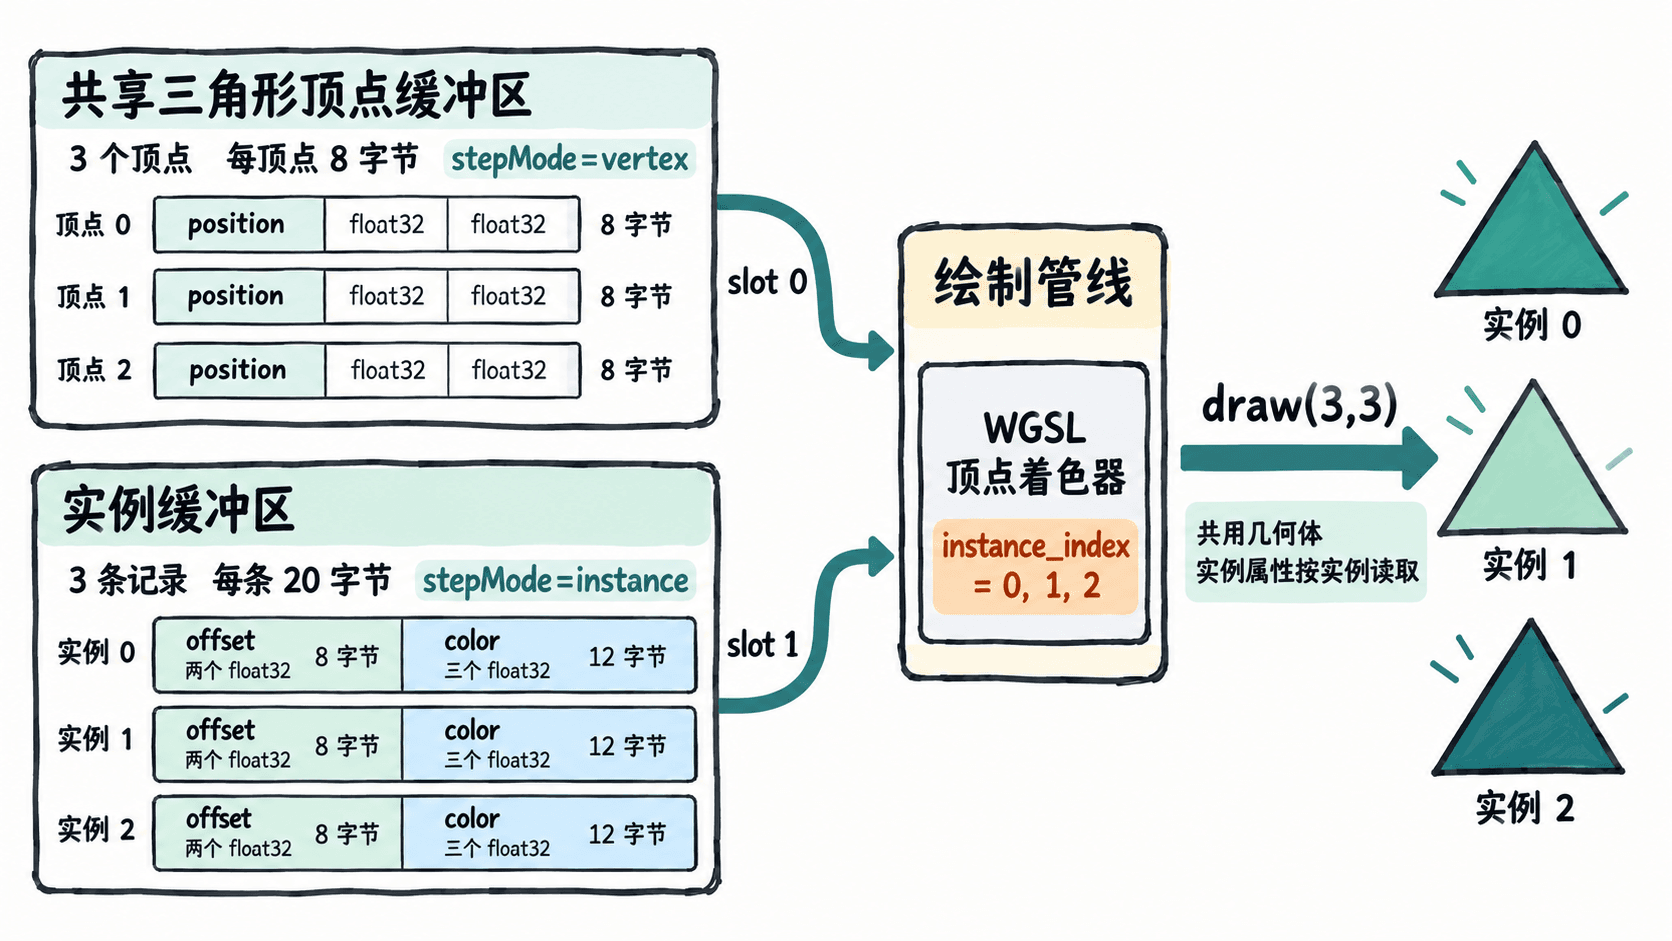
一次绘制三个三角形
将下面的完整示例保存为 index.html。浏览器必须支持 WebGPU,且页面需要在安全上下文运行;本地 localhost 可用于开发测试。示例采用两个顶点输入槽:槽 0 提供共享几何,槽 1 提供每实例的位移与颜色。
<!doctype html>
<html lang="zh-CN">
<meta charset="utf-8">
<title>WebGPU 实例化绘制</title>
<canvas id="view" width="720" height="360"></canvas>
<p id="status"></p>
<script type="module">
async function main() {
  const status = document.querySelector('#status');
  if (!navigator.gpu) {
    status.textContent = '当前浏览器不支持 WebGPU';
    return;
  }
  const adapter = await navigator.gpu.requestAdapter();
  if (!adapter) {
    status.textContent = '无法获取 GPU 适配器';
    return;
  }
  const device = await adapter.requestDevice();
  const context = document.querySelector('#view').getContext('webgpu');
  if (!context) throw new Error('无法获取 WebGPU 上下文');
  const format = navigator.gpu.getPreferredCanvasFormat();
  context.configure({ device, format, alphaMode: 'opaque' });

  // 共享三角形:3 个顶点,每个顶点 2 个 f32。
  const vertices = new Float32Array([
     0.00,  0.35,
    -0.22, -0.25,
     0.22, -0.25,
  ]);
  // 每条实例记录:[偏移 x, 偏移 y, R, G, B]。
  const instances = new Float32Array([
    -0.62, 0.00, 1.00, 0.30, 0.30,
     0.00, 0.00, 0.25, 0.95, 0.60,
     0.62, 0.00, 0.35, 0.60, 1.00,
  ]);
  function upload(data) {
    const buffer = device.createBuffer({
      size: data.byteLength,
      usage: GPUBufferUsage.VERTEX | GPUBufferUsage.COPY_DST,
    });
    device.queue.writeBuffer(buffer, 0, data);
    return buffer;
  }
  const vertexBuffer = upload(vertices);
  const instanceBuffer = upload(instances);

  const shader = device.createShaderModule({ code: `
    struct VSOut {
      @builtin(position) position: vec4f,
      @location(0) color: vec3f,
    };
    @vertex fn vs(
      @location(0) position: vec2f,
      @location(1) offset: vec2f,
      @location(2) color: vec3f,
      @builtin(instance_index) instanceId: u32
    ) -> VSOut {
      var out: VSOut;
      out.position = vec4f(position + offset, 0.0, 1.0);
      // 默认 firstInstance=0,三个实例编号依次为 0、1、2。
      out.color = color * (1.0 - f32(instanceId) * 0.1);
      return out;
    }
    @fragment fn fs(input: VSOut) -> @location(0) vec4f {
      return vec4f(input.color, 1.0);
    }
  ` });

  const pipeline = device.createRenderPipeline({
    layout: 'auto',
    vertex: {
      module: shader,
      entryPoint: 'vs',
      buffers: [
        {
          arrayStride: 8,
          stepMode: 'vertex',
          attributes: [
            { shaderLocation: 0, offset: 0, format: 'float32x2' },
          ],
        },
        {
          arrayStride: 20,
          stepMode: 'instance',
          attributes: [
            { shaderLocation: 1, offset: 0, format: 'float32x2' },
            { shaderLocation: 2, offset: 8, format: 'float32x3' },
          ],
        },
      ],
    },
    fragment: {
      module: shader,
      entryPoint: 'fs',
      targets: [{ format }],
    },
    primitive: { topology: 'triangle-list' },
  });

  const encoder = device.createCommandEncoder();
  const pass = encoder.beginRenderPass({
    colorAttachments: [{
      view: context.getCurrentTexture().createView(),
      clearValue: { r: 0.05, g: 0.08, b: 0.12, a: 1 },
      loadOp: 'clear',
      storeOp: 'store',
    }],
  });
  pass.setPipeline(pipeline);
  pass.setVertexBuffer(0, vertexBuffer);
  pass.setVertexBuffer(1, instanceBuffer);
  pass.draw(3, 3); // 3 个顶点 × 3 个实例,只有一次绘制调用。
  pass.end();
  device.queue.submit([encoder.finish()]);
  status.textContent = '已提交 1 次 draw,绘制 3 个实例';
}
main().catch(error => {
  document.querySelector('#status').textContent = String(error);
});
</script>
</html>
预期结果:画布上从左到右显示红、绿、蓝三个三角形,下面显示“已提交 1 次 draw,绘制 3 个实例”。顶点缓冲区为 24 字节,实例缓冲区为 60 字节;着色器按 3 个实例分别读取同一组三角形顶点。
运行和验证
在保存 index.html 的目录启动本地静态文件服务:
python3 -m http.server 8000预期结果:终端显示 HTTP 服务监听端口 8000(具体提示文字取决于 Python 版本);在支持 WebGPU 的浏览器访问 http://localhost:8000,即可看到上述三个三角形。命令需要 Python 3,停止服务可按 Ctrl+C。
把 pass.draw(3, 3) 改成 pass.draw(3, 1) 并刷新,预期只剩最左边的红色三角形。再改回实例数 3,恢复三角形数量。这里两个数字分别表示每实例 3 个顶点和总共 3 个实例,不是 9 个顶点组成一个实例。
与循环绘制的差异
逐个绘制三个对象通常需要三次 draw(3, 1, 0, i)(i 为 0、1、2),而实例化只调用一次 draw(3, 3)。两种方式都要处理 9 个顶点着色器调用对应的顶点与实例组合,实例化主要减少 CPU 侧的命令记录和重复设置状态,并不自动减少 GPU 上的三角形数量。
当多个物体共享网格和管线,只在位置、颜色、缩放等逐实例属性上有差异时,优先考虑实例化。若物体需要不同的管线或无法统一的绑定资源,仍可能需要分批绘制。