
C / C++ / 系统课时
用 EventLoop 驱动回调
用 EventLoop 驱动回调
这一节把 Reactor 的主循环真正跑起来:EventLoop 在所属线程中等待 I/O 事件,拿到活跃文件描述符后执行对应回调,并在每轮结束后继续等待。最终会形成“等待 → 分发 → 执行 → 再等待”的稳定闭环,同时阻止跨线程直接操作循环内部状态。
学习目标
- 实现一次完整的事件等待与回调分发流程。
- 理解为什么一个 EventLoop 必须绑定一个固定线程。
- 能用最小示例验证
epoll_wait返回后回调确实在循环线程执行。
EventLoop 的主循环
EventLoop 的核心并不复杂,真正重要的是职责边界。它不负责业务协议,也不直接读写每一种连接;它只做三件事:等待事件、找到事件对应的处理对象、执行回调。
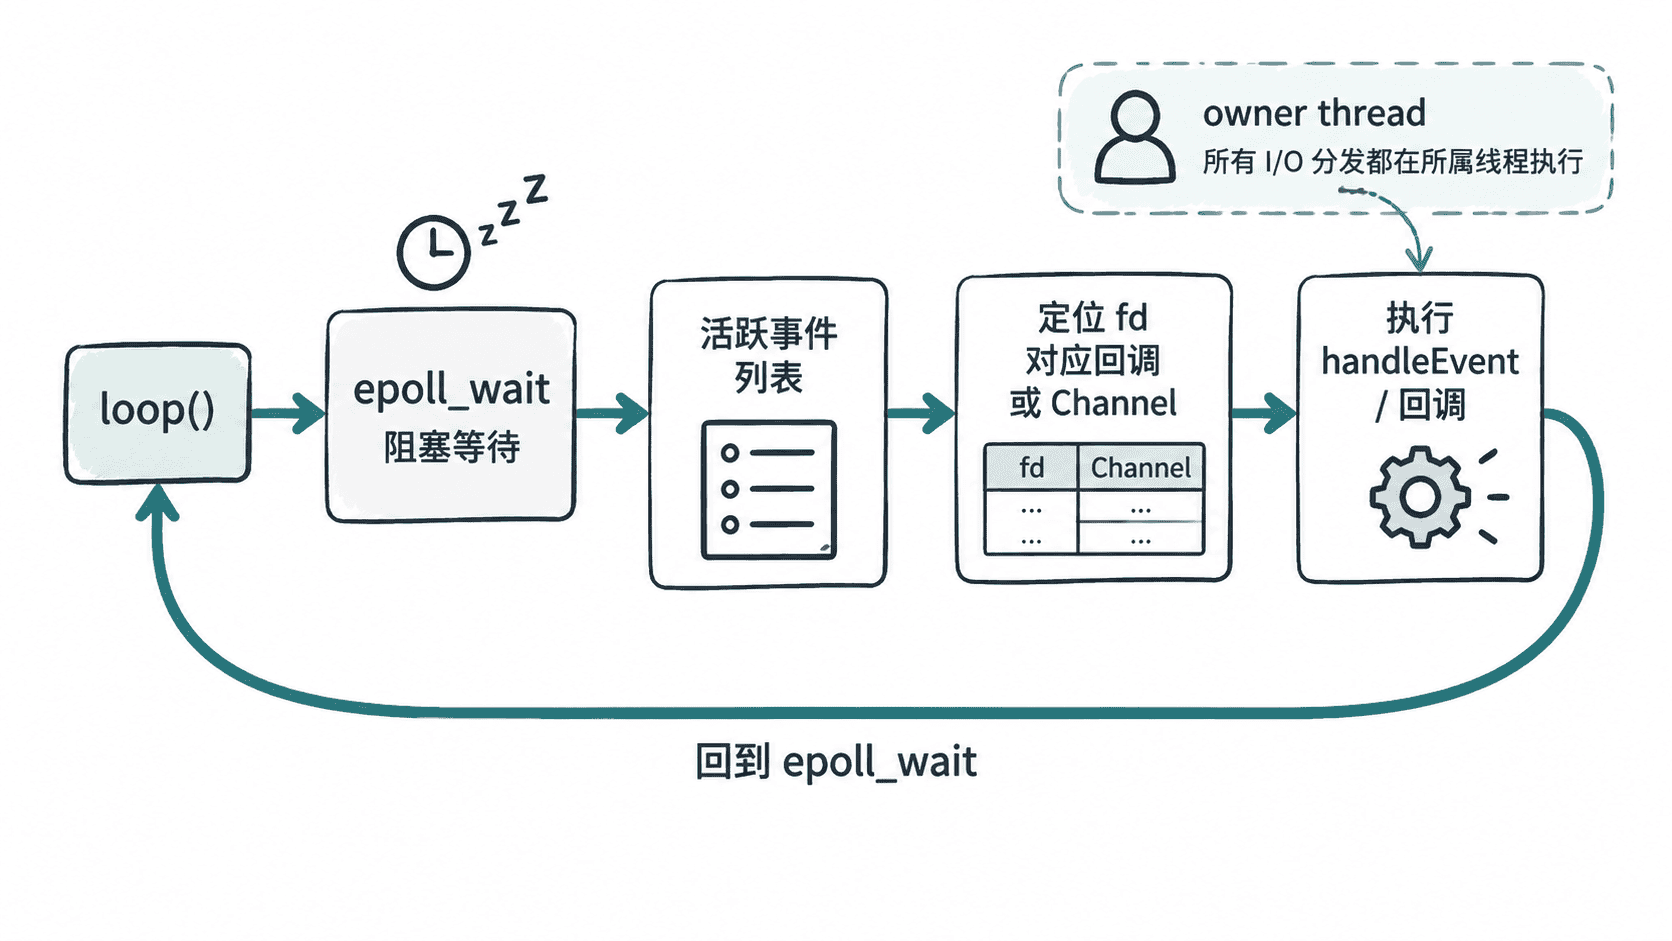
典型流程可以概括为:循环开始后调用 Poller 等待;Poller 返回若干活跃事件;EventLoop 逐个分发;如果没有退出标记,就进入下一轮。真正的网络库通常还会在每轮中处理跨线程投递的任务,但 I/O 分发主线始终不变。
一个最小可运行 EventLoop
下面直接使用 Linux epoll 实现一个精简版 EventLoop。示例用 pipe 模拟一个“可读 I/O 资源”:主线程先把读端注册进 EventLoop,再向写端写入 ping,随后执行一轮事件循环。
#include <sys/epoll.h>
#include <unistd.h>

#include <array>
#include <functional>
#include <iostream>
#include <stdexcept>
#include <string>
#include <thread>
#include <unordered_map>
#include <utility>

class EventLoop {
public:
    using Callback = std::function<void()>;

    EventLoop()
        : epollFd_(::epoll_create1(EPOLL_CLOEXEC)),
          ownerThread_(std::this_thread::get_id()) {
        if (epollFd_ < 0) {
            throw std::runtime_error("epoll_create1 failed");
        }
    }

    ~EventLoop() {
        ::close(epollFd_);
    }

    void addReadEvent(int fd, Callback cb) {
        assertInLoopThread();

        epoll_event event{};
        event.events = EPOLLIN;
        event.data.fd = fd;

        if (::epoll_ctl(epollFd_, EPOLL_CTL_ADD, fd, &event) < 0) {
            throw std::runtime_error("epoll_ctl add failed");
        }
        callbacks_[fd] = std::move(cb);
    }

    void loopOnce(int timeoutMs) {
        assertInLoopThread();

        std::array<epoll_event, 16> activeEvents{};
        const int n = ::epoll_wait(
            epollFd_, activeEvents.data(),
            static_cast<int>(activeEvents.size()), timeoutMs);

        if (n < 0) {
            throw std::runtime_error("epoll_wait failed");
        }

        // epoll_wait 只负责告诉我们“谁活跃了”,具体动作由注册的回调决定。
        for (int i = 0; i < n; ++i) {
            const int fd = activeEvents[i].data.fd;
            auto it = callbacks_.find(fd);
            if (it != callbacks_.end()) {
                it->second();
            }
        }
    }

private:
    void assertInLoopThread() const {
        if (std::this_thread::get_id() != ownerThread_) {
            throw std::runtime_error("EventLoop used from non-owner thread");
        }
    }

    int epollFd_;
    std::thread::id ownerThread_;
    std::unordered_map<int, Callback> callbacks_;
};

int main() {
    int fds[2];
    if (::pipe(fds) != 0) {
        throw std::runtime_error("pipe failed");
    }

    EventLoop loop;

    loop.addReadEvent(fds[0], [&] {
        char buffer[16]{};
        const ssize_t n = ::read(fds[0], buffer, sizeof(buffer));
        if (n > 0) {
            std::cout << "received: " << std::string(buffer, n) << '\n';
        }
    });

    const char message[] = "ping";
    ::write(fds[1], message, sizeof(message) - 1);

    loop.loopOnce(1000);

    ::close(fds[0]);
    ::close(fds[1]);
    return 0;
}
在 Linux 上使用支持 C++17 的编译器即可编译运行,例如 g++ -std=c++17 main.cpp -pthread。实际编译器路径可能不同。
预期输出:
received: ping这个结果说明事件等待、活跃 fd 定位和回调执行已经串起来了。示例只运行一轮,是为了方便验证;正式实现通常会用 while (!quit_) 持续调用 Poller。
为什么要绑定所属线程
EventLoop 内部保存了 Poller、Channel 集合、待执行任务和退出状态。如果多个线程同时修改这些结构,就需要大量锁,并且很难保证“事件到达时对象仍然有效”。
因此主流 Reactor 实现通常采用 one loop per thread:一个 EventLoop 创建后就绑定当前线程,所有 I/O 事件都在该线程中分发。其他线程如果想让它做事,不直接操作内部容器,而是把任务投递给这个 EventLoop。
上面的 assertInLoopThread() 就是在建立这条边界。它不是性能优化,而是并发模型的一部分:宁可尽早失败,也不要让跨线程误用悄悄变成竞态条件。
从直接回调升级到 Channel
示例为了聚焦 EventLoop,用 fd -> callback 映射直接完成分发。完整 Reactor 中更常见的是 fd -> Channel:Poller 返回活跃事件后,把 revents 写入 Channel,再由 EventLoop 调用 Channel::handleEvent()。
这样 EventLoop 保持通用,Channel 负责区分读、写、错误等具体事件。只要守住“等待由 Poller 完成、分发由 EventLoop 驱动、回调由 Channel 承载、I/O 全部在所属线程执行”这四条边界,后续接入 TCP 连接、定时器和 RPC 调度时就不会把职责重新揉在一起。