
Web 图形与 3D / 系统课时
提取亮区并合成 Bloom 辉光
提取亮区并合成 Bloom 辉光
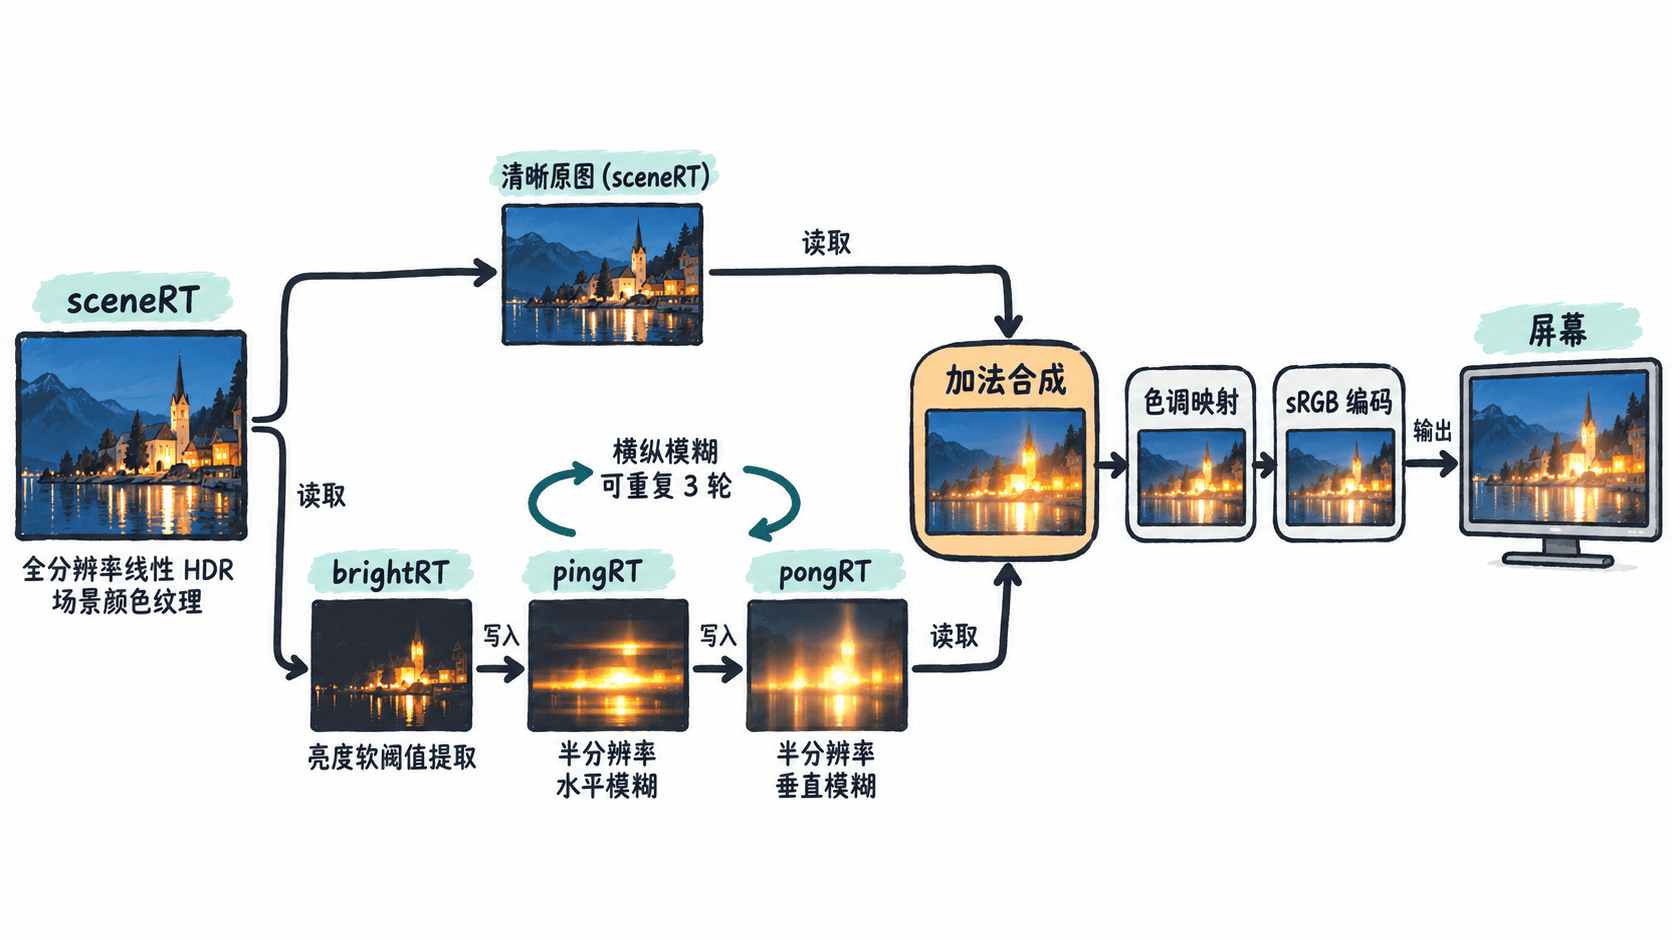
先把场景写入保留高亮数值的颜色纹理,再用亮度阈值筛出光源区域,对亮区做横向和纵向模糊,最后把模糊结果加回清晰原图。本课用 Three.js 和 WebGL2 实现完整的多 Pass Bloom,并通过滑块检查辉光强度和颜色输出。
学习目标
- 说清亮区提取、双向模糊、加法合成各自读取和写入的纹理。
- 用半浮点渲染目标与 Ping-Pong 缓冲实现可运行的 Bloom。
- 调节阈值和强度,识别过曝、整屏泛白及模糊反馈错误。
保留原图与亮区两条分支
先渲染到全分辨率 sceneRT,保存线性 HDR 颜色;这里光源 RGB 可以大于 1.0,不能在提取前截断到普通 8 位颜色纹理。提亮时使用线性亮度 ,以 smoothstep(1.0, 1.35, L) 生成软阈值,再乘回原 RGB。
亮区纹理只需屏幕一半宽高:例如 1280×720 的原图,对应 640×360 的提亮和模糊纹理。这样减少采样成本,原图则始终保持清晰。横向和纵向各做一次 9 采样高斯卷积构成一轮模糊,交替写入不同渲染目标,不能在同一 Pass 中读写同一张纹理。
搭建可调强度的四段 Pass
以下示例适用于 Three.js 0.160.1、WebGL2,以及支持 EXT_color_buffer_float 的浏览器和显卡。保存为 index.html,在所在目录运行 python3 -m http.server 8000,终端应提示正在监听 8000 端口;然后访问 http://localhost:8000/index.html。为了聚焦后处理,第一段 Pass 使用程序化 HDR 光斑代替复杂三维模型;真实项目可将它换成场景离屏渲染。
<!doctype html>
<html lang="zh-CN">
<head>
  <meta charset="utf-8">
  <meta name="viewport" content="width=device-width, initial-scale=1">
  <title>WebGL2 Bloom</title>
  <style>
    body { margin: 0; overflow: hidden; background: #080b18; }
    canvas { display: block; }
    label { position: fixed; top: 16px; left: 16px; padding: 10px;
      color: white; background: #172036; font: 14px sans-serif; }
  </style>
</head>
<body>
  <label>辉光强度 <input id="strength" type="range" min="0" max="3"
    value="1.2" step="0.05"> <span id="value">1.20</span></label>
  <script type="module">
    import * as THREE from 'https://cdn.jsdelivr.net/npm/three@0.160.1/build/three.module.js';

    const renderer = new THREE.WebGLRenderer({ antialias: false });
    renderer.setPixelRatio(Math.min(devicePixelRatio, 2));
    document.body.appendChild(renderer.domElement);
    if (!renderer.getContext().getExtension('EXT_color_buffer_float')) {
      throw new Error('当前环境不支持半浮点颜色渲染目标');
    }

    const vertexShader = `
      precision highp float;
      in vec3 position;
      in vec2 uv;
      out vec2 vUv;
      void main() {
        vUv = uv;
        gl_Position = vec4(position.xy, 0.0, 1.0);
      }
    `;
    function material(source, uniforms = {}) {
      return new THREE.RawShaderMaterial({
        glslVersion: THREE.GLSL3,
        vertexShader,
        fragmentShader: `
          precision highp float;
          precision highp sampler2D;
          in vec2 vUv;
          out vec4 outColor;
          ${source}
        `,
        uniforms, depthTest: false, depthWrite: false
      });
    }

    const sceneMaterial = material(`
      uniform float uTime;
      uniform float uAspect;
      void main() {
        vec2 p = vec2((vUv.x - 0.5) * uAspect, vUv.y - 0.5);
        vec2 a = p - vec2(-0.25 + 0.07 * sin(uTime), 0.08);
        vec2 b = p - vec2(0.25, -0.08);
        // 光斑亮度超过 1.0,提供真正的 HDR 提取源。
        vec3 c = vec3(0.015, 0.025, 0.055);
        c += vec3(7.0, 2.2, 0.6) * exp(-dot(a, a) * 1100.0);
        c += vec3(0.5, 3.0, 7.5) * exp(-dot(b, b) * 1350.0);
        outColor = vec4(c, 1.0);
      }
    `, { uTime: { value: 0 }, uAspect: { value: 1 } });

    const brightMaterial = material(`
      uniform sampler2D tInput;
      uniform float uThreshold;
      void main() {
        vec3 c = texture(tInput, vUv).rgb;
        float luma = dot(c, vec3(0.2126, 0.7152, 0.0722));
        float weight = smoothstep(uThreshold, uThreshold + 0.35, luma);
        outColor = vec4(c * weight, 1.0);
      }
    `, { tInput: { value: null }, uThreshold: { value: 1.0 } });

    const blurMaterial = material(`
      uniform sampler2D tInput;
      uniform vec2 uStep;
      void main() {
        // 一维 9 采样高斯核,横向与纵向复用同一 Shader。
        float weights[4] = float[4](0.1945946, 0.1216216, 0.054054, 0.016216);
        vec3 sum = texture(tInput, vUv).rgb * 0.227027;
        for (int i = 1; i <= 4; ++i) {
          vec2 d = float(i) * uStep;
          sum += weights[i - 1] * (
            texture(tInput, vUv + d).rgb +
            texture(tInput, vUv - d).rgb
          );
        }
        outColor = vec4(sum, 1.0);
      }
    `, { tInput: { value: null }, uStep: { value: new THREE.Vector2() } });

    const compositeMaterial = material(`
      uniform sampler2D tScene;
      uniform sampler2D tBloom;
      uniform float uStrength;
      float toSRGB(float v) {
        return v <= 0.0031308 ? 12.92 * v
          : 1.055 * pow(v, 1.0 / 2.4) - 0.055;
      }
      void main() {
        // 在线性空间叠加,再做显示转换;不要提前给亮区做色调映射。
        vec3 hdr = texture(tScene, vUv).rgb
          + uStrength * texture(tBloom, vUv).rgb;
        vec3 mapped = vec3(1.0) - exp(-hdr);
        outColor = vec4(toSRGB(mapped.r), toSRGB(mapped.g),
                        toSRGB(mapped.b), 1.0);
      }
    `, {
      tScene: { value: null }, tBloom: { value: null },
      uStrength: { value: 1.2 }
    });

    function target() {
      return new THREE.WebGLRenderTarget(1, 1, {
        format: THREE.RGBAFormat, type: THREE.HalfFloatType,
        minFilter: THREE.LinearFilter, magFilter: THREE.LinearFilter,
        depthBuffer: false, stencilBuffer: false
      });
    }
    const sceneRT = target();
    const brightRT = target();
    const pingRT = target();
    const pongRT = target();

    const screen = new THREE.Scene();
    const quad = new THREE.Mesh(new THREE.PlaneGeometry(2, 2), sceneMaterial);
    screen.add(quad);
    const camera = new THREE.OrthographicCamera(-1, 1, 1, -1, 0, 1);
    function draw(pass, output) {
      quad.material = pass;
      renderer.setRenderTarget(output);
      renderer.render(screen, camera);
    }

    let bw = 1, bh = 1;
    function resize() {
      renderer.setSize(innerWidth, innerHeight);
      const size = renderer.getDrawingBufferSize(new THREE.Vector2());
      bw = Math.max(1, Math.ceil(size.x / 2));
      bh = Math.max(1, Math.ceil(size.y / 2));
      sceneRT.setSize(size.x, size.y);
      for (const rt of [brightRT, pingRT, pongRT]) rt.setSize(bw, bh);
      sceneMaterial.uniforms.uAspect.value = size.x / size.y;
    }
    addEventListener('resize', resize);
    resize();

    const strength = document.querySelector('#strength');
    strength.addEventListener('input', () => {
      const v = Number(strength.value);
      compositeMaterial.uniforms.uStrength.value = v;
      document.querySelector('#value').textContent = v.toFixed(2);
    });

    function frame(ms) {
      sceneMaterial.uniforms.uTime.value = ms * 0.001;
      draw(sceneMaterial, sceneRT);
      brightMaterial.uniforms.tInput.value = sceneRT.texture;
      draw(brightMaterial, brightRT);

      // 横向读入与纵向读入分开写入,避免纹理反馈。
      let blurred = brightRT.texture;
      for (let i = 0; i < 3; ++i) {
        blurMaterial.uniforms.tInput.value = blurred;
        blurMaterial.uniforms.uStep.value.set(1 / bw, 0);
        draw(blurMaterial, pingRT);
        blurMaterial.uniforms.tInput.value = pingRT.texture;
        blurMaterial.uniforms.uStep.value.set(0, 1 / bh);
        draw(blurMaterial, pongRT);
        blurred = pongRT.texture;
      }
      compositeMaterial.uniforms.tScene.value = sceneRT.texture;
      compositeMaterial.uniforms.tBloom.value = blurred;
      draw(compositeMaterial, null);
      requestAnimationFrame(frame);
    }
    requestAnimationFrame(frame);
  </script>
</body>
</html>
预期结果:深蓝背景上有一枚左右缓慢移动的暖色光斑和一枚固定的蓝色光斑,周围出现柔和光晕。将“辉光强度”滑块从 1.20 调到 0 后,光斑本体仍在,向外扩散的辉光明显收敛;恢复到 1.20 后重新出现。浏览器控制台正常情况下无 Shader 编译错误。
调整亮区与模糊尺度
| 参数 | 示例值 | 直接可见的变化 |
|---|---|---|
uThreshold |
1.0 |
降到 0.5 会让更多较暗像素进入 Bloom;升到 2.0 只保留最亮核心 |
| 横纵模糊轮数 | 3 轮 |
改成 1 轮时光晕更紧;增大轮数时范围更宽、GPU 开销也更高 |
uStrength |
1.2 |
0 关闭辉光;2.0 产生更强的扩散亮度 |
| 模糊目标尺寸 | 原尺寸的 1/2 × 1/2 |
降到 1/4 × 1/4 可减少像素成本,但小高亮点可能丢失 |
模糊次数改变的是光晕宽度,不等同于增强辉光;想让远处也看到宽泛光晕,优先考虑不同分辨率的多级模糊组合,而不是无限增加同分辨率卷积。调阈值时须观察 HDR 线性亮度,不能把 sRGB 编码值直接当作光照强度计算。
验证渲染目标与颜色输出
先将 uStrength 设为 0,检查画面与未经 Bloom 的清晰场景一致;再把它设为 1.2,确认只有光斑附近增加光晕,背景没有整体发白。接着把源码中 uThreshold.value 从 1.0 改为 2.0 并刷新页面,应看到辉光范围收窄,而原图分支的光斑位置和颜色不受阈值影响。
窗口尺寸变化后,必须同时更新全分辨率场景纹理、半分辨率亮区与双缓冲纹理以及模糊的 1/bw、1/bh 步长。完成这些检查后,Bloom 才能在不同分辨率下维持一致的空间关系。