
Web 图形与 3D / 系统课时
用 fwidth 平滑程序化边缘
用 fwidth 平滑程序化边缘
距离场能判断像素位于图形内还是外,但直接用 step 切边会出现锯齿;固定 smoothstep 宽度又会随画布尺寸改变模糊程度。本篇用片元导数 fwidth 为圆形边缘估计屏幕空间过渡宽度,并绘制左右对比来验证。
学习目标
- 理解距离场的单位如何影响固定平滑宽度。
- 使用
fwidth(d)配合smoothstep实现自适应抗锯齿。 - 在 WebGL2 中通过改变画布尺寸检查效果与限制。
固定宽度为什么不稳定
圆的有符号距离可以写成 d = length(p) - radius:负值在圆内,零值在轮廓上,正值在圆外。如果用 step(0.0, d) 决定内外,边缘会从 0 突变到 1,斜线和曲线容易出现阶梯状像素。
为了让圆保持正圆,下面将片元相对圆心的像素偏移除以画布高度,得到坐标 p。此时 d 也以画布高度为单位:固定过渡带 0.012 在画布高 360 像素时约宽 4.32 像素,在高 1080 像素时却宽 12.96 像素。宽度没有跟着像素密度自适应,放大后容易显得过软。
用 fwidth 计算局部过渡带
在 GLSL ES 3.00 的片元着色器中,fwidth(d) 等价于 abs(dFdx(d)) + abs(dFdy(d)),通过相邻片元间的局部差分估计距离值在屏幕上的变化。对于圆形距离场,在光滑轮廓附近,这通常对应约 1~1.4 个屏幕像素的过渡范围,而非固定的几何距离。
先计算 w = max(fwidth(d), 1e-6),再用 1.0 - smoothstep(-0.5 * w, 0.5 * w, d) 将距离映射成圆内部的覆盖权重。max 避免平坦区域出现零宽度;smoothstep 的下、上界必须保持递增。
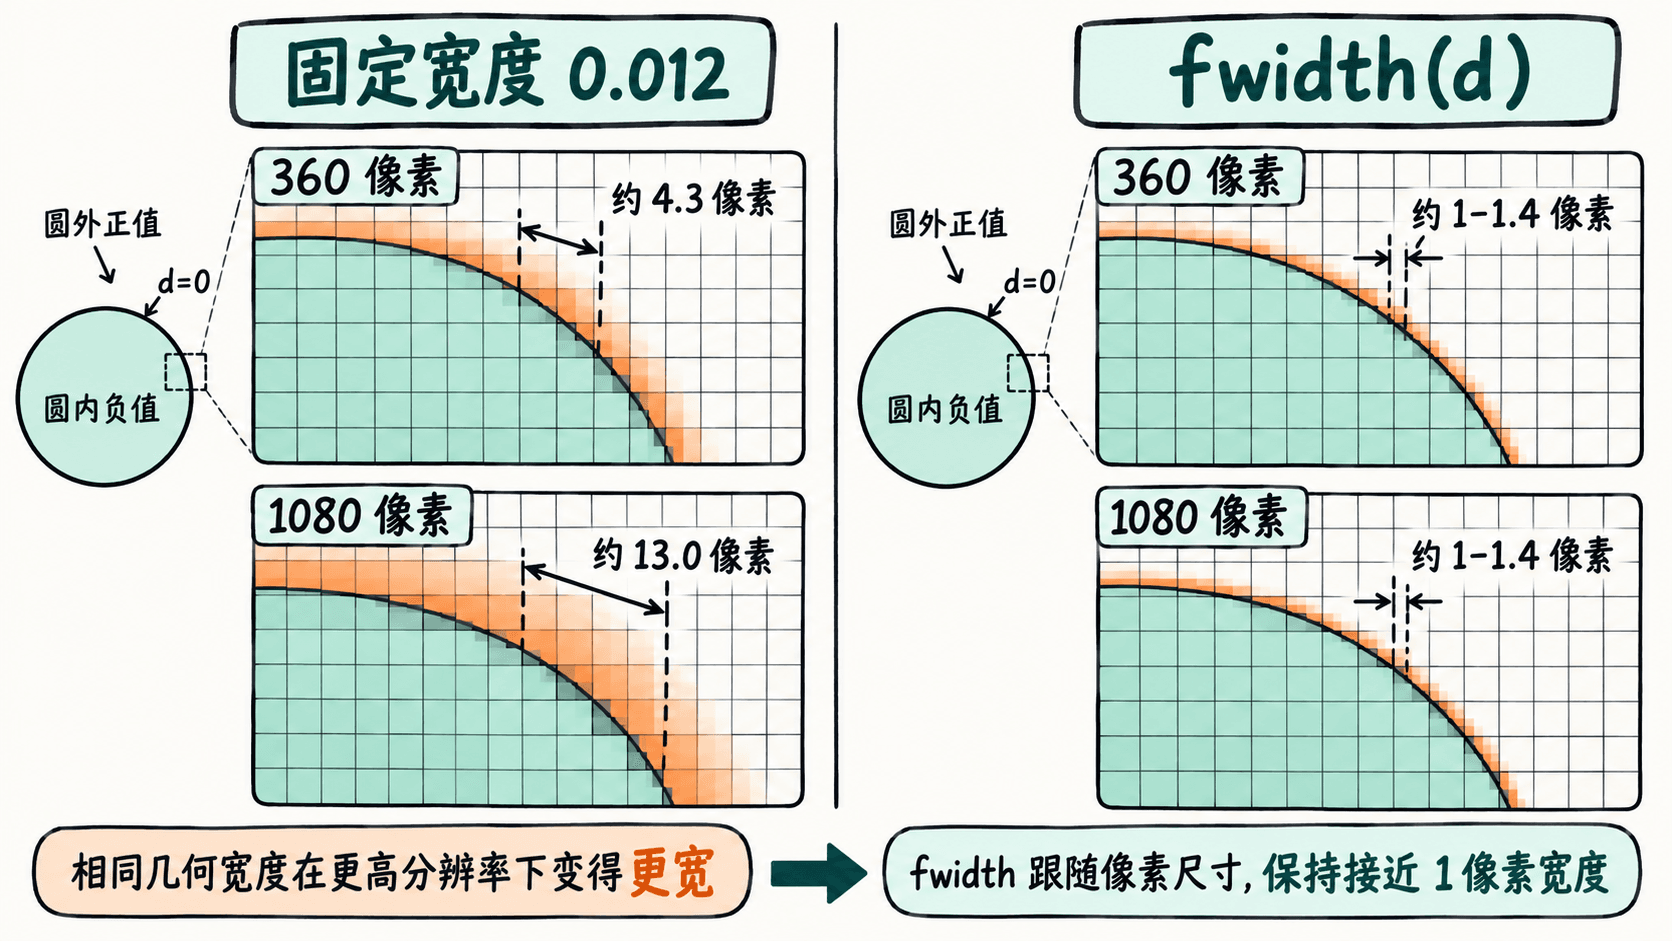
在 WebGL2 运行左右对比
以下代码可直接粘贴到支持 WebGL2 的浏览器开发者工具 Console 中运行。它创建一张响应式画布,用单个全屏三角形绘制两个圆:左边采用固定宽度 0.012,右边采用 fwidth(d)。这里的片元坐标、距离值与导数都在同一次绘制中求得,避免两种方法受到不同几何参数影响。
(() => {
  const canvas = document.createElement('canvas');
  canvas.style.cssText = 'display:block;width:100%;max-width:960px;aspect-ratio:16/9';
  document.body.appendChild(canvas);
  const gl = canvas.getContext('webgl2');
  if (!gl) throw new Error('当前浏览器不支持 WebGL2');
  const vertexSource = `#version 300 es
void main() {
  vec2 p[3] = vec2[3](
    vec2(-1.0, -1.0), vec2(3.0, -1.0), vec2(-1.0, 3.0)
  );
  gl_Position = vec4(p[gl_VertexID], 0.0, 1.0);
}`;
  const fragmentSource = `#version 300 es
precision highp float;
uniform vec2 uResolution;
out vec4 fragColor;
void main() {
  float panelWidth = uResolution.x * 0.5;
  float right = step(panelWidth, gl_FragCoord.x);
  vec2 center = vec2(panelWidth * (0.5 + right), uResolution.y * 0.5);
  vec2 p = (gl_FragCoord.xy - center) / uResolution.y;
  float radius = min(0.26, 0.34 * panelWidth / uResolution.y);
  float d = length(p) - radius;
  // 在选择左右模式之前统一求导,避免在非一致分支内求导
  float adaptiveWidth = max(fwidth(d), 1e-6);
  float w = mix(0.012, adaptiveWidth, right);
  float coverage = 1.0 - smoothstep(-0.5 * w, 0.5 * w, d);
  vec3 color = mix(vec3(0.95), vec3(0.06, 0.58, 0.62), coverage);
  fragColor = vec4(color, 1.0);
}`;
  function compile(type, source) {
    const shader = gl.createShader(type);
    gl.shaderSource(shader, source);
    gl.compileShader(shader);
    if (!gl.getShaderParameter(shader, gl.COMPILE_STATUS)) {
      throw new Error(gl.getShaderInfoLog(shader));
    }
    return shader;
  }
  const program = gl.createProgram();
  gl.attachShader(program, compile(gl.VERTEX_SHADER, vertexSource));
  gl.attachShader(program, compile(gl.FRAGMENT_SHADER, fragmentSource));
  gl.linkProgram(program);
  if (!gl.getProgramParameter(program, gl.LINK_STATUS)) {
    throw new Error(gl.getProgramInfoLog(program));
  }
  gl.useProgram(program);
  gl.bindVertexArray(gl.createVertexArray());
  const resolutionLocation = gl.getUniformLocation(program, 'uResolution');
  function render() {
    const scale = window.devicePixelRatio || 1;
    canvas.width = Math.max(2, Math.round(canvas.clientWidth * scale));
    canvas.height = Math.max(2, Math.round(canvas.clientHeight * scale));
    gl.viewport(0, 0, canvas.width, canvas.height);
    gl.uniform2f(resolutionLocation, canvas.width, canvas.height);
    gl.drawArrays(gl.TRIANGLES, 0, 3);
  }
  window.addEventListener('resize', render);
  render();
  canvas.scrollIntoView();
})();
预期结果:页面下方新增一张左右并排的青绿色圆形对比画布,浅灰色为背景。左侧轮廓具有肉眼可见的宽软边;右侧轮廓过渡更窄,接近单像素。没有预期的控制台日志;若着色器编译或链接失败,代码会直接抛出错误。
验证缩放效果与适用边界
将浏览器窗口从宽于 960 像素逐步缩小至约 480 像素,观察画布自动等比缩放:左侧过渡带的物理像素宽度随画布高度变化,右侧仍主要由局部像素导数决定。若使用高 DPI 屏幕,实际绘制分辨率还会乘以 devicePixelRatio,因此应以画布实际像素而非 CSS 像素理解 fwidth。
注意三个边界:fwidth 用在片元着色器而非顶点着色器;不要把求导表达式放进不同片元走向不同分支的 if 内;极密集的重复条纹或高频噪声仍可能混叠,不能仅靠一次 smoothstep 完全解决。若美术上确实需要更软的边,可以用 max(fwidth(d), softWidth) 设置最小过渡宽度,而不必退回纯固定宽度。函数的 GLSL ES 3.00 适用范围可查阅 fwidth 参考。