
Web 图形与 3D / 系统课时
用半程向量生成高光反射
用半程向量生成高光反射
在 WebGL2 中实现一个会随表面朝向变化的高光球体,并用两个滑块分别控制高光范围与亮度。你将把光源方向、观察方向和法线统一到同一坐标空间,再用半程向量计算 Blinn-Phong 高光,最后检查常见的背光亮斑和坐标错误。
学习目标
- 理解法线、光照方向、观察方向与半程向量的几何关系。
- 编写可独立运行的 GLSL ES 3.00 高光着色器。
- 用高光指数和强度区分亮斑的宽窄与明暗。
半程向量为何产生亮斑
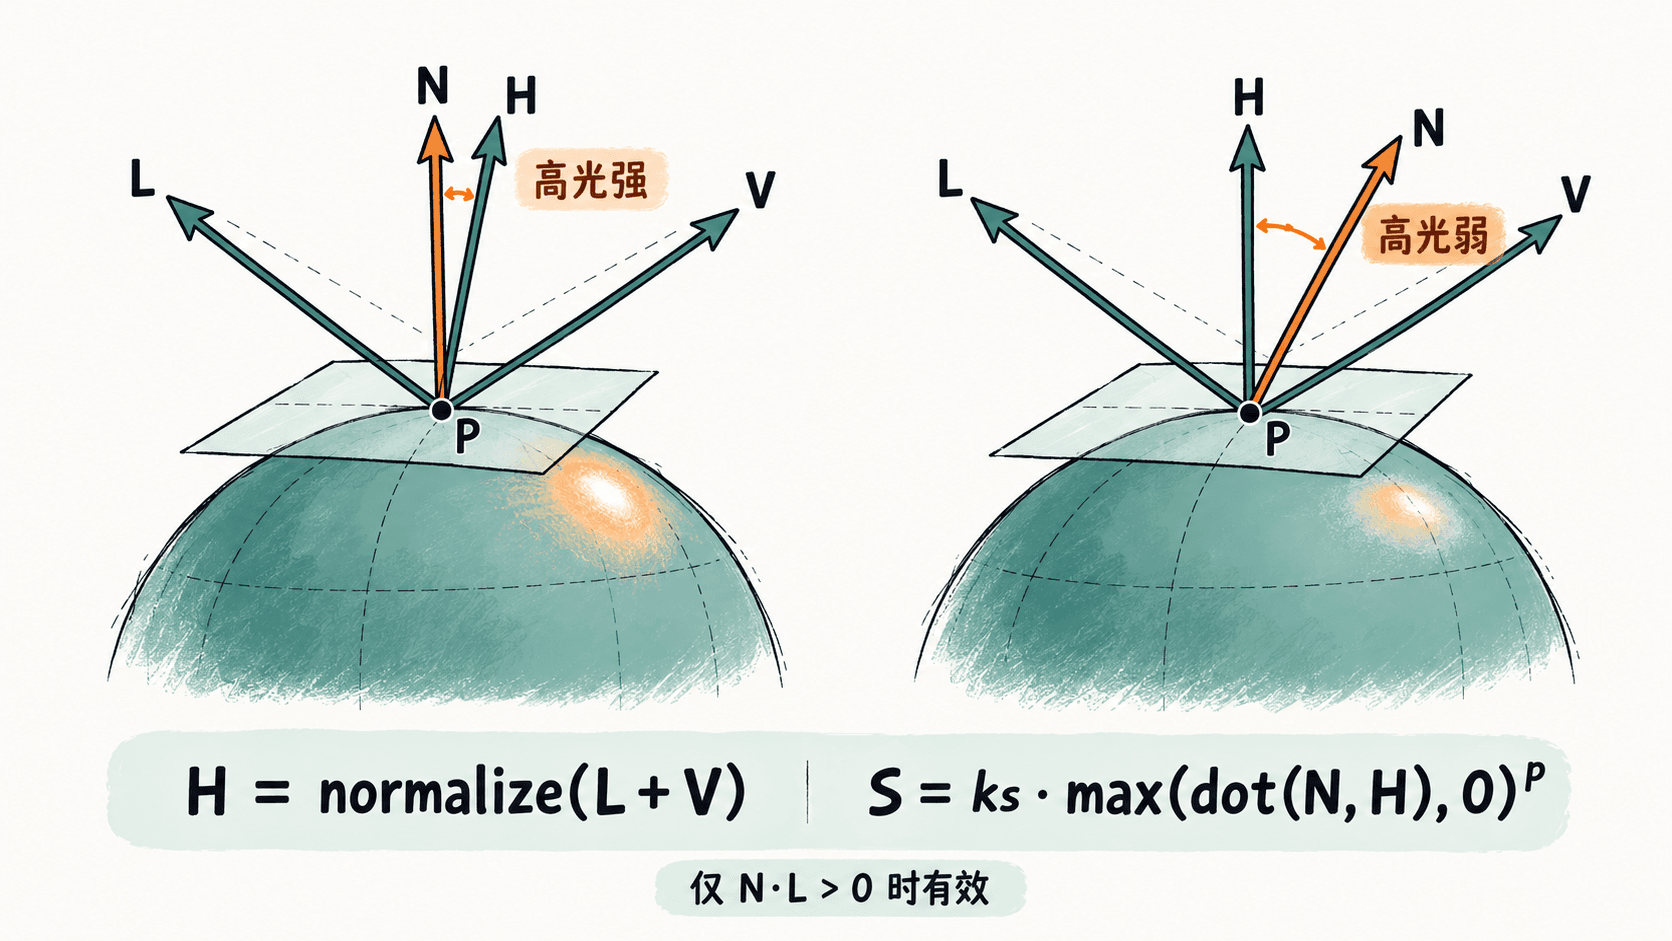
在球面上一点 , 是指向外侧的单位法线, 从 指向光源, 从 指向相机。先归一化 和 ,再计算 。半程向量 位于光照方向与观察方向之间;当 越接近 ,高光越强。
只有 的正面受光区域才计算高光。令高光强度系数为 、指数为 ,则 。当 且 ,若 ,则 ;降到 时仅约 ,说明指数越大,亮斑越集中。
运行可调节的球面高光
新建 blinn-phong.html,复制下面的完整代码并用支持 WebGL2 的浏览器打开。示例使用单位球:顶点位置本身就是法线;模型矩阵为单位矩阵,所以球面位置、法线、光源和相机都位于同一世界坐标空间。
<!doctype html>
<html lang='zh-CN'>
<head><meta charset='utf-8'><title>Blinn-Phong 高光</title></head>
<body>
<p>高光指数 <input id='exponent' type='range' min='8' max='128' step='8' value='32'> <output id='expValue'>32</output></p>
<p>高光强度 <input id='strength' type='range' min='0' max='1.5' step='0.1' value='0.8'> <output id='strengthValue'>0.8</output></p>
<canvas id='view' width='480' height='480'></canvas>
<script>
const canvas = document.querySelector('#view');
const gl = canvas.getContext('webgl2');
if (!gl) throw new Error('当前浏览器不支持 WebGL2');

const vertexSource = `#version 300 es
layout(location=0) in vec3 aPosition;
out vec3 vPosition;
out vec3 vNormal;
void main() {
  // 单位球且没有模型变换:位置和法线都在世界空间
  vPosition = aPosition;
  vNormal = aPosition;
  gl_Position = vec4(aPosition.xy * 0.8, -aPosition.z * 0.4, 1.0);
}`;

const fragmentSource = `#version 300 es
precision highp float;
in vec3 vPosition;
in vec3 vNormal;
uniform vec3 uLightPosition;
uniform vec3 uEyePosition;
uniform float uShininess;
uniform float uSpecularStrength;
out vec4 outColor;
void main() {
  vec3 N = normalize(vNormal);
  vec3 L = normalize(uLightPosition - vPosition);
  vec3 V = normalize(uEyePosition - vPosition);
  float diffuse = max(dot(N, L), 0.0);
  float specular = 0.0;
  // 不让背光面出现虚假的镜面高光
  if (diffuse > 0.0 && dot(N, V) > 0.0) {
    vec3 H = normalize(L + V);
    specular = pow(max(dot(N, H), 0.0), uShininess);
  }
  vec3 baseColor = vec3(0.08, 0.52, 0.58);
  vec3 color = baseColor * (0.16 + 0.74 * diffuse)
             + vec3(1.0, 0.94, 0.82) * specular * uSpecularStrength;
  outColor = vec4(color, 1.0);
}`;

function compile(type, source) {
  const shader = gl.createShader(type);
  gl.shaderSource(shader, source);
  gl.compileShader(shader);
  if (!gl.getShaderParameter(shader, gl.COMPILE_STATUS)) {
    throw new Error(gl.getShaderInfoLog(shader));
  }
  return shader;
}
const program = gl.createProgram();
gl.attachShader(program, compile(gl.VERTEX_SHADER, vertexSource));
gl.attachShader(program, compile(gl.FRAGMENT_SHADER, fragmentSource));
gl.linkProgram(program);
if (!gl.getProgramParameter(program, gl.LINK_STATUS)) {
  throw new Error(gl.getProgramInfoLog(program));
}
gl.useProgram(program);

// 生成球面三角形;单位球的每个顶点也可当作法线
const positions = [];
const indices = [];
const stacks = 40, slices = 64;
for (let i = 0; i <= stacks; i++) {
  const phi = i * Math.PI / stacks;
  for (let j = 0; j <= slices; j++) {
    const theta = j * 2 * Math.PI / slices;
    positions.push(Math.sin(phi) * Math.cos(theta),
                   Math.cos(phi),
                   Math.sin(phi) * Math.sin(theta));
  }
}
for (let i = 0; i < stacks; i++) {
  for (let j = 0; j < slices; j++) {
    const a = i * (slices + 1) + j;
    const b = a + slices + 1;
    indices.push(a, a + 1, b, a + 1, b + 1, b);
  }
}
const vao = gl.createVertexArray();
gl.bindVertexArray(vao);
const vertexBuffer = gl.createBuffer();
gl.bindBuffer(gl.ARRAY_BUFFER, vertexBuffer);
gl.bufferData(gl.ARRAY_BUFFER, new Float32Array(positions), gl.STATIC_DRAW);
gl.enableVertexAttribArray(0);
gl.vertexAttribPointer(0, 3, gl.FLOAT, false, 0, 0);
const indexBuffer = gl.createBuffer();
gl.bindBuffer(gl.ELEMENT_ARRAY_BUFFER, indexBuffer);
gl.bufferData(gl.ELEMENT_ARRAY_BUFFER, new Uint16Array(indices), gl.STATIC_DRAW);

// 光源和相机的位置与片元位置使用同一世界空间
gl.uniform3f(gl.getUniformLocation(program, 'uLightPosition'), 1.5, 1.5, 2.5);
gl.uniform3f(gl.getUniformLocation(program, 'uEyePosition'), 0, 0, 4);
const shininessLoc = gl.getUniformLocation(program, 'uShininess');
const strengthLoc = gl.getUniformLocation(program, 'uSpecularStrength');
const exponent = document.querySelector('#exponent');
const strength = document.querySelector('#strength');
gl.viewport(0, 0, canvas.width, canvas.height);
gl.enable(gl.DEPTH_TEST);
gl.clearColor(1, 1, 1, 1);

function draw() {
  gl.uniform1f(shininessLoc, Number(exponent.value));
  gl.uniform1f(strengthLoc, Number(strength.value));
  document.querySelector('#expValue').value = exponent.value;
  document.querySelector('#strengthValue').value = Number(strength.value).toFixed(1);
  gl.clear(gl.COLOR_BUFFER_BIT | gl.DEPTH_BUFFER_BIT);
  gl.drawElements(gl.TRIANGLES, indices.length, gl.UNSIGNED_SHORT, 0);
}
exponent.addEventListener('input', draw);
strength.addEventListener('input', draw);
draw();
</script>
</body>
</html>
预期结果: 白底画布中央出现青绿色球体,朝右上方有偏暖的高光。拖动“高光指数”,亮斑宽度变化;拖动“高光强度”,亮斑明暗变化。浏览器控制台不应出现着色器编译或链接错误。
区分高光范围与亮度
| 参数 | 推荐试值 | 直接观察到的变化 |
|---|---|---|
uShininess |
8、32、128 |
从宽而散的高光逐渐变成窄而集中的亮斑 |
uSpecularStrength |
0、0.8、1.5 |
从没有镜面高光到逐渐明亮,主要改变强度而非宽度 |
指数 大通常给人更光滑的视觉感受,指数小则显得更粗糙,但它并不等于 PBR 材质的 roughness 参数。本例为突出半程向量而省略光照距离衰减、阴影和完整线性颜色管理,不宜直接当作真实材质的物理模型。
排查亮斑位置异常
如果背面出现亮斑,先检查是否仅在 dot(N,L)>0 时计算高光。如果亮斑随相机移动产生错误漂移,检查 、、 是否在同一空间,以及是否把从相机指向片元的向量误当作 ;正确的方向是从片元指向相机。
若模型使用非均匀缩放,不能直接拿模型矩阵左上角的 mat3 变换法线;应使用逆转置法线矩阵,并在片元着色器里再次执行 normalize。将高光强度设为 0 可以暂时关闭镜面项,用漫反射检查法线方向,再恢复 0.8 定位问题。