
游戏引擎 / 系统课时
用Character完成玩家移动
用Character完成玩家移动
玩家移动不只是给 Actor 改坐标。使用 ACharacter 时,应把输入转换为移动意图,再交给 CharacterMovement 处理加速度、地面约束、跳跃与碰撞。本课用 UE5 的 Enhanced Input 串起移动、跳跃和朝向控制,并给出可直接放进 C++ 项目的实现方式。
学习目标
- 理解
ACharacter、CharacterMovement与输入系统各自负责什么。 - 用 Enhanced Input 实现相机相对移动、视角旋转和跳跃。
- 正确选择“朝移动方向转身”与“跟随控制器朝向”两种基础策略。
先明确 Character 的移动链路
ACharacter 已经组合了胶囊碰撞、骨骼网格和 UCharacterMovementComponent。因此常规玩家移动不需要每帧手动 SetActorLocation,而是调用 AddMovementInput 提交方向与强度;移动组件会在 Tick 中结合速度、加速度、地面信息和碰撞完成实际位移。
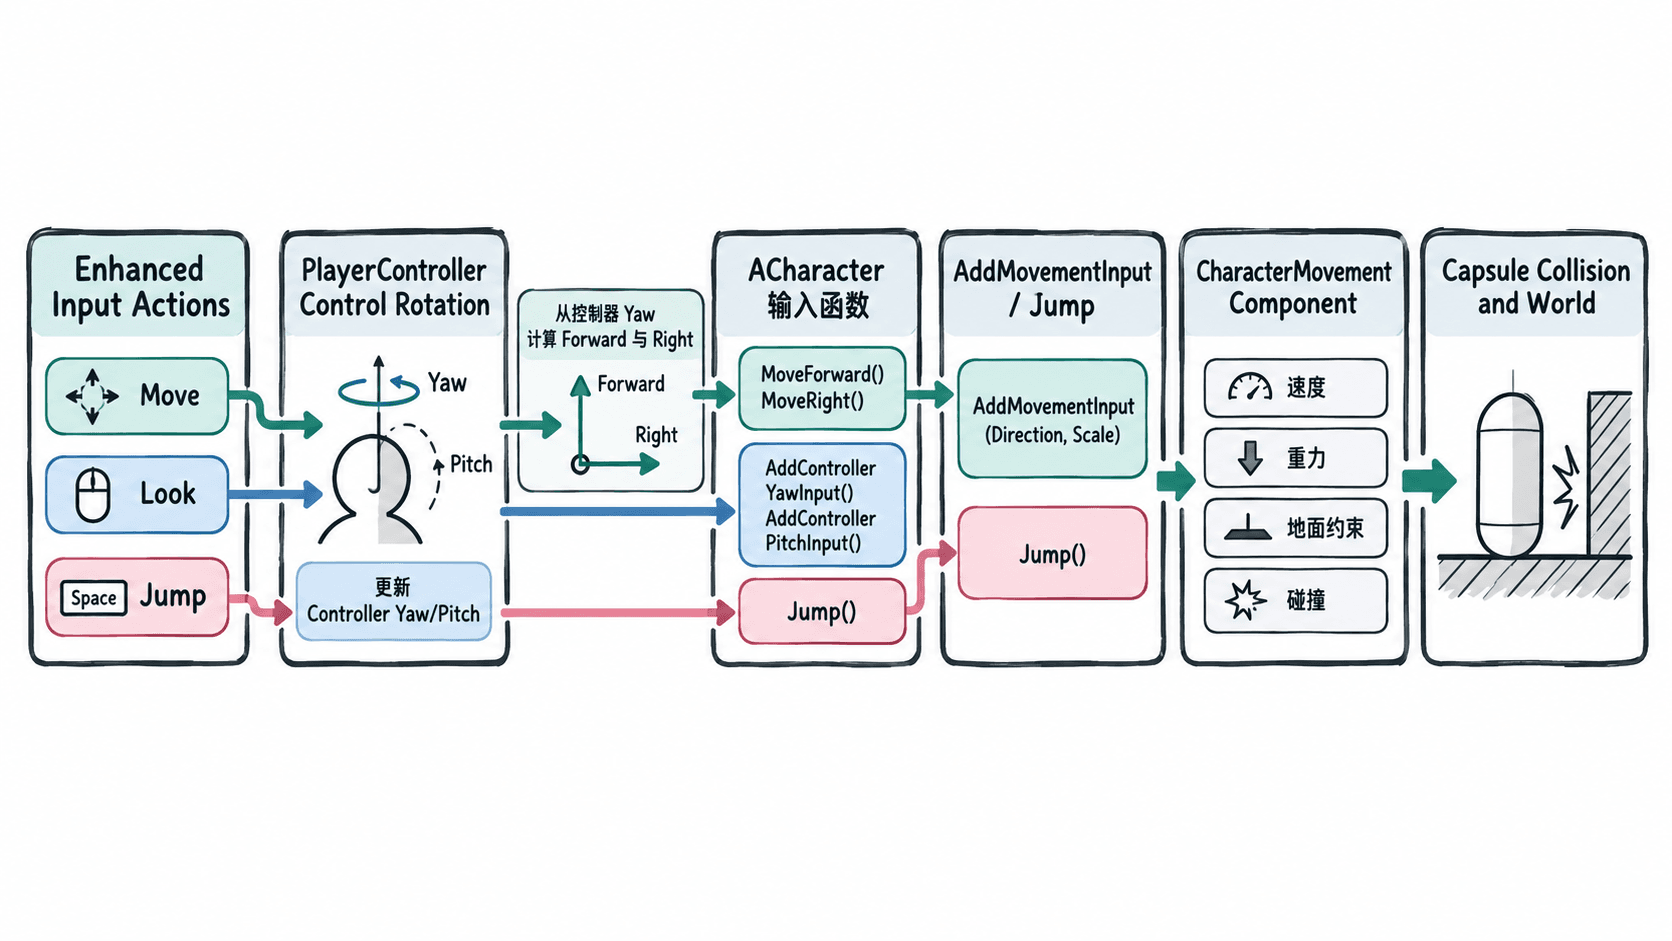
这条链路的关键是职责分离:输入层决定“玩家想做什么”,ACharacter 把输入转换为移动命令,CharacterMovement 决定“这一帧实际上能移动多少”。这样才能继续使用走坡、下落、网络移动预测等已有能力。
配置移动、观察和跳跃输入
下面示例假设项目已经启用 Enhanced Input,并创建了 IA_Move、IA_Look、IA_Jump 三个 Input Action,以及包含 WASD、鼠标和空格映射的 IMC_Player。IA_Move 与 IA_Look 的 Value Type 都设为 Axis2D,IA_Jump 设为 Digital。
在模块的 Build.cs 中确保依赖包含 EnhancedInput,然后在角色类中声明输入资源和处理函数。以下代码是工程内可编译示例,类名可按项目命名调整。
// PlayerCharacter.h
#pragma once

#include "CoreMinimal.h"
#include "GameFramework/Character.h"
#include "InputActionValue.h"
#include "PlayerCharacter.generated.h"

class UInputAction;
class UInputMappingContext;

UCLASS()
class APlayerCharacter : public ACharacter
{
    GENERATED_BODY()

public:
    APlayerCharacter();

protected:
    virtual void NotifyControllerChanged() override;
    virtual void SetupPlayerInputComponent(UInputComponent* PlayerInputComponent) override;

    UPROPERTY(EditDefaultsOnly, Category="Input")
    TObjectPtr<UInputMappingContext> DefaultMappingContext;

    UPROPERTY(EditDefaultsOnly, Category="Input")
    TObjectPtr<UInputAction> MoveAction;

    UPROPERTY(EditDefaultsOnly, Category="Input")
    TObjectPtr<UInputAction> LookAction;

    UPROPERTY(EditDefaultsOnly, Category="Input")
    TObjectPtr<UInputAction> JumpAction;

private:
    void Move(const FInputActionValue& Value);
    void Look(const FInputActionValue& Value);
};// PlayerCharacter.cpp
#include "PlayerCharacter.h"
#include "EnhancedInputComponent.h"
#include "EnhancedInputSubsystems.h"
#include "GameFramework/CharacterMovementComponent.h"
#include "GameFramework/PlayerController.h"
#include "InputMappingContext.h"
APlayerCharacter::APlayerCharacter()
{
bUseControllerRotationYaw = false;
GetCharacterMovement()->bOrientRotationToMovement = true;
GetCharacterMovement()->RotationRate = FRotator(0.0f, 500.0f, 0.0f);
GetCharacterMovement()->JumpZVelocity = 600.0f;
}
void APlayerCharacter::NotifyControllerChanged()
{
Super::NotifyControllerChanged();
if (APlayerController* PC = Cast<APlayerController>(Controller))
{
if (UEnhancedInputLocalPlayerSubsystem* Subsystem =
ULocalPlayer::GetSubsystem<UEnhancedInputLocalPlayerSubsystem>(PC->GetLocalPlayer()))
{
if (DefaultMappingContext)
{
Subsystem->AddMappingContext(DefaultMappingContext, 0);
}
}
}
}
void APlayerCharacter::SetupPlayerInputComponent(UInputComponent* PlayerInputComponent)
{
Super::SetupPlayerInputComponent(PlayerInputComponent);
UEnhancedInputComponent* Input = CastChecked<UEnhancedInputComponent>(PlayerInputComponent);
Input->BindAction(MoveAction, ETriggerEvent::Triggered, this, &APlayerCharacter::Move);
Input->BindAction(LookAction, ETriggerEvent::Triggered, this, &APlayerCharacter::Look);
Input->BindAction(JumpAction, ETriggerEvent::Started, this, &ACharacter::Jump);
Input->BindAction(JumpAction, ETriggerEvent::Completed, this, &ACharacter::StopJumping);
}
void APlayerCharacter::Move(const FInputActionValue& Value)
{
const FVector2D Axis = Value.Get<FVector2D>();
if (!Controller)
{
return;
}
const FRotator ControlRotation = Controller->GetControlRotation();
const FRotator YawRotation(0.0f, ControlRotation.Yaw, 0.0f);
const FVector Forward = FRotationMatrix(YawRotation).GetUnitAxis(EAxis::X);
const FVector Right = FRotationMatrix(YawRotation).GetUnitAxis(EAxis::Y);
AddMovementInput(Forward, Axis.Y);
AddMovementInput(Right, Axis.X);
}
void APlayerCharacter::Look(const FInputActionValue& Value)
{
const FVector2D Axis = Value.Get<FVector2D>();
AddControllerYawInput(Axis.X);
AddControllerPitchInput(Axis.Y);
}预期结果
WASD:角色按当前视角的水平朝向前后左右移动
鼠标:改变控制器的 Yaw/Pitch,从而改变观察方向
空格:调用 Character 的跳跃逻辑,松开后结束持续跳跃输入
移动时:角色以约 500 deg/s 的速率转向移动方向
实际跳跃高度、加速度和最高速度还受 CharacterMovement 的其他参数影响,因此不要把示例中的 JumpZVelocity 当成固定项目标准。
控制角色朝向而不是硬改旋转
第三人称角色通常使用 bOrientRotationToMovement = true,让角色朝当前移动方向平滑转身,同时关闭 bUseControllerRotationYaw。这种方式适合动作、探索和大多数越肩视角。
如果玩法要求角色始终朝准星方向,例如部分射击或锁定模式,则可以反过来设置:关闭 bOrientRotationToMovement,开启 bUseControllerRotationYaw。两种策略不要同时抢控制权,否则容易出现转向抖动或动画朝向与移动方向不一致。
在 PIE 中验证三件事
把角色蓝图的父类设为该 C++ 角色,在默认值中绑定 IMC_Player 和三个 Input Action,再确保 GameMode 使用这个角色作为 Default Pawn。进入 PIE 后分别验证:移动方向是否随镜头水平朝向变化、跳跃后是否能正常落地、角色转向是否与当前设计一致。
如果完全没有输入,先检查 Mapping Context 是否成功加入本地玩家子系统;如果只有跳跃有效而移动无效,重点检查 IA_Move 是否为 Axis2D,以及 WASD 映射的正负方向是否正确。输入已经触发但角色不动时,再检查 Pawn 是否被 PlayerController 正确 Possess、CharacterMovement 是否处于可移动状态。