
UI 视觉设计 / 系统课时
按系统偏好切换明暗主题
按系统偏好切换明暗主题
页面首次打开时应尽量匹配操作系统的明暗外观,但用户主动选择浅色或深色后,系统变化不应覆盖这项决定。本课用原生 HTML、CSS 和 JavaScript 实现三态主题切换、持久化与实时更新,并验证刷新和跨标签页行为。
学习目标
- 区分“跟随系统”和显式选择,确定主题优先级。
- 使用
matchMedia、localStorage与 CSS 变量实现切换。 - 验证系统变化、页面刷新和存储受限时的表现。
确定三态规则与优先级
将用户偏好分为 system、light、dark 三种。首次访问没有存储记录时默认 system;显式的 light 或 dark 始终优先。实际用于渲染的 data-theme 只取 light 或 dark,不要把 system 当作一套颜色值。
| 保存的偏好 | 系统偏好 | 实际主题 |
|---|---|---|
未保存或 system |
深色 | dark |
未保存或 system |
浅色或未声明深色 | light |
light |
任意 | light |
dark |
任意 | dark |
决策过程还要响应两种变化:用户改动下拉选项时更新存储和界面;系统偏好变化时,仅在 system 模式下更新界面。
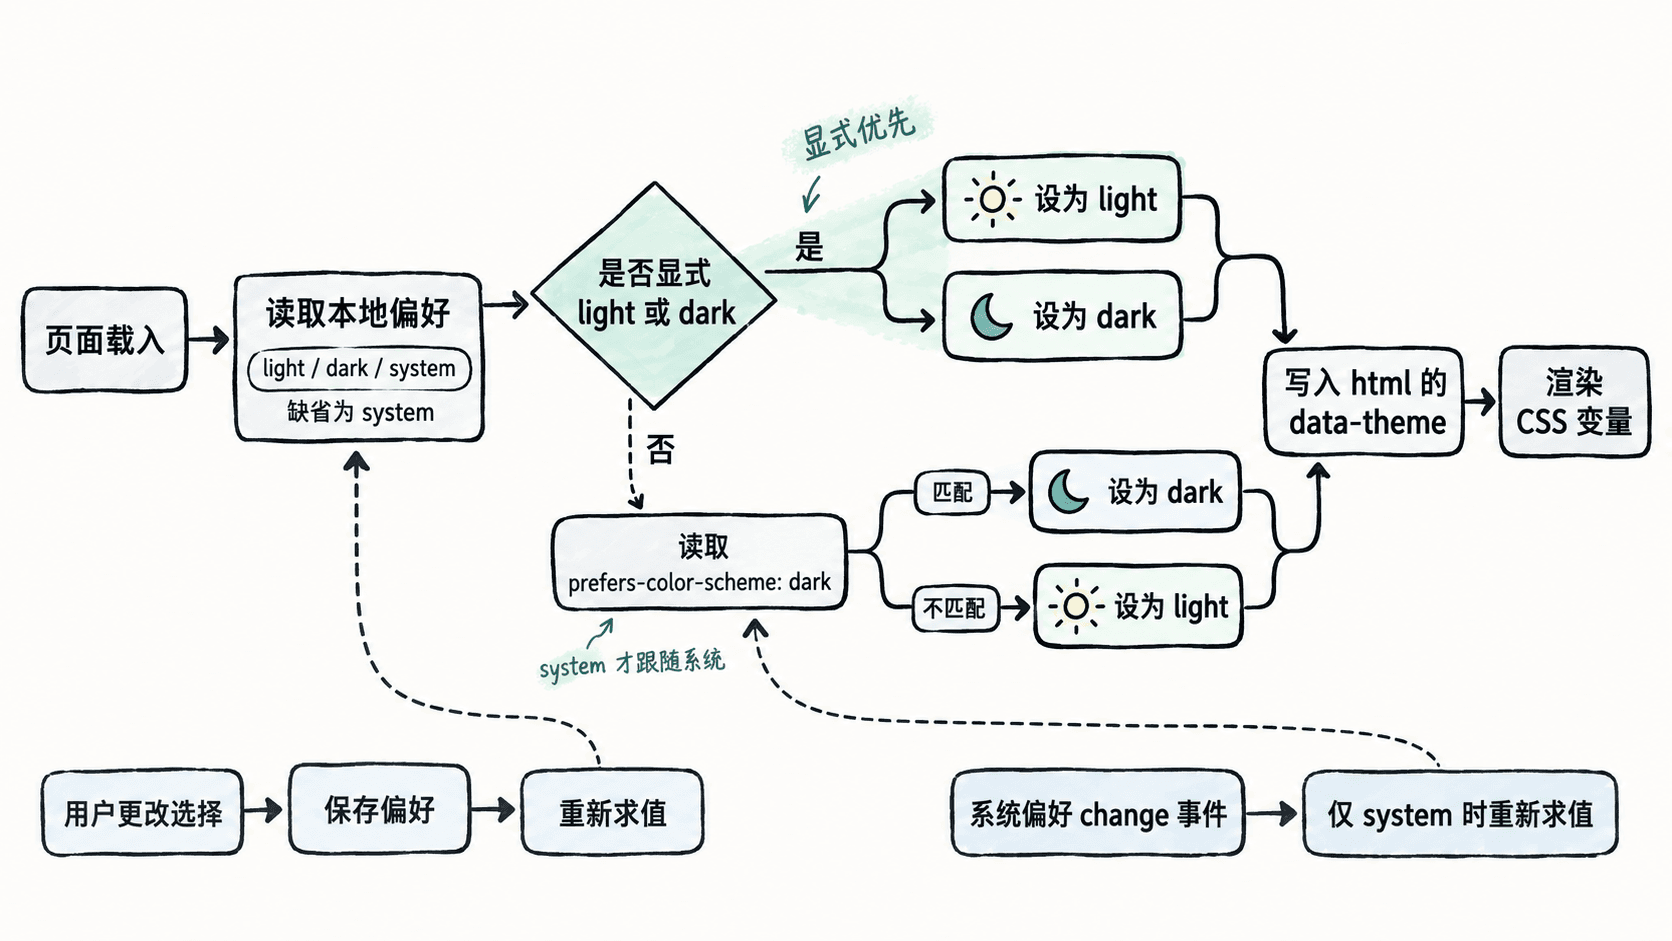
实现首屏应用与实时更新
将下面内容保存为 index.html。示例适用于支持 MediaQueryList.addEventListener('change') 的现代浏览器。放在 <head> 中的同步脚本先设置 data-theme,使后续样式在首屏绘制前就能选择正确色值。
<!doctype html>
<html lang="zh-CN">
<head>
  <meta charset="utf-8">
  <meta name="viewport" content="width=device-width, initial-scale=1">
  <title>主题偏好</title>
  <script>
    const KEY = "ui-theme-preference";
    const systemDark = matchMedia("(prefers-color-scheme: dark)");

    function readPreference() {
      try {
        const saved = localStorage.getItem(KEY);
        return saved === "light" || saved === "dark" ? saved : "system";
      } catch {
        return "system"; // 禁用存储时退回系统偏好
      }
    }

    let preference = readPreference();

    function resolvedTheme() {
      return preference === "system"
        ? (systemDark.matches ? "dark" : "light")
        : preference;
    }

    // 在样式表应用前确定首屏主题,减少明暗闪烁
    document.documentElement.dataset.theme = resolvedTheme();
  </script>
  <style>
    :root {
      color-scheme: light;
      --bg: #ffffff;
      --fg: #192b43;
      --panel: #edf2f8;
    }
    :root[data-theme="dark"] {
      color-scheme: dark;
      --bg: #121c29;
      --fg: #edf2fa;
      --panel: #263649;
    }
    body {
      background: var(--bg);
      color: var(--fg);
      font: 16px/1.6 system-ui, sans-serif;
      padding: 24px;
    }
    .panel { background: var(--panel); padding: 16px; }
  </style>
</head>
<body>
  <main>
    <h1>外观设置</h1>
    <label for="theme-preference">主题偏好</label>
    <select id="theme-preference">
      <option value="system">跟随系统</option>
      <option value="light">浅色</option>
      <option value="dark">深色</option>
    </select>
    <p id="theme-status" aria-live="polite"></p>
    <p class="panel">订单工作台示例卡片</p>
  </main>
  <script>
    const select = document.querySelector("#theme-preference");
    const status = document.querySelector("#theme-status");

    function render() {
      const theme = resolvedTheme();
      document.documentElement.dataset.theme = theme;
      select.value = preference;
      const names = { system: "跟随系统", light: "浅色", dark: "深色" };
      status.textContent = `偏好:${names[preference]};实际:${names[theme]}`;
    }

    select.addEventListener("change", () => {
      preference = select.value;
      try {
        localStorage.setItem(KEY, preference);
      } catch {
        // 存储受限时只保留当前页面内的选择
      }
      render();
    });

    // 系统变化只影响“跟随系统”模式
    systemDark.addEventListener("change", () => {
      if (preference === "system") render();
    });

    window.addEventListener("storage", (event) => {
      if (event.key === KEY) {
        preference = readPreference();
        render();
      }
    });

    render();
  </script>
</body>
</html>
预期结果:未保存偏好时,下拉框显示“跟随系统”,文字与卡片颜色匹配系统外观;选择“深色”后立即变暗,刷新页面仍保持深色。系统外观变更只会改变“跟随系统”状态下的页面,其他已打开的同源标签页也会同步显式选择。
检查刷新、系统事件与存储边界
建议通过本地开发服务器或 HTTPS 页面测试,避免直接用 file:// 打开时浏览器对存储行为的限制。已安装 Python 3 的环境可在文件所在目录执行 python -m http.server 8000,然后访问 http://localhost:8000。预期页面显示外观设置、主题选择框和示例卡片。
在浏览器开发者工具的 Elements 面板检查根元素:它应始终为 data-theme="light" 或 data-theme="dark";在 Application → Local Storage 中查看 ui-theme-preference。
- 清除此键并刷新:下拉框为“跟随系统”,实际主题按系统决定;系统未声明深色时回退浅色。
- 在 DevTools 的 Rendering 面板模拟
prefers-color-scheme: dark,再切到light:自动模式应随之变化。 - 显式选择“浅色”并重复模拟:颜色不得变化;刷新后选择仍为“浅色”。
- 打开第二个同源标签页,在第一处改为“深色”:另一标签页应收到
storage事件并更新。 - 若浏览器禁止本地存储,切换仍会立即生效,但刷新后回到“跟随系统”;不要把这种情况误判为持久化成功。
若项目采用服务端渲染,服务端初始 HTML 和客户端主题判定也要协调,否则水合前仍可能短暂显示错误颜色;本例面向纯客户端静态页面。