
C / C++ / 系统课时
为核心模块补上自动测试
为核心模块补上自动测试
这一节为独立核心库接入 CTest,并用一个测试程序覆盖正常文本、空字符串和错误参数。目标不是只让测试“能跑”,而是让测试直接链接核心库、由 CMake 统一构建,再由 CTest 提供可重复执行的测试入口。
学习目标
- 能用
include(CTest)、add_executable和add_test注册测试 - 能为正常输入、边界输入和错误参数编写最小断言
- 能通过
ctest --output-on-failure验证测试结果并快速定位失败
测试应该直接指向核心库
如果测试只启动命令行程序,它会同时覆盖参数解析、进程退出码和业务逻辑,失败后很难判断问题在哪。核心模块已经有稳定 C API 时,更合适的做法是让测试可执行文件直接链接核心库,CTest 只负责调度测试进程和汇总结果。
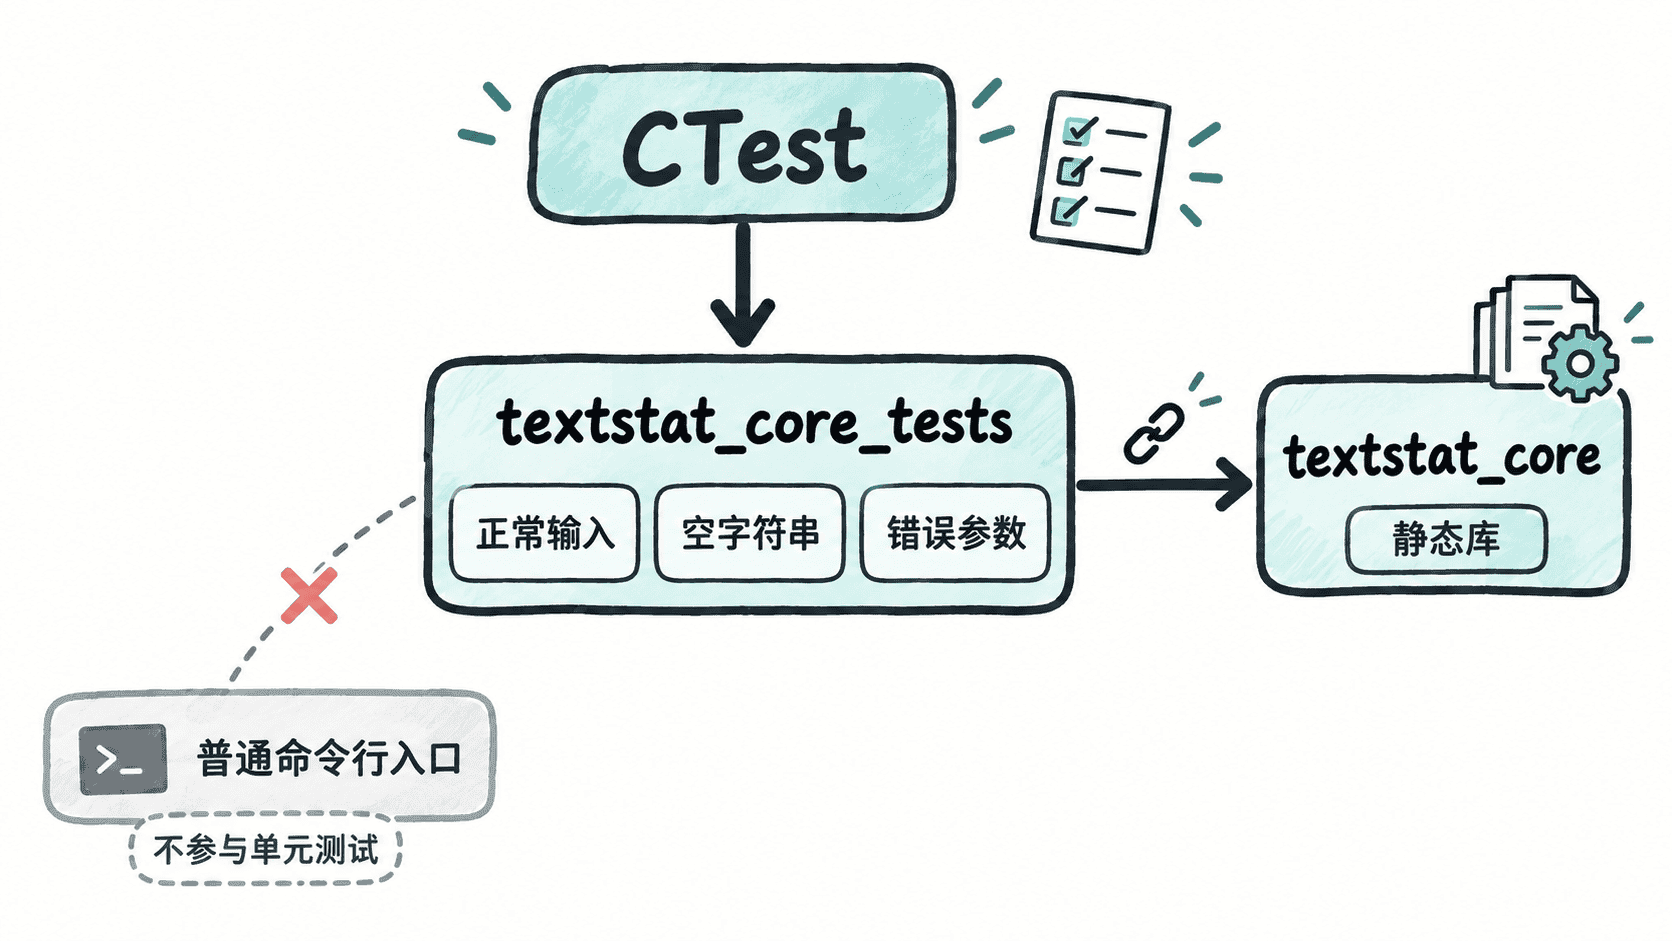
这样测试失败时,排查范围首先落在核心接口和断言上,而不是先怀疑命令行解析层。
准备可测试的核心 API
下面使用一个返回错误码的单词统计函数。片段示例:以下头文件和实现文件需要与后面的测试目标、CMake 配置一起使用。
include/textstat.h:
#ifndef TEXTSTAT_H
#define TEXTSTAT_H

#include <stddef.h>

enum {
    TEXTSTAT_OK = 0,
    TEXTSTAT_ERR_INVALID = 1
};

int textstat_count_words(const char *text, size_t *out_count);

#endifsrc/textstat.c:
#include "textstat.h"

#include <ctype.h>

int textstat_count_words(const char *text, size_t *out_count)
{
    if (text == NULL || out_count == NULL) {
        return TEXTSTAT_ERR_INVALID;
    }

    size_t count = 0;
    int in_word = 0;

    for (const unsigned char *p = (const unsigned char *)text; *p != '\0'; ++p) {
        if (isspace(*p)) {
            in_word = 0;
        } else if (!in_word) {
            ++count;
            in_word = 1;
        }
    }

    *out_count = count;
    return TEXTSTAT_OK;
}
这个接口把“空字符串”和“无效指针”区分开:空字符串是合法数据,结果应为 0;NULL 输入或空输出指针才是错误参数。
接入 CTest 并注册测试
tests/test_textstat.c 使用一个小型检查函数。片段示例:它依赖前面的 textstat.h 和 textstat_core 目标。
#include "textstat.h"

#include <stdio.h>

static int check(int condition, const char *name)
{
    if (!condition) {
        fprintf(stderr, "FAIL: %s\n", name);
        return 0;
    }
    return 1;
}

int main(void)
{
    size_t count = 999;

    /* 正常输入验证返回码与业务结果。 */
    if (!check(textstat_count_words("hello cmake world", &count) == TEXTSTAT_OK,
               "normal input return code") ||
        !check(count == 3, "normal input count")) {
        return 1;
    }

    /* 空字符串是合法边界,NULL 才属于错误参数。 */
    if (!check(textstat_count_words("", &count) == TEXTSTAT_OK,
               "empty input return code") ||
        !check(count == 0, "empty input count") ||
        !check(textstat_count_words(NULL, &count) == TEXTSTAT_ERR_INVALID,
               "null text") ||
        !check(textstat_count_words("abc", NULL) == TEXTSTAT_ERR_INVALID,
               "null output")) {
        return 1;
    }

    puts("all tests passed");
    return 0;
}
根目录 CMakeLists.txt:
cmake_minimum_required(VERSION 3.20)
project(textstat LANGUAGES C)

add_library(textstat_core STATIC
    src/textstat.c
)

target_include_directories(textstat_core
    PUBLIC
        ${CMAKE_CURRENT_SOURCE_DIR}/include
)

target_compile_features(textstat_core PUBLIC c_std_11)

include(CTest)

if(BUILD_TESTING)
    add_executable(textstat_core_tests
        tests/test_textstat.c
    )

    target_link_libraries(textstat_core_tests
        PRIVATE
            textstat_core
    )

    add_test(
        NAME textstat_core
        COMMAND textstat_core_tests
    )
endif()
include(CTest) 会提供标准的 BUILD_TESTING 选项,并在启用测试时调用 enable_testing()。把测试目标放在 if(BUILD_TESTING) 中,可以让不需要测试产物的构建通过 -DBUILD_TESTING=OFF 关闭它。
运行并验证结果
在工程根目录、使用 Bash 或兼容 Shell 执行:
cmake -S . -B build -DBUILD_TESTING=ON >/dev/null
cmake --build build >/dev/null
ctest --test-dir build --output-on-failure
预期输出中路径、耗时和空格可能因 CMake 版本不同而变化,关键状态应与下面一致:
Internal ctest changing into directory: <PATH>/build
Test project <PATH>/build
    Start 1: textstat_core
1/1 Test #1: textstat_core ....................   Passed    <TIME> sec
100% tests passed, 0 tests failed out of 1
Total Test time (real) = <TIME> sec
如果断言失败,测试程序会返回非 0,CTest 会把该项标记为 Failed;加上 --output-on-failure 后还能直接看到 FAIL: 行。此时应先根据失败名称定位是哪类输入破坏了接口契约,再修复核心逻辑,而不是把测试改成迎合错误结果。